
Many of our readers are worried that moving a WordPress website or switching to a different SEO plugin will affect their website search rankings.
Search is the primary traffic source for most websites, so you want to be extremely careful when migrating.
In this tutorial, we will share the ultimate WordPress SEO migration checklist. It will ensure that all your SEO settings are preserved during the migration without hurting any of your search rankings.
Here is a list of topics we will cover in this guide:
What Is SEO Migration?
SEO migration is a set of best practices for maintaining search rankings and SEO settings while moving or making major changes to a website.
Search is the #1 source of traffic for most websites. It would be bad to lose some or all of that traffic during a migration.
Here are some common scenarios when you will need SEO migration:
- Moving a WordPress website to a new domain name
- Moving your website to a new WordPress hosting provider
- Switching to a better WordPress SEO plugin
You need to ensure that you take proper precautions to preserve all your website data and SEO.
Following this step-by-step checklist will allow you to do proper WordPress SEO migration without losing rankings and traffic.
Preparing Your Website for Migration
First, you need to prepare your WordPress website for migration. You will do that by setting up proper SEO tracking and making a complete website backup.
Step 1: Track Your SEO Performance
First, you want to make sure that you can properly understand how your website is doing in search before you begin the migration.
This will help you compare your search performance after the migration and determine if the migration had any negative or positive impact on your traffic.
You’ll need two tools to track this data.
1. Set Up Google Analytics
The easiest way to track and monitor your website traffic is by using MonsterInsights. It helps you easily install Google Analytics on your website, which monitors your website traffic and shows you where your users are coming from.
For more details, see our tutorial on how to install Google Analytics in WordPress.
Note: If you haven’t used Google Analytics before, then it will take some time before it starts showing any data.
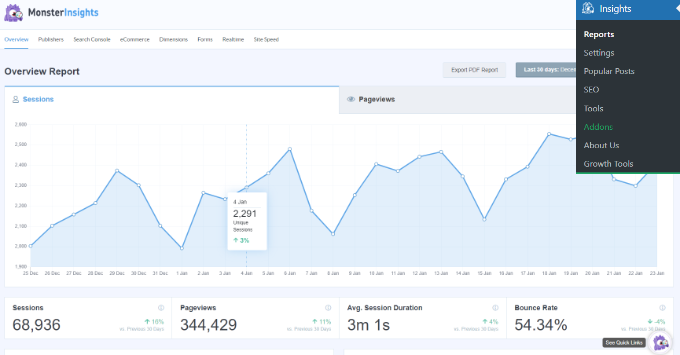
Once you have set up MonsterInsights, you will be able to see your website traffic performance by visiting the Insights » Reports page.
For more details, see our guide on how to track website visitors in WordPress.
2. Set Up Google Search Console
Google Search Console is a free tool that helps website owners track their performance in Google search results.
First, you will need to sign up and add your website to Google Search Console.
After that, you will be asked to verify ownership of your website. You can do that by adding a code snippet to your site’s header.
We recommend using All in One SEO for WordPress to verify your site’s ownership. It makes it easy to add a Google Search Console verification code.

More importantly, All in One SEO has the most powerful XML sitemaps, which you can then add to your Google Search Console account to improve how Google crawls your website.
Once your website is verified, you will be able to access a treasure trove of data. You can see it in your Google Search Console dashboard under the Performance tab.
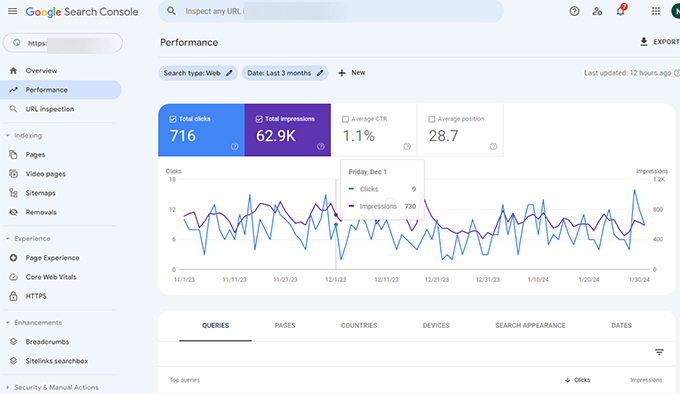
It will show you how often your site appears in search results, how many clicks you get, which keywords you are ranking for, and search ranking positions.
For more details, see our tutorial on how to add your WordPress website to Google Search Console.
3. Download XML Sitemaps
An XML sitemap lists all your website content in XML format so search engines like Google can easily discover and index it.
WordPress generates a basic XML sitemap by default. However, this sitemap is quite basic and not customizable.
For better XML sitemaps, we recommend using All in One SEO For WordPress. It generates comprehensive sitemaps that you can customize manually.
For details, see our tutorial on creating an XML sitemap in WordPress.
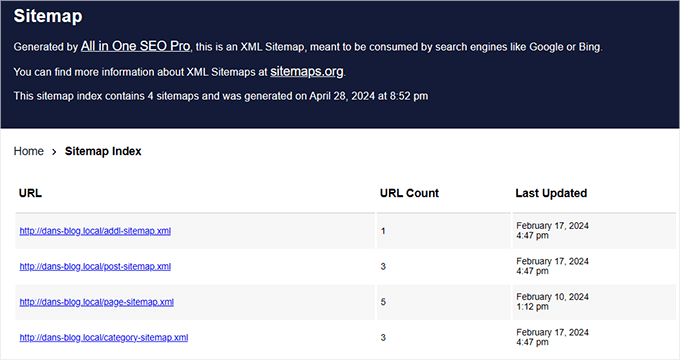
Once you have created XML sitemaps, you need to download them to your computer.
Simply open an XML sitemap and select ‘Save as’ from the right-click menu.
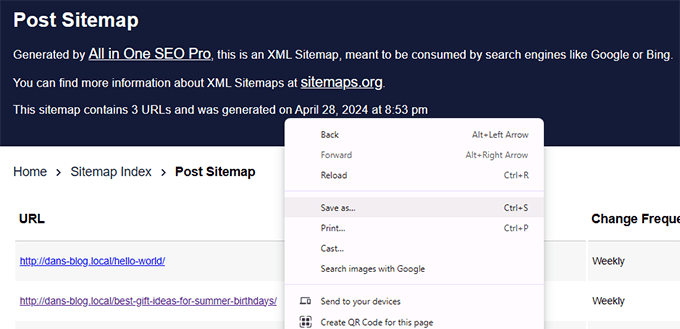
Repeat the process to download all sitemap XML files.
3. Download URLs Using Screaming Frog SEO Spider (Paid)
Screaming Frog SEO Spider is an app for SEO professionals. It allows you to crawl any website, like search engines, and collect important data for SEO.
It crawls all your website URLs, external links, image URLs, JavaScript and CSS files, and more.
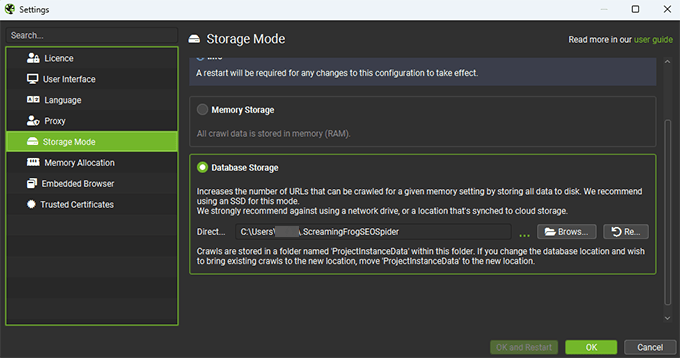
Open the app on your computer, go to File » Settings, and change the ‘Storage Mode’ to ‘Database Storage’.
After that, you need to enter your website URL in the top bar and click on the ‘Start’ button.
Screaming Frog SEO Spider will start crawling your website. Wait for it to finish the crawl, which may take some time, depending on your website’s size.
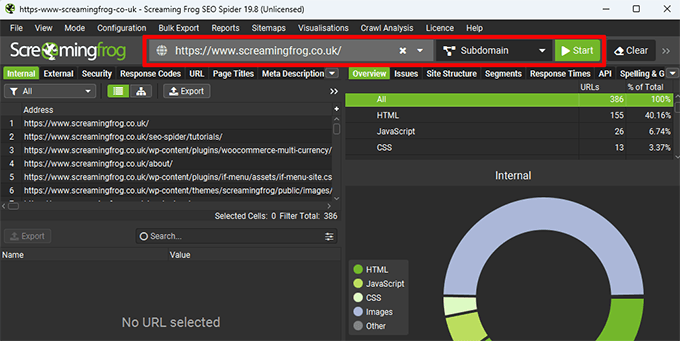
Once finished, your crawl data will be stored in the app’s database.
After the migration, you can crawl your website again and then compare the data to find missing URLs, broken links, images, and other files.
Note: A free version of Screaming Frog software is available for download. However, it is limited to 500 URLs, and most other features are locked. You will need the paid version to perform a full crawl and unlock all features.
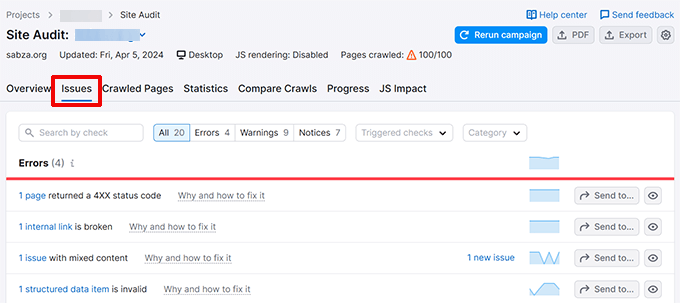
4. Compare with Semrush Site Audit (Paid)
Semrush is one of the best SEO platforms used by marketers and SEO professionals.
You can perform a complete site audit before and after the migration, which will highlight the changes in your SEO performance.
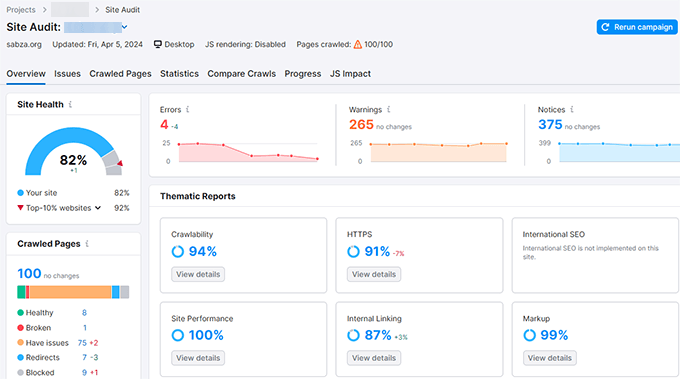
Semrush will also let you catch missing files, broken links, URLs that are not indexable, 404 errors, and other SEO warnings.
Note: Semrush has a free version, but it is limited. For a comprehensive SEO site audit, you’ll need a paid plan.
Step 2: Back Up Your Website
A backup is one of the most important tools in your arsenal for securing all your data.
Generally, you should set up automatic backups on your website so that a complete, fresh copy of your site is always safely stored. This is handy if something bad happens to your website and you need to restore it quickly.
You must also create a complete WordPress backup before initiating major site changes, such as a migration.
There are several WordPress backup plugins that you can use.
We recommend using Duplicator because it is a complete backup and migration plugin for WordPress.
Making a backup using Duplicator is super easy.
First, you need to install and activate the Duplicator plugin. For more details, see our tutorial on how to install a WordPress plugin.
Upon activation, go to the Duplicator » Packages page and click the ‘Create New’ button.
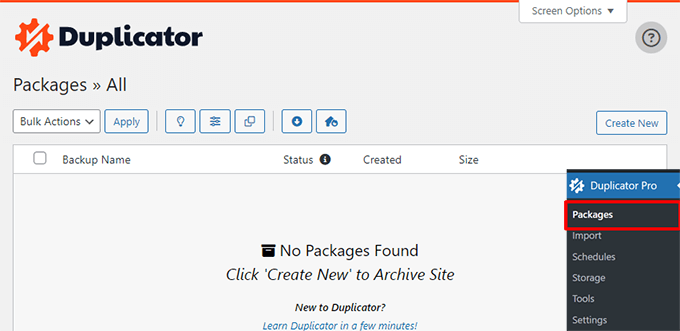
Duplicator will start the new package wizard. Simply follow the on-screen instructions to create the package.
Once you have created a package, you can download it to your computer.
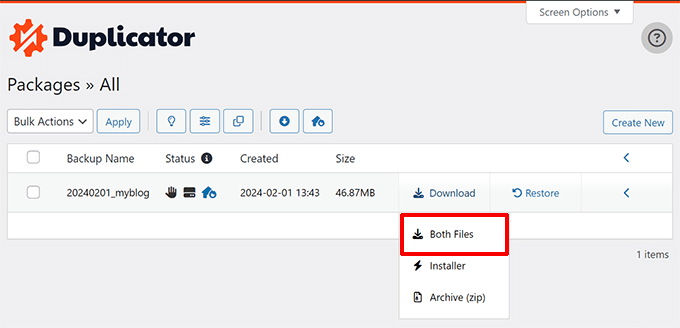
If you are migrating your WordPress website to a new server or domain name, then you can also download the package and installer files to your computer.
Step 3: Migrating Your WordPress Website (Optional)
If you are not migrating your WordPress website to a new host or to a new domain name, then you can skip this step.
Now that you have downloaded Duplicator packages to your computer, you can migrate your WordPress website.
Migrating WordPress to a New Host
If you haven’t already done so, you first need to sign up for a new host.
We recommend using Bluehost. They are one of the largest hosting companies in the world and an officially recommended WordPress hosting provider.
They offer WPBeginner users a generous discount on hosting and a free domain name. You can get started for $1.99 per month.
You are ready to migrate your website once you have set up your new hosting account.
Follow the instructions in our step-by-step tutorial on how to move WordPress to a new host.
Migrating WordPress to a New Domain
This section is for users migrating WordPress to a new domain name.
Please keep the following points in mind before migrating a website to a new domain name.
- Switching to a new domain may temporarily impact your search rankings as Google and other search engines adjust to the changes.
- Switching to a new domain may also temporarily reduce your search traffic. This is normal when switching domain names.
However, you can reduce the impact and quickly recover by properly switching the domain name and following this SEO migration guide.
Continue with our step-by-step tutorial on moving WordPress to a new domain name.
Once you are done, return to this guide and follow the remaining steps.
Post Migration SEO Checklist
After moving your WordPress website (either to a new host or a new domain), it is time to perform the post-migration SEO checks.
These steps will prevent any negative SEO impact of the migration and fix potential issues before they become a problem.
Step 4. Setting Up Redirects
If you have migrated your WordPress site to a new domain name, you must redirect users from the old domain name to the new one.
This step is crucial for a successful SEO migration.
These redirects properly send users from your old domain to the new one, and they also let search engines know that your website has moved to this new location.
There are two easy ways to do this in WordPress. We’ll show you both.
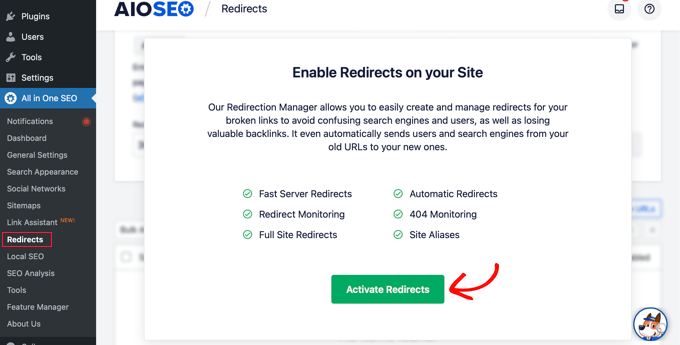
Method 1. Set Up Full Site Redirect Using All in One SEO for WordPress
For this method, you’ll need the All in One SEO for WordPress. It is the best WordPress SEO plugin on the market and allows you to optimize your WordPress website for SEO.
First, you need to install and activate the All in One SEO for WordPress plugin on your old domain. For more details, see our step-by-step guide on how to install a WordPress plugin.
Note: You’ll need at least the Pro version of the plugin to access the redirect manager addon.
Upon activation on your old domain, you need to visit the All in One SEO » Redirects page and click on the ‘Activate Redirects’ button.
Next, you need to switch to the ‘Full Site Redirect’ tab and turn on the ‘Relocate Site’ toggle.
After that, you need to enter your new domain name next to the ‘Relocate to domain’ option.
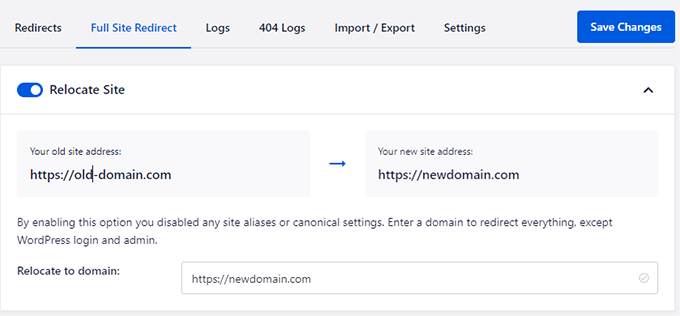
Don’t forget to click the ‘Save Changes’ button to store your settings.
Method 2. Set up Redirects Using Redirection
You can use this method if you are not using All in One SEO for WordPress.
First, install and activate the Redirection plugin on your old domain name. For more details, see our tutorial on how to install a WordPress plugin.
Upon activation, go to the Tools » Redirection page and switch to the Site tab.
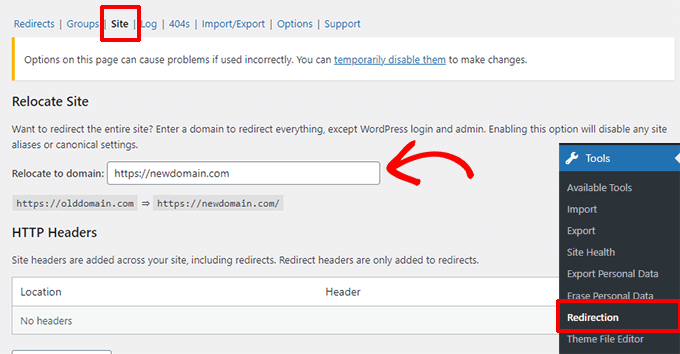
Under the Relocate Site section, add your new domain name and click the Update button to save your settings.
The Redirection plugin will now redirect users and search engines to your domain name.
Step 5. Compare URLS
Next, you need to perform a comprehensive website crawl to compare all URLs on the new website with the old data.
This is the data you collected in the first step to benchmark your SEO performance before the migration.
1. Compare URLs Using XML Sitemaps
Set up XML sitemaps on your new website using All in One SEO. After that, download the XML Sitemaps to your computer.
Simply compare the new sitemap URLs with the old sitemaps you downloaded earlier.
2. Compare URLs Using Screaming Frog SEO Spider
If you have a paid subscription to Screaming Frog SEO Spider, then you can compare the two crawls.
Open the App and perform a full crawl of your new website. After that, switch to the Mode » Compare tab and select the current and previous crawl.
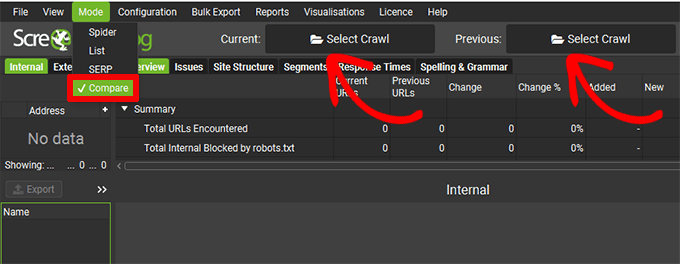
You can also perform more comprehensive analyses by examining both crawls in different Modes, such as List and Spider mode.
Screaming Frog SEO Spider website has a detailed tutorial on comparing crawls.
3. Compare URLs Using Semrush
Another easy way to compare URLs is with Semrush using the Site Audit tool.
If you have set up Semrush before migration using a paid subscription plan, then you can compare it with the new craw post-migration.
Semrush will automatically report any issues it finds under the Issues tab.
You can also compare before and after crawls automatically.

All you have to do is switch to the ‘Compare Crawls’ tab to compare a past crawl with the latest crawl.
Step 6. Fixing Crawl Issues and URLs
When comparing URLs, you may come across some issues. The most common problems are:
- Missing URLs – A post or page on your old site is unavailable on your new site. To fix this, you may need to create a new post or page or create a redirect (see Step 4 for redirect tools).
- Missing Media – An image, audio, or video file failed to import. To fix this, try to manually import the missing media file or set up a redirect.
Go through any issues you find and fix them manually if needed.
Step 7. Migrating WordPress SEO Data
WordPress SEO plugins save important SEO data in your WordPress database. This includes plugin settings, SEO metadata, redirects, focus keyphrases, and more.
However, since you backed up your entire WordPress website during the migration, your SEO plugin and all its SEO data should start working out of the box.
This step is for users who want to switch their WordPress SEO plugin and want to migrate SEO data from one plugin to another.
For example, a while ago, we switched from Yoast to All in One SEO, and preserving all our SEO data was crucial during the switch.
Luckily, all good WordPress SEO plugins come with built-in SEO data importers.
For instance, All in One SEO will automatically detect other WordPress SEO plugins and will give you an option to import SEO during the setup wizard.
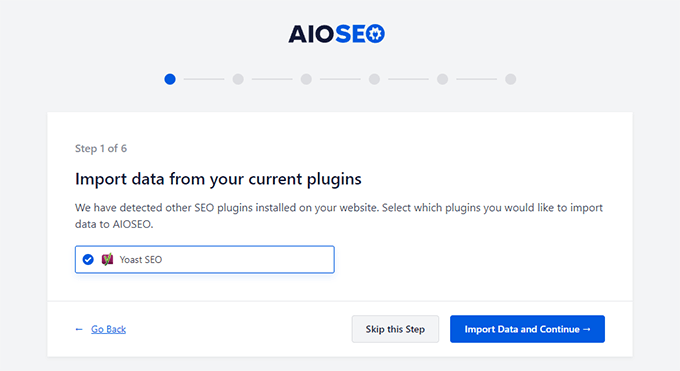
You can also manually import SEO data in the plugin settings.
Simply head over to the All in One SEO » Tools page and switch to the ‘Import / Export’ tab.
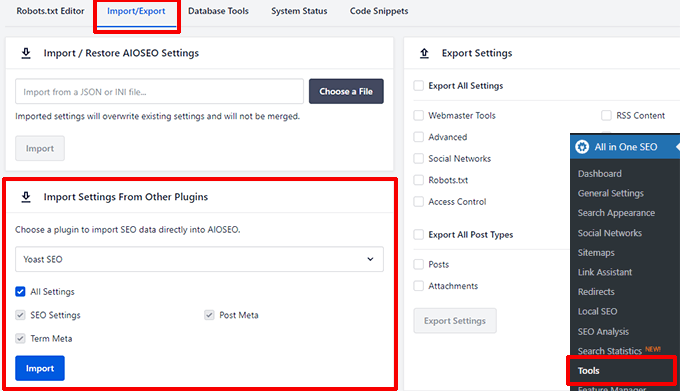
Under the ‘Import Settings From Other Plugins’ section, choose your older SEO plugin and then check ‘All Settings’.
Click ‘Import’ to continue, and All in One SEO will import all your SEO data from your previous SEO plugin.
Other WordPress SEO plugins like Rank Math and Yoast SEO also have built-in SEO data importers and exporters that you can use.
Step 8. Monitor SEO Performance Post Migration
Now that you have completely migrated WordPress while preserving SEO, you need to ensure that you are tracking important marketing data, including analytics and Google Search Console.
If you didn’t change your domain name, then your older Google Analytics and Google Search Console integrations will continue working.
Keep an eye on those reports to monitor your website for any post-migration traffic loss or drop in search rankings.
On the other hand, if you migrated WordPress to a new domain name, you will need to reconfigure Google Analytics and Google Search Console.
Reconfigure Google Analytics
Those using MonsterInsights can go to the Insights » Settings page and scroll down to the Google Authentication section.
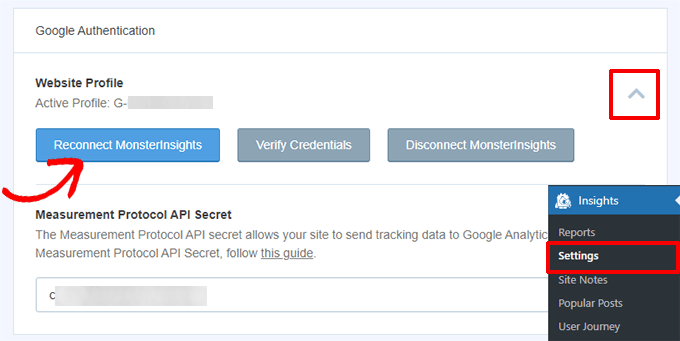
Click the downward arrow to expand the Website Profile section, and then click the ‘Reconnect MonsterInsights’ button.
MonsterInsights will then reauthenticate your website to Google Analytics and automatically add a new data stream configured with your new domain name.
Users who have manually installed Google Analytics in WordPress will need to add their new Domain Name as a Data Stream in Google Analytics.
Login to your Google Analytics account and click the gear icon at the bottom left corner to switch to the admin view.
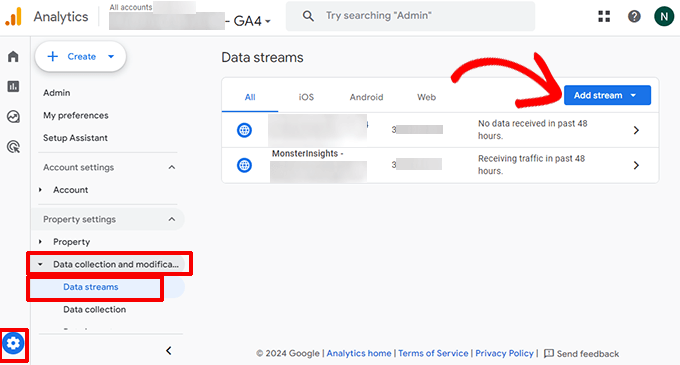
Next, go to the Data collection and modifications » Data streams and then click on the ‘Add stream’ button.
Select Web as your stream type, and then add your new domain and website title.
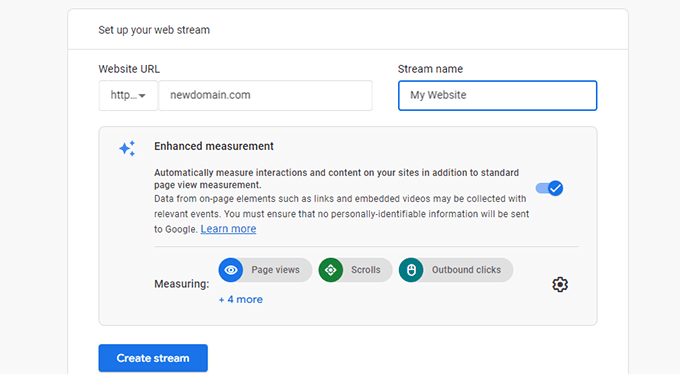
Click the ‘Create stream’ button to save your settings.
Google Analytics will now start tracking data from your new domain name.
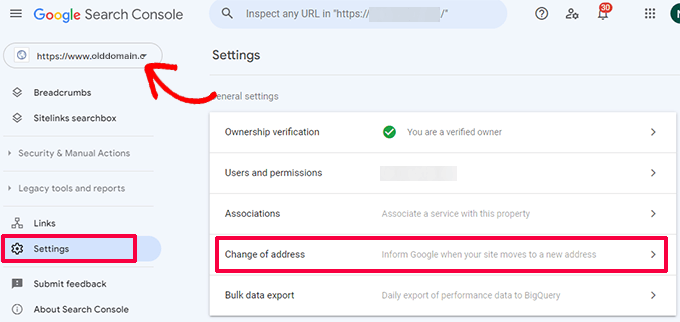
Reconfigure Google Search Console
Next, you need to reconfigure Google Search Console and inform Google about the change of address.
Note: This step is important because otherwise, Google may consider your new site a mirror or duplicate, which will make it much longer to rank for your new domain name.
First, add your new domain name as a new property in Google Search Console. Simply follow the instructions in our guide on how to add your site to Google Search Console.
Important: Ensure you use the same Google account you used for your old domain name.
After adding your new domain to Google Search Console, switch to your old domain name profile in Google Search Console.
On the next screen, you will be asked to set up 301 redirects from your old domain to your new site address. You have already done that earlier, so you can move on to the next step. If you missed that step, we suggest going back and doing it now.
Below that, select your new domain name from the drop-down menu and click on the ‘Validate & Update’ button.
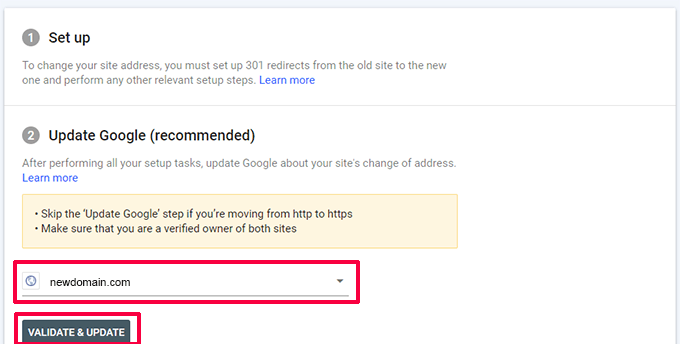
That’s all. You have now informed Google about the change of address.
This may take a while, but gradually, your new domain will start appearing in search results instead of your old domain name. During this time, you won’t lose any traffic due to the 301 redirects you set up.
Frequently Asked Questions About WordPress SEO Migration
Following are some of the most commonly asked questions about SEO migration for WordPress websites.
1. How do you do an SEO migration?
First, back up your website and track performance with Google Analytics and Google Search Console. Then, move your website data, including SEO data.
If you are migrating to a new domain name, ensure that you set up 301 redirects. Finally, use the Change of Address tool in Google Search Console to notify Google about the new URL.
2. How can I migrate my website without losing SEO?
By setting up proper redirects and using the Google search console, you can migrate your website easily without losing SEO.
3. Will domain migration increase SEO traffic?
Depending on the domain you use for migration, it may cause an increase in SEO traffic. For instance, if your new domain is more relevant to your website topics or you are using a country domain to reach a more targeted audience.
We hope this WordPress SEO migration checklist is helpful in migrating your websites. You may also want to take a look at our complete WordPress SEO guide for a more detailed SEO walkthrough and our expert picks of the best domain name registrars if you are looking to switch to a new domain name.
If you liked this article, then please subscribe to our YouTube Channel for WordPress video tutorials. You can also find us on Twitter and Facebook.
The post The Ultimate WordPress SEO Migration Checklist (For Beginners) first appeared on WPBeginner.
Dr Crash says: