Do you want to rank new WordPress content faster?
Sometimes search engines take some time to index new content, so your WordPress site may not show up in search results or get much traffic at first.
In this guide, we’ll show you how to easily rank new WordPress content faster with practical tips.
Why Is It Important to Rank New Content?
As a WordPress website owner, you’ll miss out on a ton of traffic if you don’t work on ranking your content from day one.
When you do, your content can gain higher search rankings and get more traffic from the start. Later on, your rankings will continue to improve as your site gets more credibility in search engines.
However, many websites struggle to get more organic traffic to their content right away.
Luckily, there are some easy to implement WordPress SEO best practices that can help. Simply follow the steps below to rank your new content and start getting more traffic right away.
That being said, let’s take a look at how to easily rank your new WordPress content faster.
1. Install All in One SEO for WordPress
First thing you need to do is install and activate All in One SEO for WordPress. For more details, see our step by step guide on how to install a WordPress plugin.
All in One SEO (AIOSEO) is the best WordPress SEO plugin on the market. It allows you to easily optimize WordPress SEO without any special skills.
Note: There is a free version of All in One SEO available as well. However, we recommend using the premium version to unlock its full potential.
Upon activation, the plugin will launch a setup wizard which will walk you through the process to get started. Simply follow the on-screen instructions and you’ll be all set in a few clicks.
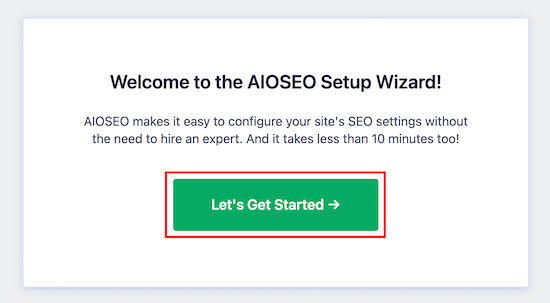
Setting up AIOSEO will automatically take care of many important search engine optimization tasks. For instance, if an older blog post is missing an SEO title or description, then the plugin can automatically generate those for you.
However, there’s a lot more that you can do with the plugin that will further boost search rankings for your new content.
For step-by-step instructions and more tips, see our complete guide on how to set up All in One SEO.
2. Add Your Website to Google Search Console
Google Search Console is a free tool provided by Google to help website owners monitor their website performance in search results.
It allows you to track search rankings and get notified when Google is unable to crawl or index any page on your website. You’ll also be able to notify Google of any new content you publish automatically by using a sitemap.
First, you need to visit the Google Search Console website and click on the start now button.
Next, you need to provide your website URL and click on the continue button.
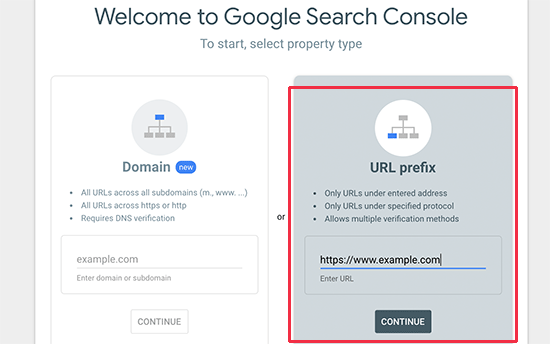
Now, you’ll be asked to verify ownership of your website. There are several ways to do that, but we will show the HTML tag method because it is the easiest one.
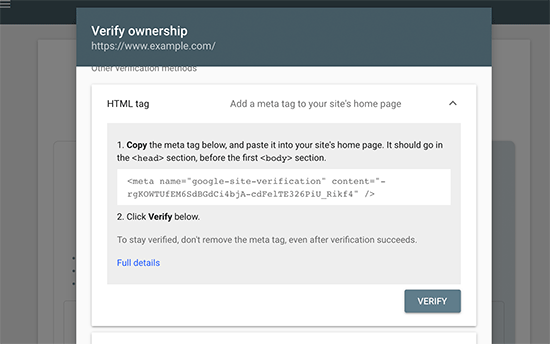
Click on the HTML tag to expand it and then copy the code inside it.
All in One SEO for WordPress comes with a built-in tool to easily add this code to your website. Simply switch to the admin area of your WordPress website and go to the All in One SEO » General Settings page.
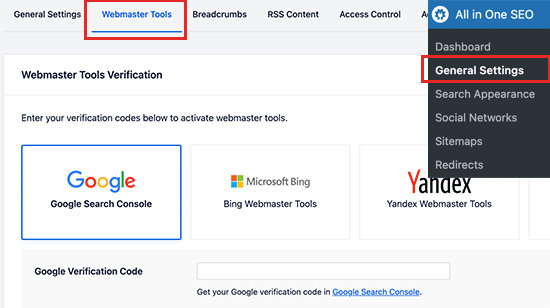
From here, you need to switch to the Webmaster tools page and click on the Google Search Console box to add your search console verification code.
Don’t forget to click on the Save Changes button to store your settings.
You can now switch back to the Google Search Console tab and click on the Verify button.
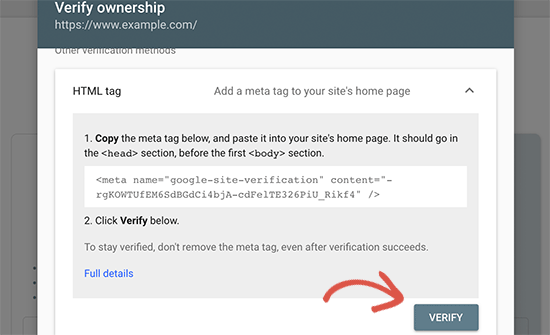
That’s all! You’ve successfully added your website to Google Search Console.
3. Add XML Sitemaps to Google Search Console
An XML sitemap is a file that lists all your website content in an XML format, so search engines like Google can easily discover and index your content.
WordPress comes with its own basic XML sitemaps, which you can find by adding wp-sitemaps.xml at the end of your website address (for example, https://example.com/wp-sitemap.xml).
However, if you are using AIOSEO, then it generates its own XML sitemaps that are more powerful. It includes XML sitemaps, video sitemaps, news sitemaps, and RSS sitemaps as well.
AIOSEO sitemaps are also completely customizable, so you can decide exactly which content to include. You can even use your sitemap to help hide specific pages from Google.
You can view and manage your sitemaps by visiting All in One » Sitemaps.
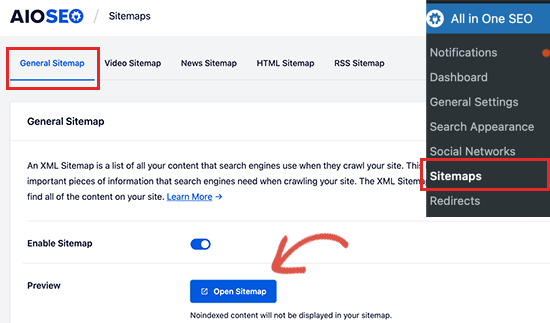
To view your sitemap, simply click on the Open Sitemap button, or you can just add sitemap.xml at the end of your website domain (for example, https://example.com/sitemap.xml).
Next, login to your Google Search Console account dashboard and then click on the Sitemaps menu from the left column. After that, you need to add ‘sitemap.xml’ in the the ‘Add a New Sitemap’ field.
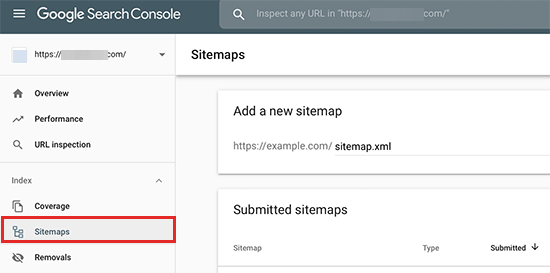
Click on the Submit button to continue.
Add RSS Sitemap to Google Search Console
All in One SEO also comes with an RSS Sitemap feature which contains your most recent blog posts.
Search engines recommend adding an RSS sitemap to your site, too. It is a smaller file and search engines can access it more frequently to look for new content.
First, you need to visit All in One SEO » Sitemaps page and switch to the RSS Sitemap tab.
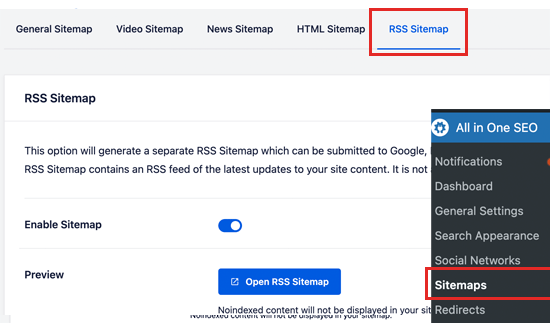
From here you need to make sure that the RSS sitemap option is enabled. You can click on the Open Sitemap button to view it.
By default, the RSS sitemap URL has sitemap.rss added to your domain name (e.g. https://example.com/sitemap.rss).
Now you can switch back to Google Search Console dashboard and click on the Sitemaps menu. From here, add ‘sitemap.rss’ in the Add a New Sitemap option, and then click the Submit button.
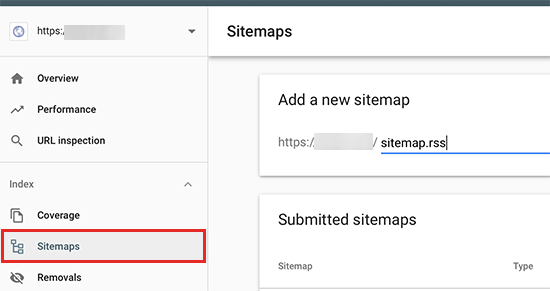
That’s all. Google will now start using your sitemaps to find new content on your website more quickly.
4. Optimize Your New Content for Ranking
The first three tips mentioned above ensure that search engines can quickly find your content. Now let’s talk about how to prepare your new content for ranking faster in higher positions.
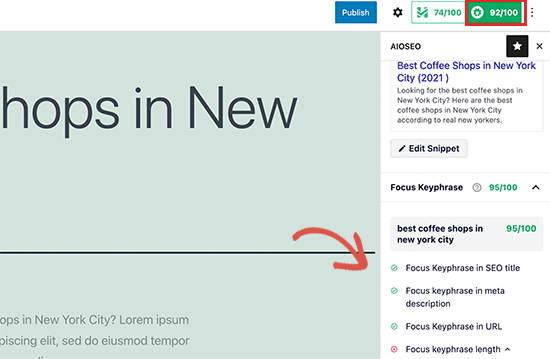
All in One SEO allows you to easily add a meta title and description to any post or page under the AIOSEO settings box below your content.
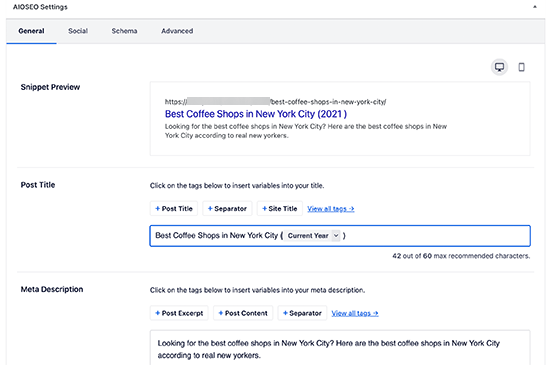
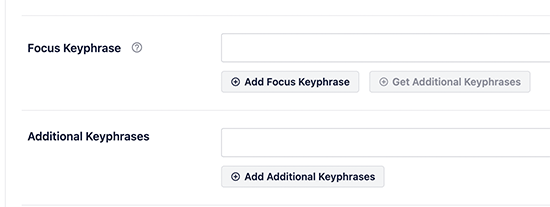
Below that, you can add the Focus Keyphrase that you want to rank for.
This allows All in One SEO to analyze your content for those focus keywords, and give you suggestions to improve your optimization.
You can view your overall SEO score at the top right corner of the screen.
Clicking on it will also show you actionable tips that you can apply to improve your content.
For more details, see our checklist on improving your blog posts for SEO.
5. Add Internal Links
An internal link is a link to another page on your own website. Internal linking to your own content has a huge impact on SEO.
To improve your SEO, it’s smart to make it a habit to add links to your most important content in any new content that you write. This can help to boost rankings for your older content.
However, it’s also important to add internal links that point to your new content when you publish it.
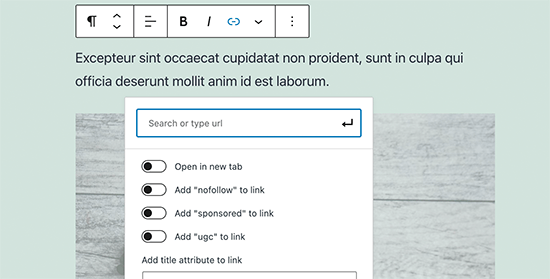
You can do this by editing your older articles to add links to your newer content whenever you publish. Many successful bloggers dedicate time to add internal links to new articles on a weekly or monthly basis.
6. Share Your Content
Another quick way to promote your new blog posts is by sharing them with your followers on social media platforms like Facebook, Twitter, Pinterest, and more.
To get the most engagement on social media, you want to make sure that your content looks good on every platform.
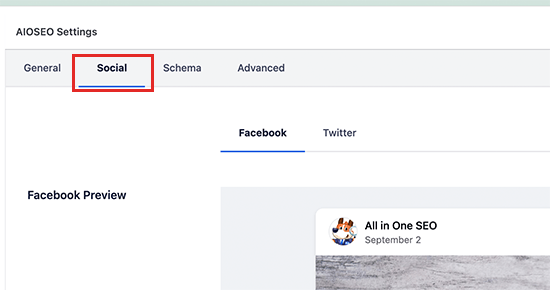
That’s where All in One SEO comes in. AIOSEO makes it possible to control how your content looks when it’s shared on social media websites like Facebook and Twitter.
You can add Open Graph meta data to include proper thumbnail images for each article on your website.
For more details, see our complete social media cheat sheet for WordPress with step by step instructions on promoting your content on social media.
Bonus: Track Website Traffic
Finally, you need a way to make sure your new content is getting indexed and ranked properly.
The easiest way to track this is by using MonsterInsights. It is the best Google Analytics plugin for WordPress and allows you to easily monitor your website traffic and rankings.
First, you need to install and activate the MonsterInsights plugin. For more details, see our guide on how to install Google Analytics in WordPress.
Once you have set up MonsterInsights, you can view your website performance directly from your WordPress dashboard.
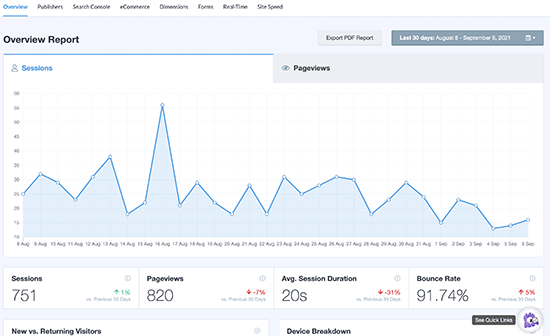
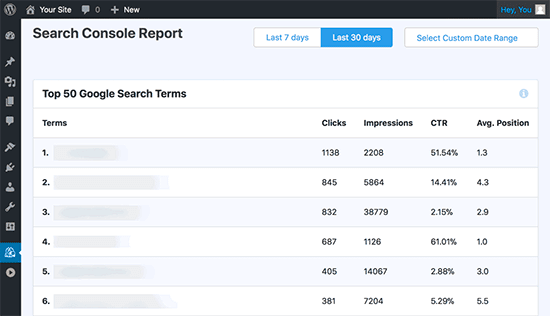
MonsterInsights also shows you your search engine rankings, so you can track the performance of your content and make sure it’s indexed properly.
We hope this article helped you learn how to rank your new WordPress content faster. You may also want to see our guide on how to start your own podcast, or our expert comparison of the best email marketing services for small business.
If you liked this article, then please subscribe to our YouTube Channel for WordPress video tutorials. You can also find us on Twitter and Facebook.
The post How to Rank New WordPress Content Faster (In 6 Easy Steps) appeared first on WPBeginner.
Dr Crash says:
