Conditional logic allows forms to change in real time based on the user’s answers, making them more relevant and engaging.
In our experience, conditional logic can be great for everything from user surveys to event RSVP forms. It makes your forms more dynamic and can lead to more form completions and conversions.
In this article, we will explore the best ways to use conditional logic in your WordPress forms.
What Is Conditional Logic in Forms, and Why Is It Important?
Conditional logic is a powerful feature that enables your form fields to change based on the user’s responses.
So, instead of presenting all possible fields to every user, you can show or hide fields based on specific conditions. This makes your forms cleaner and easier to navigate as you ensure that users see only the relevant fields.
For example, let’s say you have a customer satisfaction survey form on your WordPress website.
If customers rate their satisfaction as ‘Low’ (1-2 stars), additional fields for ‘Please describe your issue’ and ‘How can we improve?’ could appear. And if customers rate their satisfaction as ‘High’ (4-5 stars), then a field for ‘What did you like the most?’ appears.
The result? A more user-friendly form-filling experience on your WordPress website.
Forms that adapt based on responses keep users interested and encourage them to complete their responses. So, you can get higher submission rates.
When it comes to data collection, conditional logic also ensures that you gather higher-quality data. This is because users are more likely to provide accurate information when the questions are highly relevant to their previous answers.
And with more precise data from conditional fields, follow-up actions like emails or recommendations can be more accurately targeted. This can lead to higher conversion rates.
How to Add Conditional Logic in WordPress Forms
In the following sections, we will share six conditional logic use cases to improve your WordPress forms. To demonstrate the process, we will use WPForms and Formidable Forms.
WPForms is a beginner-friendly form builder with drag-and-drop functionality. It has more than 1900 templates, which can help you create any form in just a few minutes. For more details, see our WPForms review.
Meanwhile, Formidable Forms is a more advanced option. It’s best for creating complex forms, including calculators and quizzes. You can read our Formidable Forms review for more details.
So, before we start, you might want to install these plugins first. For more details, feel free to check out our detailed guide on how to install a WordPress plugin.
Note: To use conditional logic on WPForms and Formidable Forms, you’ll need the premium versions of the plugins. But you can always start with WPForms Lite and then upgrade when needed.
Here’s a quick overview of the use cases we will cover in this article:
Ready? Let’s get started.
Use Case 1: Ask for Additional Information in Survey Forms
Conditional logic can help you create a more insightful survey form.
For example, let’s say a user leaves negative feedback about your website’s user experience. You might want to learn more about it so you can work to improve it.
In this first use case, we will show you how to create survey forms with conditional logic using WPForms and its ‘Surveys and Polls Addon.’
Note: You’ll need at least the WPForms Pro plan to use the Surveys and Polls Addon.
To start creating a survey form, you first need to navigate to WPForms » Add New from your WordPress dashboard.
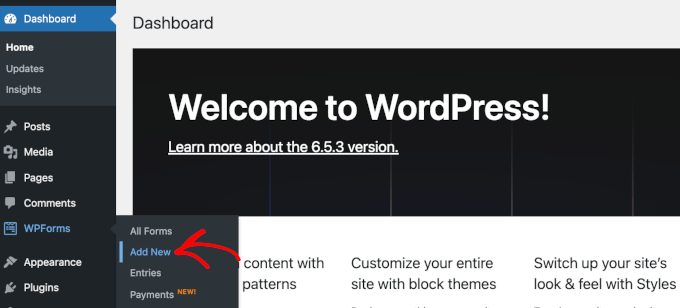
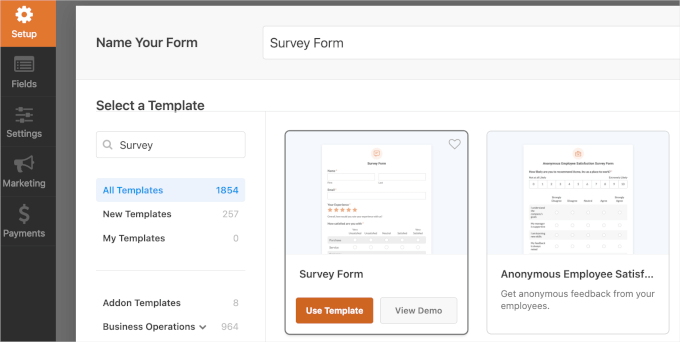
This will redirect you to WPForms’ ‘Setup’ page. Here, you’ll name your form and select a template.
After naming your form, it’s time to find the ‘Survey Form’ template. You can also use the search box to filter the templates.
Once you’ve found it, simply hover over the ‘Survey Form’ template option and click ‘Use Template.’
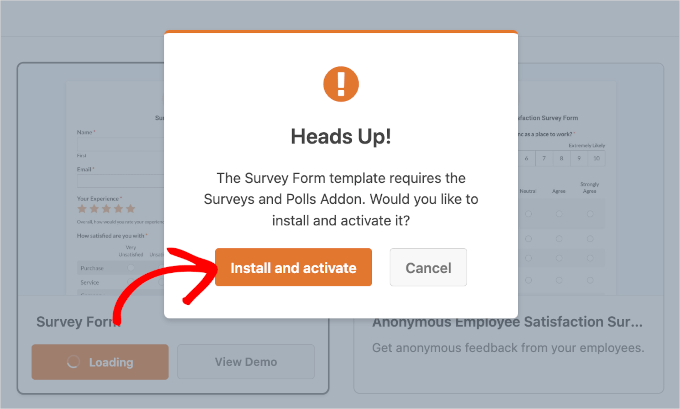
After selecting the template, you might see a pop-up window.
There, you’ll see a message saying that you’ll need ‘Surveys and Polls Addon’ to use the ‘Survey Form’ template.
Go ahead and click ‘Install and activate.’
Once done, you will be redirected to the form builder.
In the live preview, you can see all the pre-made fields. Now, let’s click on the ‘How can we improve?’ field.
You’ll want to head over to the ‘Smart Logic’ tab in the field’s settings. Here, you should see that WPForms has already enabled and set up conditional logic for you.
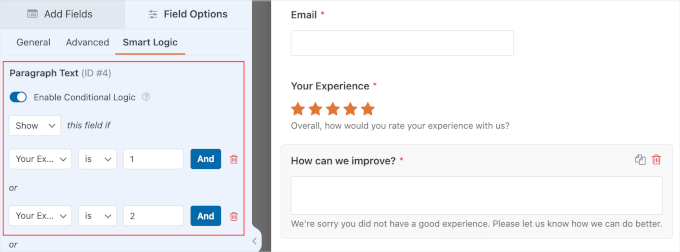
The pre-configured conditional logic settings tell the form to show the ‘How can we improve?’ field only if a user submits a 1 or 2-star rating for the ‘Your Experience’ field. You can also change these settings by playing around with them.
If everything else looks good already, you can click ‘Save’ so you don’t lose your progress.
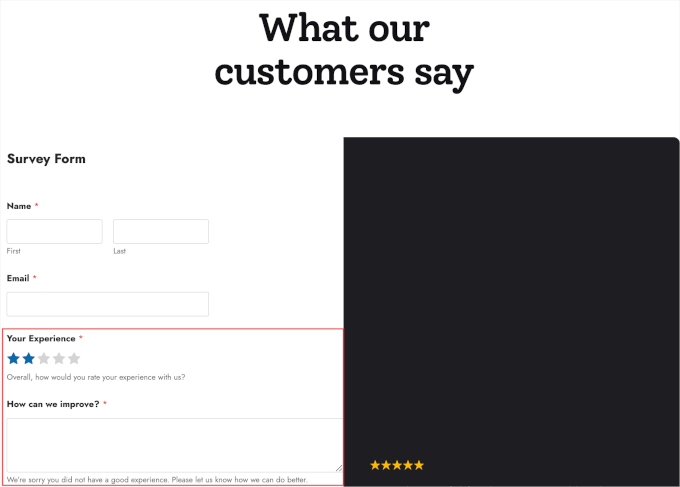
And all done! You’ve successfully created a survey form with conditional logic. Here’s what it might look like:
Use Case 2: Show or Hide Options in Event RSVP Forms
In an RSVP form, you can use conditional logic to direct users through different paths based on their answers.
For instance, if a user answers ‘Yes’ to attending your event, you can ask whether they want to bring extra people with them. If they answer ‘No,’ then they can skip those questions and move on to the next relevant section.
This keeps the survey short and sweet for each respondent, which can help improve your form completion rates.
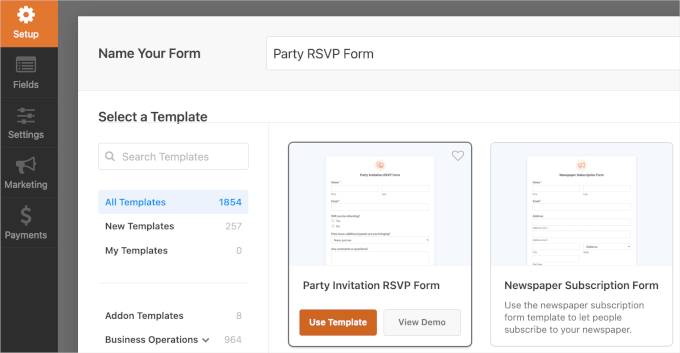
In WPForms, you can quickly set up an RSVP form using the ‘Party Invitation RSVP Form’ template. From your WordPress dashboard, let’s navigate to WPForms » Add New.
You can name your form based on the event you want to hold. Here, we will go with the ‘Party RSVP Form’ as an example.
Then, you can scroll down the screen to locate the ‘Party Invitation RSVP Form’ template. Once you’ve found it, simply hover over the template and click ‘Use Template.’
Next, you’ll arrive in the ‘Fields’ section.
You are now ready to customize the form in WPForms’ drag-and-drop form builder interface. The left side contains all the customization settings, and the right side shows the form’s live preview.
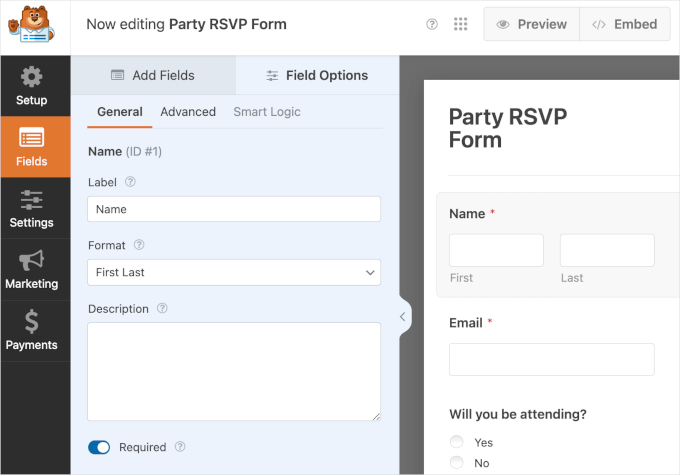
To start customizing, you can simply click on a field. Then, WPForms will display the ‘General’ tab to edit the field.
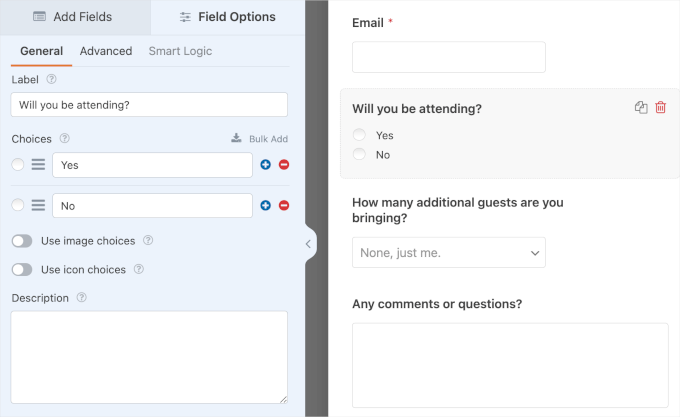
For example, you can edit the label, add a new choice, and write a description for the ‘Will you be attending?’ field.
Now, it’s time to set up conditional logic.
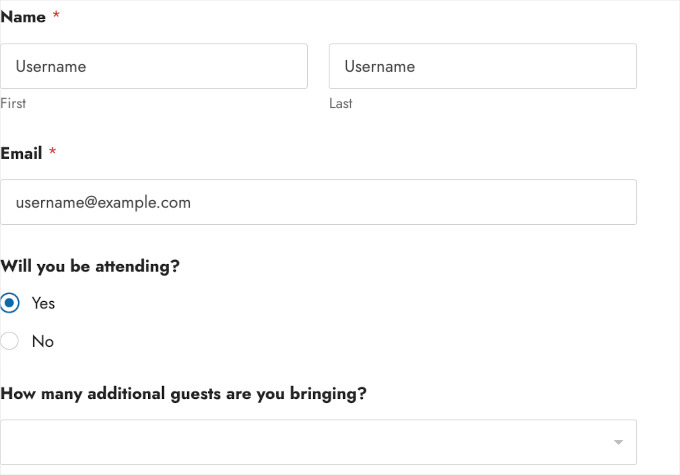
Basically, you’ll want to show the ‘How many additional guests are you bringing?’ field only if a user selects ‘Yes’ on ‘Will you be attending?’.
To show or hide the field, the first thing you need to do is click the ‘How many additional guests are you bringing?’ field.
On the left-hand side, you can head over to the ‘Smart Logic’ tab. Then, simply toggle on the ‘Enable Conditional Logic’ option.
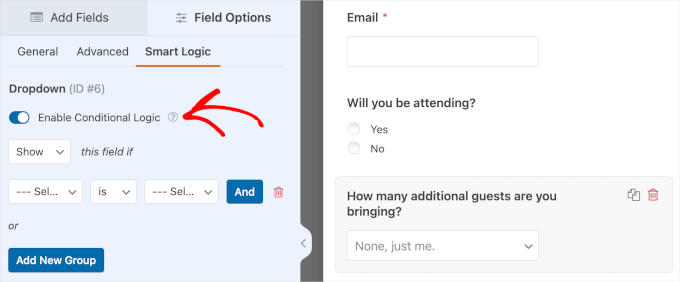
Then, you’ll see dropdown menus for configuring the settings:
- Show or Hide. This dropdown allows you to show or hide the ‘How many additional guests are you bringing?’ field.
- Select Field. In this dropdown, you’ll choose one from the other fields in the form to set the subject of the condition.
- Is and other options. The default configuration for this dropdown is ‘is.’ But you can find different options like ‘is not,’ ’empty,’ ‘contains,’ ‘starts with,’ and more.
- Select Choice. In this last dropdown, you’ll choose an option from your chosen field.
Now, the complete configuration should be ‘Show‘ this field if ‘Will you be attending‘ ‘is‘ ‘Yes‘.
Once you are done, remember to click ‘Save’ to save your progress. And that’s it—you’ve successfully used conditional logic to show or hide a field!
Here’s what the form might look like:
Use Case 3: Display Different Fields in Job Application Forms
If you are accepting job applications, then you can use conditional logic to display different fields based on the position the applicant is applying for.
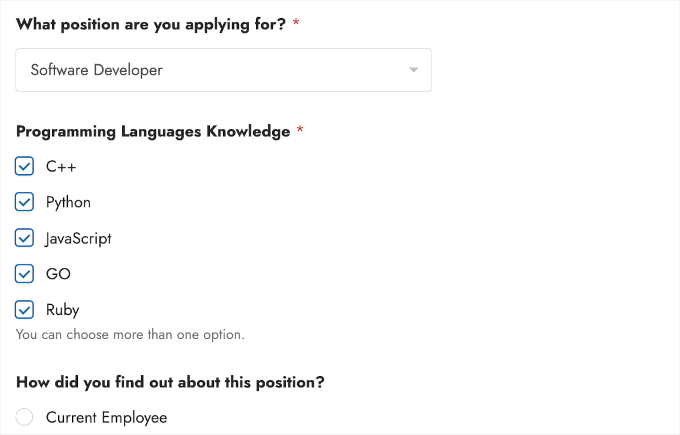
For example, if an applicant selects the ‘Software Developer’ position, you can display an additional field such as ‘Programming Languages Knowledge’.
And if they choose ‘Graphic Designer,’ then the ‘Design Software Skills’ field will appear instead.
Let’s head over to WPForms » Add New from your WordPress dashboard, and start creating a job application form with conditional logic.
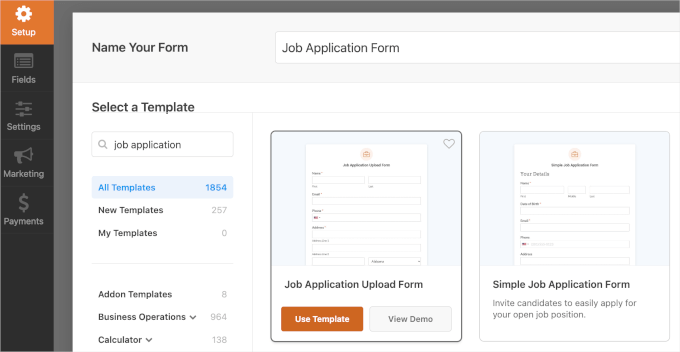
Once inside the ‘Setup’ page, the first thing to do is name your form. After that, you’ll want to scroll down to select a template.
WPForms has a lot of job application form templates.
In this example, we are going to use the ‘Job Application Upload Form’. Once you’ve located the template, you’ll want to hover over it and click ‘Use Template.’
Once you arrive at the WPForms’ builder interface, you can start customizing the template using the tools in the left-hand panel.
in the right-hand panel, you have the live preview. You can explore this section to see what fields are available on the template.
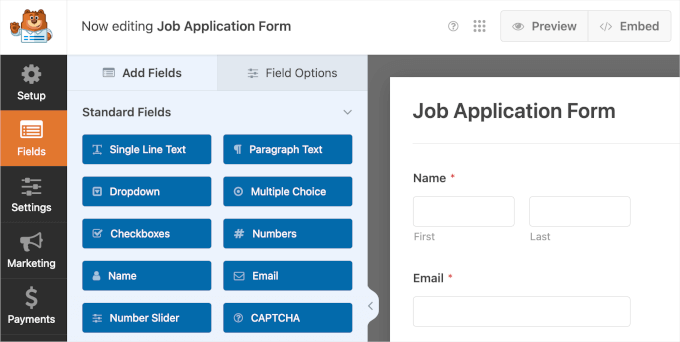
You’ll want to add a dropdown field for available positions and checkbox fields for required skills. Then, we can set conditional logic based on the candidate’s selection in the available position dropdown.
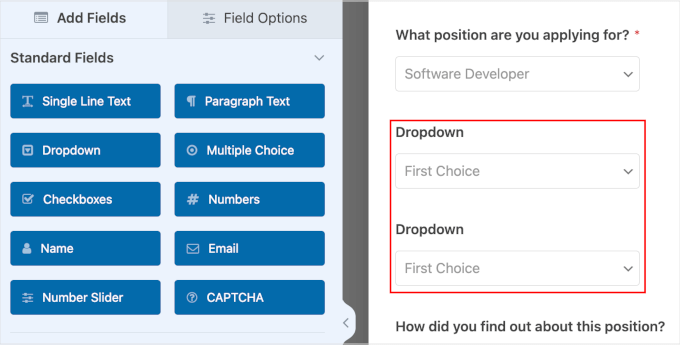
To create a ‘What position you are applying for’ field, simply click ‘Dropdown’ on the left-hand side.
Then, you can drag and drop the new dropdown field above the ‘How did you find out about this position?’ field to keep everything organized.
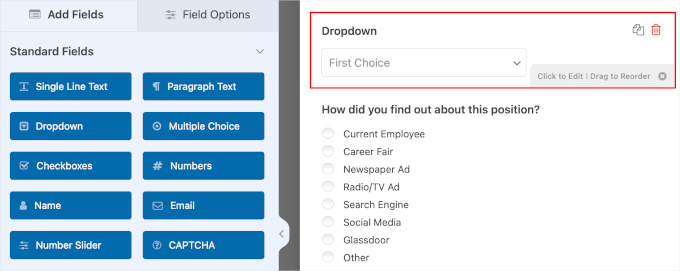
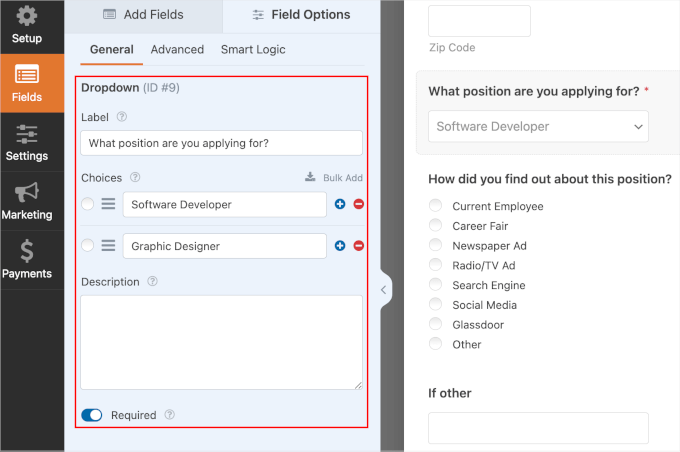
Next, let’s click on the dropdown field to edit its details. This will open the ‘Field Options’ tab. There, you can edit the following:
- Label. This is like a name. Instead of ‘Dropdown’, you can change it to ‘What position are you applying for?’
- Choices. In this field, simply type in the available positions. For example, we are going to use ‘Software Developer‘ and ‘Graphic Designer’. You can enter as many as you want.
- Description. If necessary, you can give a brief description of the field. Then, it will show just below the dropdown menu.
- ‘Required’ switch. You’ll want to toggle on the ‘Required’ switch to make sure candidates don’t skip this step.
Once you’ve completed the details, here’s what it might look like:
The next step is to prepare checkbox fields to follow up on the candidate’s input for the position they are applying for.
Let’s go back to the ‘Fields’ tab and click ‘Checkboxes’. Then, you’ll want to do it once again so you have two checkbox fields.
Once you have added the fields, you can move them below ‘What position are you applying for?’
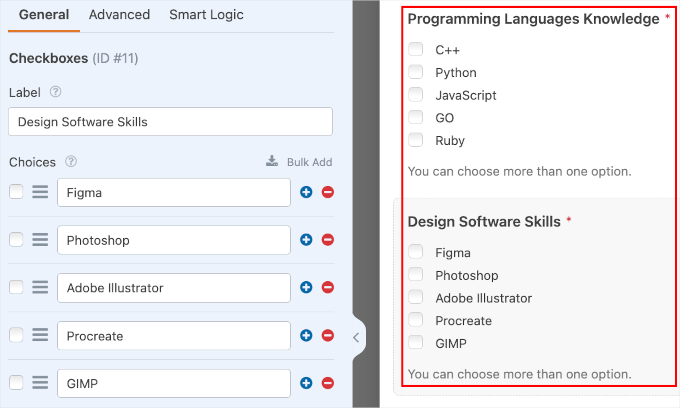
Now, you can click on the checkboxes fields to edit their details. In the ‘Field Options’ panel, you can edit the following:
- Label. You can change it to ‘Programming Languages Knowledge.’ For the second checkbox, you can label it as ‘Design Software Skills’.
- Choices. The choices for the software developer position could be C++, Python, JavaScript, GO, Ruby, and so on. The graphic designer’s required skills can be Figma, Photoshop, Adobe Illustrator, Procreate, GIMP, etc.
- Description. For this field, it’s a good idea to let candidates know they can choose more than one option.
- Toggles. The checkboxes’ Field Options panel has several switches. The ‘Use image choices’ toggle lets you add images to each available option. And the ‘Use icon choices’ field lets you use icons for each available option. Then, the ‘Required’ toggle makes sure that candidates fill out the field.
After customizing the fields’ details, here’s the final look:
Now, you should be ready to set conditional logic.
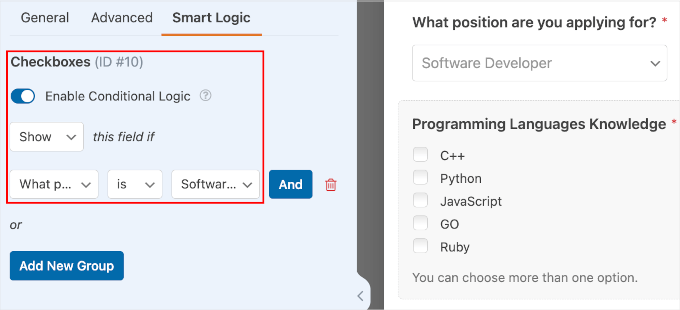
To begin with, you’ll want to click on the ‘Programming Languages Knowledge’ field. Then, simply navigate to the ‘Smart Logic’ tab to enable conditional logic.
Now, simply switch the ‘Enable Conditional Logic’ toggle on. After that, you can set the field to show only when candidates choose the ‘Software Developer’ position.
Here’s how the full configuration should be: ‘Show‘ this field if ‘What position are you applying for?’ ‘is‘ ‘Software Developer‘.
Next, let’s repeat the steps once again for candidates applying for the graphic designer position.
You’ll first want to click on the ‘Design Software Skills’ field. Then, go ahead and enable conditional logic from the ‘Smart Logic’ tab.
Once you do that, you can configure the settings.
The full configuration for this field should be: ‘Show‘ this field if ‘What position are you applying for?‘ ‘is‘ ‘Graphic Designer‘.
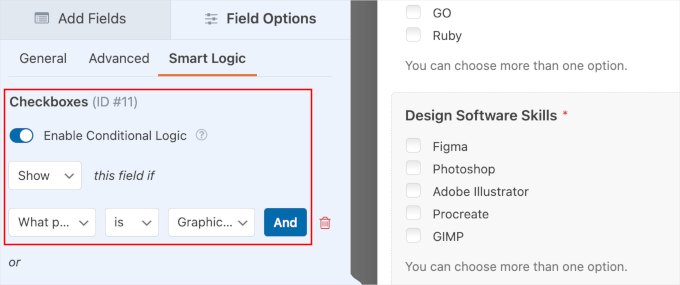
At this point, you can go ahead and click ‘Save.’
Congratulations! You’ve successfully created a job application form with conditional logic. Here’s what it might look like on your website:
Use Case 4: Personalized Thank-You Messages
Conditional logic also lets you send different thank-you messages based on the user’s selection within your WordPress form. Personalized thank-you messages can provide valuable and specific information to the user, which can improve engagement.
For instance, if a user selects ‘Technical Support Inquiry’ within a support form, then the thank-you message can include information on the next steps and a link to support resources.
If they select ‘Sales Inquiry,’ then the message can include information on your products and a link to schedule a demo or consultation.
in WPForms, you can set up different thank-you messages from the notifications setting area.
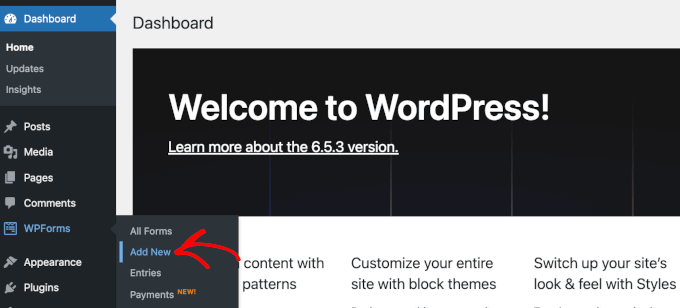
But first, let’s create a support form. You can do this by navigating to WPForms » Add New.
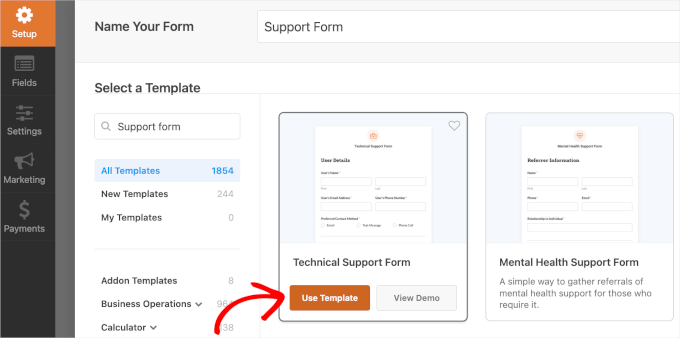
On the next screen, you will name your form. This name is for your reference only, so you can use any name you want.
Then, go ahead and scroll down the screen to select a template. You can use the search bar to find the support form template more quickly.
Once you’ve found a survey form template you want to use, simply hover over it and click ‘Use Template.’ In our example, we are using the ‘Technical Support Form’ template.
This will redirect you to the WPForms’ builder interface. From here, you’ll want to head over to Settings » Confirmations.
From here, let’s click on ‘Add New Confirmation’.
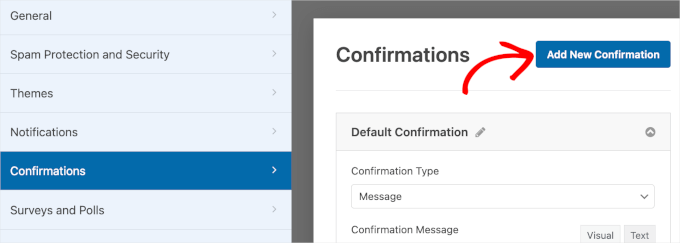
Once you click on the button, you’ll see a pop-up window.
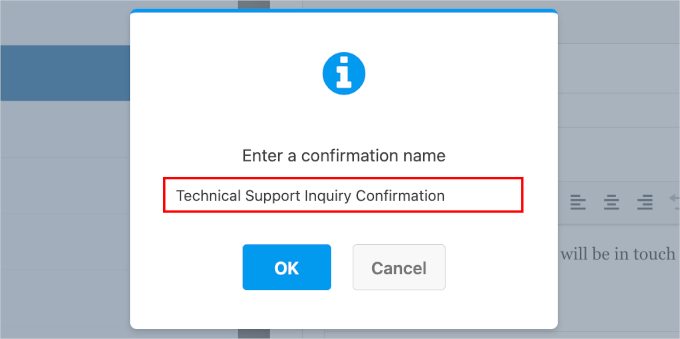
In this pop-up, type your new confirmation name into the text box. Here, we’re naming it ‘Technical Support Inquiry Confirmation.’
Then, go ahead and click ‘OK’ to get to the settings area.
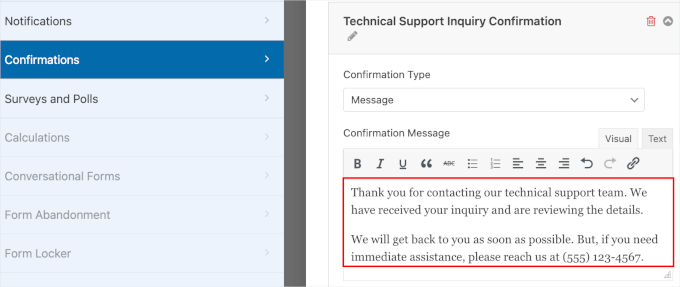
In the ‘Confirmation Type’ field, you’ll want to choose ‘Message.’
This will open the text box, where you can write a custom confirmation message when users submit a technical support inquiry.
Here’s an example:
Once done, it’s time to set up conditional logic.
Firstly, you can scroll down the section to find the ‘Enable Conditional Logic’ toggle. You need to switch it on.

Then, you’ll be able to configure the settings through the dropdown menus:
- Use or Don’t Use. This field lets you specify when to use the confirmation message. We will set this up as ‘Use.’
- Select Field. In the next dropdown menu, go ahead and choose ‘What can we help you with today?’ to use as the subject.
- Is and other options. Here, you’ll see that the default setting is ‘is’. You’ll want to keep it like this.
- Select Choice. Finally, let’s select the ‘Technical Support Inquiry’ option, as we want to use this confirmation message when a user is asking for technical help.
After finishing up the configuration, here’s what it might look like:

Once all is done, simply click ‘Save’ to keep your progress. Then, you’ll want to repeat these steps to set up a confirmation message for users submitting sales inquiries instead.
Congratulations! You’ve now learned to use conditional logic to personalize thank-you messages.
Use Case 5: Set Up Multiple Notification Recipients
This use case works best if you have a form on your landing page or a popup designed to capture leads.
By setting up your multiple recipients, you ensure that every lead is directed to the right team right away.
Customers and prospects will appreciate the reduced response time. This will help you make your customer service lead capture process more efficient and effective.
Using the same support form as in the previous method, let’s try creating a notification for your technical support and sales team.
First, you’ll need to navigate to WPForms » All Forms and click on ‘Edit’ under your technical support form.
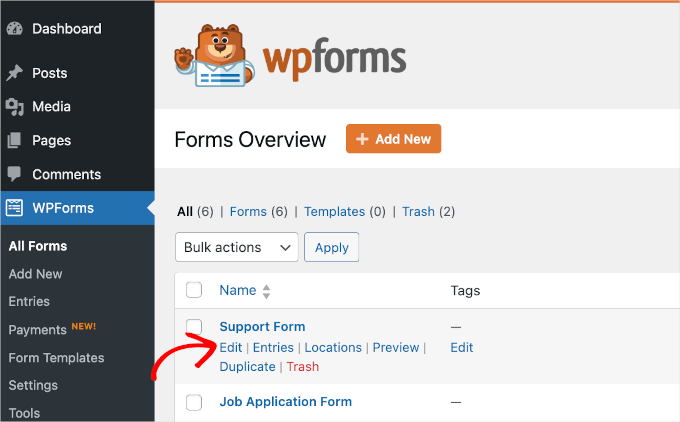
Then, you can start setting up notifications by navigating to Settings » Notifications.
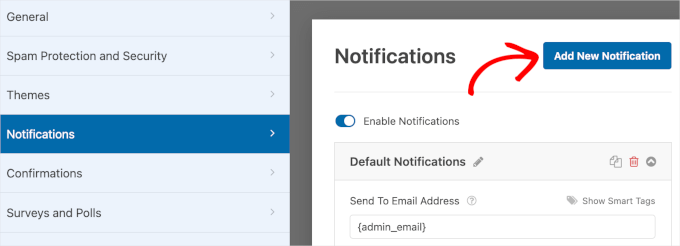
From here, go ahead and click on ‘Add New Notification’.
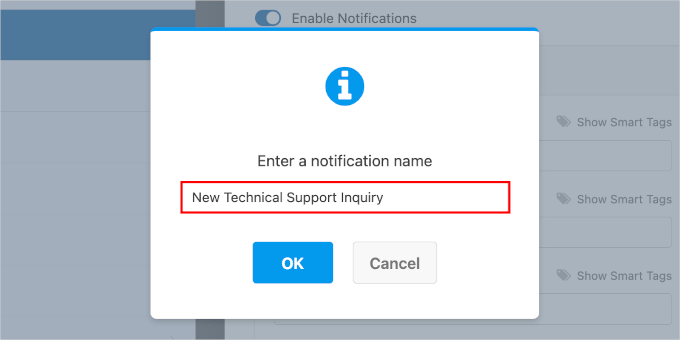
A pop-up window will appear. All you need to do is to name the new notification. Here, we will name it ‘New Technical Support Inquiry’.
Then, simply click ‘OK’ to move on to the next step.
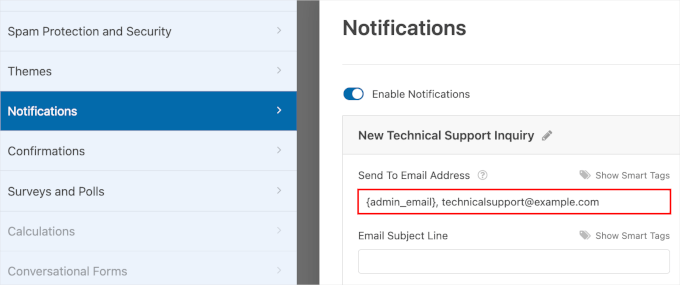
Once inside, the first thing you want to do is type the correct email address for your technical support team into the ‘Send To Email Address’ field.
You can delete or keep the {admin_email} smart tag. If you want to keep it, then please make sure to use a comma when entering the technical support team’s email address.
Next, you can scroll down the section to find the ‘Enable Conditional Logic’ toggle.
Go ahead and switch on that toggle.
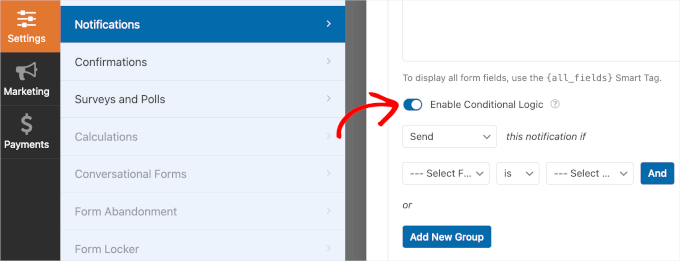
Below the toggle, you should find dropdown menus for setting up conditional logic:
- Send or Don’t Send. This dropdown lets you choose to send or not send notifications. Let’s choose ‘Send.’
- Select Field. In this field, you’ll want to choose ‘What can we help you with today?’. This will set the subject for the following dropdown menus.
- Is and other options. The default setting is ‘is,’ and we will keep that.
- Select Options. In this last field, you’ll want to select the ‘Technical Support Inquiry’ option.
Here’s how the conditional logic should look after configuration:

Once that is done, don’t forget to click ‘Save’ so you don’t lose your progress.
Then, you’ll want to repeat these steps, from adding a new notification to clicking ‘Save’ to create notifications for the sales team.
And that’s it! You’ve learned to use conditional logic to set appropriate notification recipients.
Use Case 6: Create a Chained Quiz
One of the most fun ways to use conditional logic is to create quizzes in WordPress with chained answers and responses.
A chained quiz lets you present questions to users based on their previous answers. So, because each user’s path through the quiz can be different, this will be a more personalized and interactive experience.
For example, a health and wellness website could use a chained quiz to recommend personalized fitness plans.
The first question might ask about the user’s primary fitness goal, such as weight loss, muscle gain, or general health.
Depending on the user’s answer, the next question could ask about their current exercise habits or dietary preferences, which leads to more specific recommendations.
We will be using Formidable Forms for this final use case. It is one of the best WordPress conditional logic plugins for creating quizzes. Plus, it also allows you to create a scoring system along with the quiz.
To get started, let’s install the free Formidable Forms plugin. For detailed instructions, see our step-by-step guide on how to install a WordPress plugin.
Upon activation, you’ll want to go to Formidable Forms » Global Settings to upgrade to the pro version. Then, simply click the ‘Connect to account’ button.
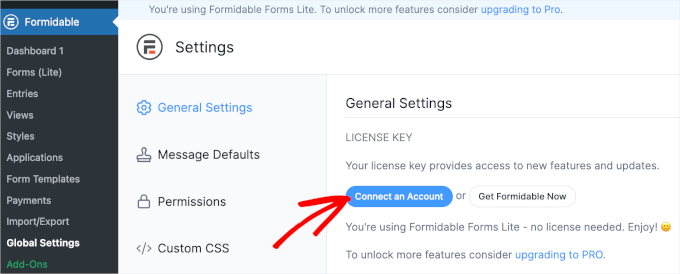
This will redirect you to a new page.
On this page, you can see the email address that you used to sign up for Formidable Forms. If everything is in order, go ahead and click ‘Connect and Install Formidable Forms Pro.’
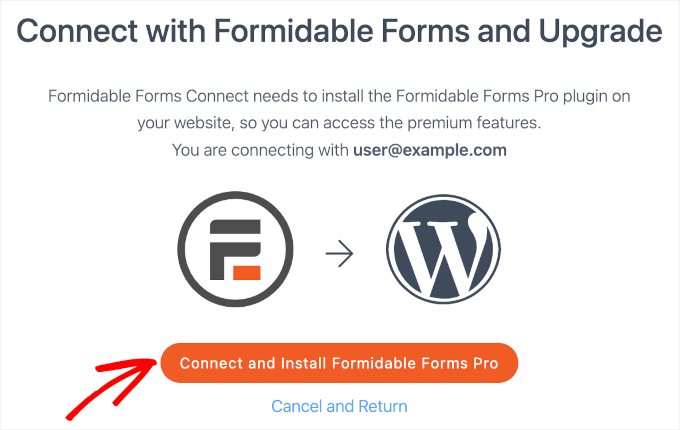
The button will then turn to ‘Please wait…’ and all you have to do is wait for the process to complete.
Once done, let’s navigate to Formidable Forms » Forms » + Add New.
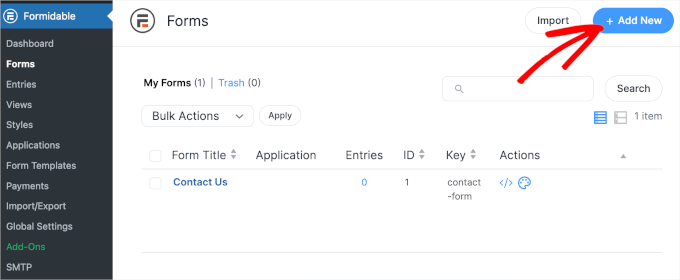
The next step is choosing a template.
In the ‘Form Templates’ panel, we can see that Formidable Forms offers more than 300 templates. To find a quiz template more quickly, you can type ‘quiz’ into the search bar.
Then, simply hover over the ‘Quiz’ template and click ‘Use Template.’ You can also preview the template first by clicking the ‘View Demo’ button.
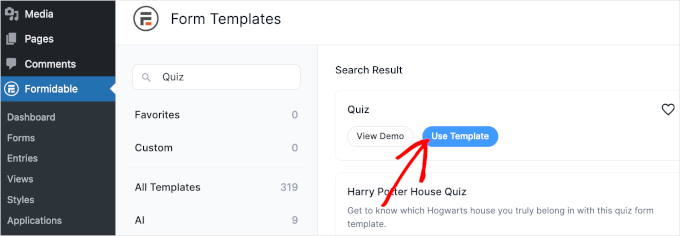
Clicking the ‘Use Template’ button will redirect you to the Formidable Forms builder.
You can access all the customization tools on the left-hand side. The right-hand side is where you have the form’s live preview.
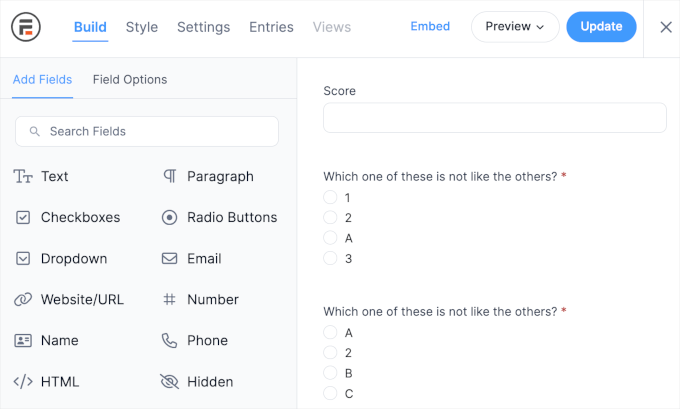
We can see that there are pre-set questions in this form template.
To add your questions, you can click on each field. Then, simply adjust the written copy from the customization panel on the left-hand side.
For this guide, we are going to create a health and wellness chained quiz as an example.
Here, we are changing the first question from ‘Which one of these is not like the others?’ to ‘What is your primary fitness goal?’
Then, let’s tick the ‘Required’ checkbox to make sure users don’t skip this question.
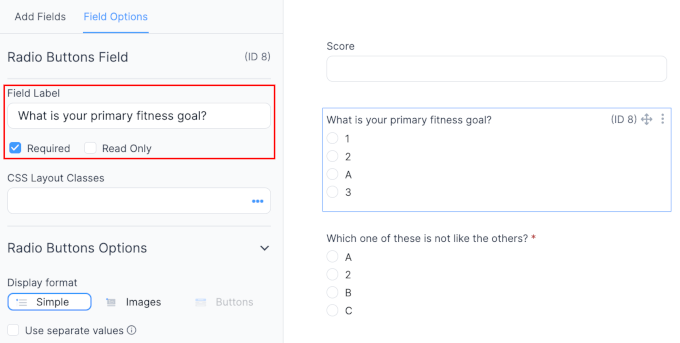
If you want, then you can change the radio button style. We are sticking with ‘Simple’, but you can use images or install the ‘Button’ add-on to get more access to other button styles.
Now, you’ll want to scroll down the customization panel and change the options for this question.
We are adjusting the options to ‘Weight loss,’ ‘Muscle gain,’ and ‘General health.’ By default, the form template has four options. So, we will want to make sure that we change that, too.
To remove an option, simply click the ‘-‘ button to the right of the option field.
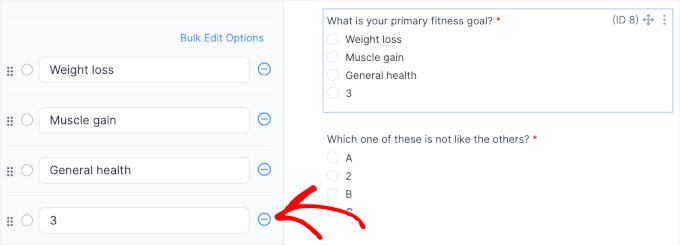
Once you click the ‘-‘ button, you’ll see in the live preview that Formidable Forms has removed the option.
Next, you’ll want to create related questions for each option. This is because we are going to set up conditional logic for when users choose either of the three options.
You can repeat the process to add your questions. And here’s what our additional question for the ‘Weight loss’ option looks like:
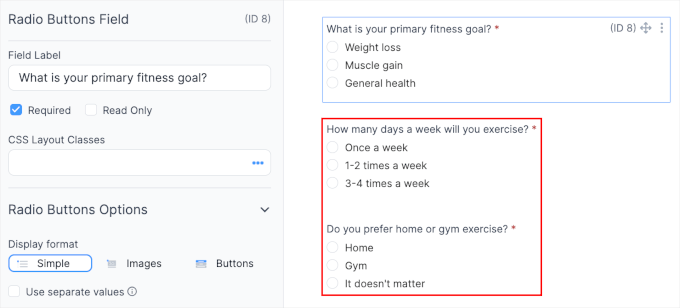
For the ‘Muscle gain’ option, you might want to ask about the user’s dietary preferences.
Since there are dozens of options for dietary preferences, you can add some of the most popular ones and add an ‘Other’ field where users can type in their preferences.
All you have to do is simply click ‘Add other’ at the end of the option section.
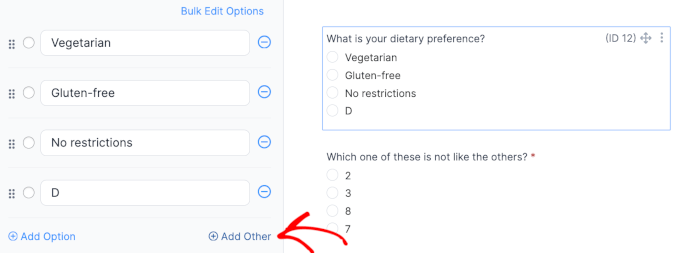
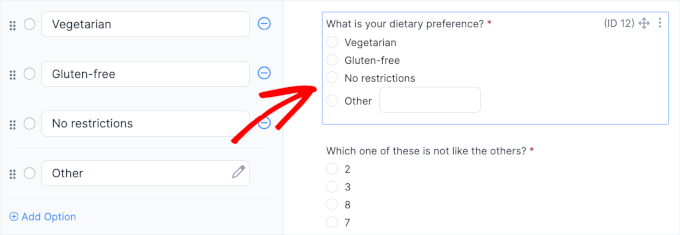
Once you’ve done that, an ‘Other’ radio button with a simple text box will be added. If you haven’t already done so, feel free to click the ‘-‘ button for the ‘D’ option.
And here’s what that might look like:
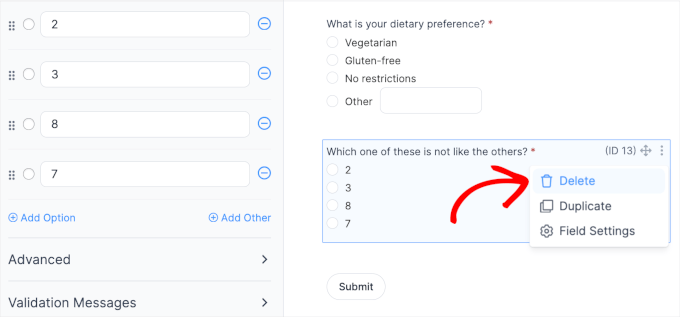
If there are more fields than needed, you can delete the rest.
To do this, you’ll first need to click on the field. Then, go ahead and click the three-dot button in the top right corner.
Once the menu expands, simply click ‘Delete.’
Now, it’s time to set up conditional logic.
First, you’ll want to head over the second question about how often users are willing to exercise in a week. Go ahead and click on the field.
After that, let’s scroll down the customization panel and expand the ‘Conditional Logic’ menu item.
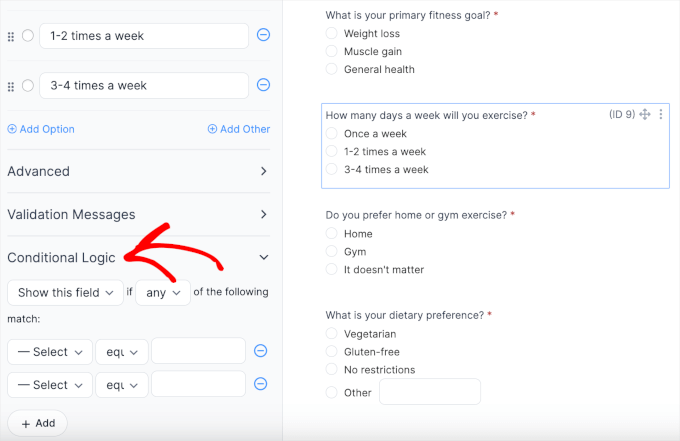
In the ‘Conditional Logic’ section, you can configure several drop-down menus.
You will want to show the ‘How many days a week will you exercise?’ field if users choose the ‘Weight loss’ option. Here are the settings you will need:
- Show or hide this field. This is where you can show or hide the ‘How many days a week will you exercise?’ field. You can keep it as ‘Show this field.’
- Any or all. In this dropdown, you can configure if any or all of the conditions should be met. Let’s keep it as ‘any.’
- Select field. Here, you’ll choose one from the other fields in the form to set the subject of the condition. Let’s choose ‘What is your primary goal?’
- Equals and other options. By default, the configuration is ‘equals.’ You can keep it as is.
- Select option. In this last field, you’ll want to select ‘Weight loss,’ as you want this question to appear for users who choose the option.
If you only want to set one condition, then you can click the ‘-‘ button or leave it as is.
And here’s what the final configuration might look like:
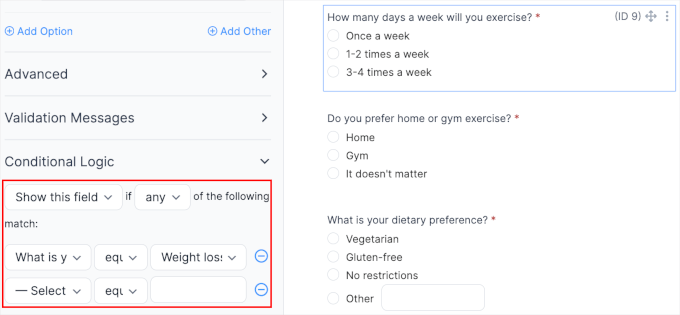
Next, let’s set conditional logic for the ‘Do you prefer home or gym exercise?’ field. For this guide, we will try showing the question if users select the other options from the ‘How many days a week will you exercise?’ field.
Go ahead and click on the ‘Do you prefer home or gym exercise?’ field to access the conditional logic settings.
Once you’re in the conditional logic settings, you’ll want to set two conditions:
- ‘How many days a week will you exercise?’ ‘equals’ ‘1-2 times a week’
- ‘How many days a week will you exercise?’ ‘equals’ ‘3-4 times a week’
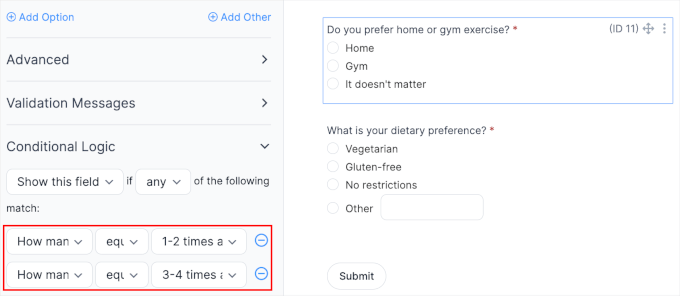
These settings enable you to keep the ‘Do you prefer home or gym exercise?’ field hidden for users who select the ‘Once a week’ option. For those users, we can recommend the home exercise straight away.
You can repeat these processes for all your other fields. Once that is done, go ahead and click the ‘Update’ button.
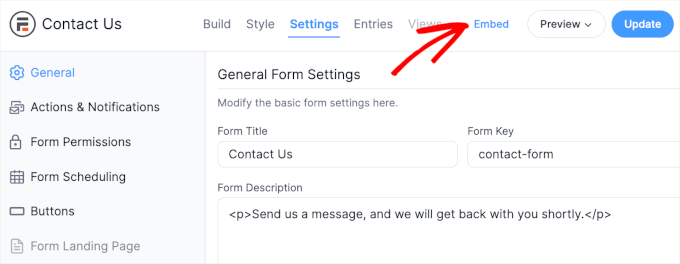
You can now embed the quiz form into your WordPress website. Simply click the ‘Embed’ button at the top of the form builder.
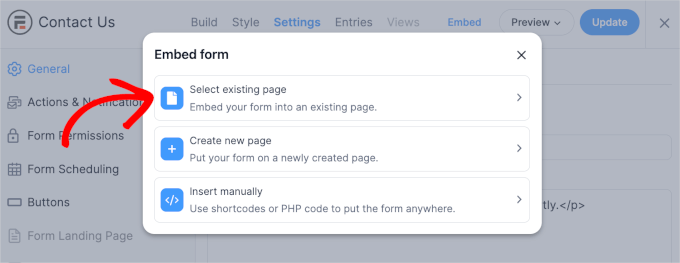
You will now see a popup with different embed options.
For example, you can select an existing page, create a new page, or insert the form manually with a shortcode.
Now, we are going to show you what the chained quiz form might look like on your website.
Here’s a preview of when users choose ‘Weight loss’ for their fitness goal and ‘Once a week’ as their exercise plan:
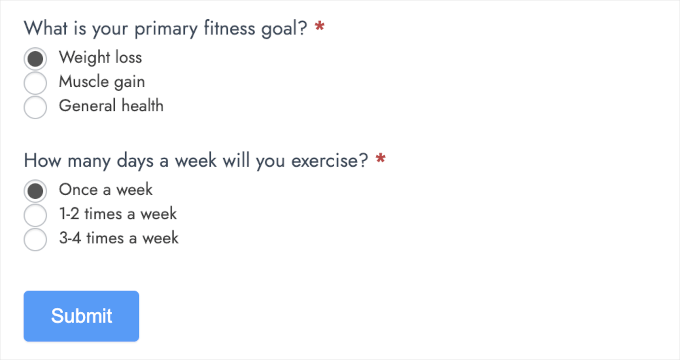
From the screenshot above, we can see that you’ve successfully hidden the ‘Do you prefer home or gym exercise?’ field.
And the following is what it might look like if users select ‘Weight loss’ and ‘3-4 times a week.’
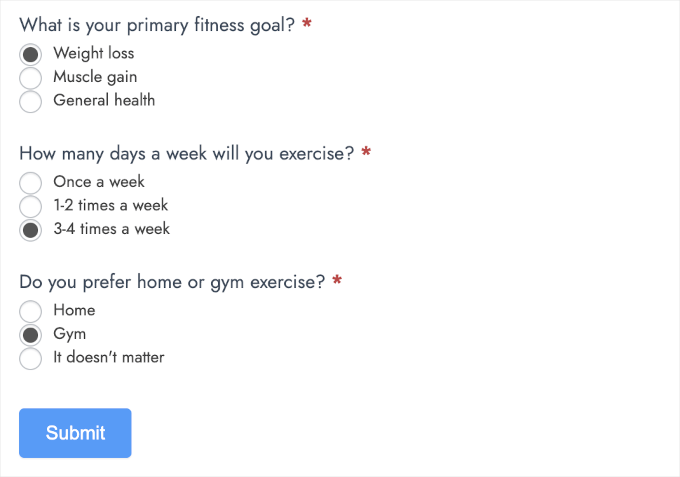
As we can see in the screenshot, the ‘Do you prefer home or gym exercise’ option appears for users who choose ‘3-4 times a week.’
Now, let’s see how the fields change when users choose the ‘Muscle gain’ option.
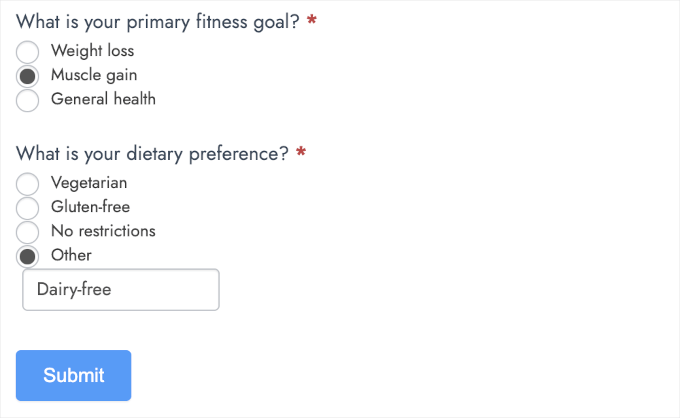
Congratulations! You have now learned how to create a conditional logic chained quiz.
Redirect Users to the Personalized Fitness Plan Page After Form Submission
Now, users will expect to get the personalized fitness plan after they submit the form. The easiest way to do this is to redirect users to the respective personalized fitness plan page.
First, let’s create the fitness plan pages. You can go to Pages » Add New Page from your WordPress dashboard.
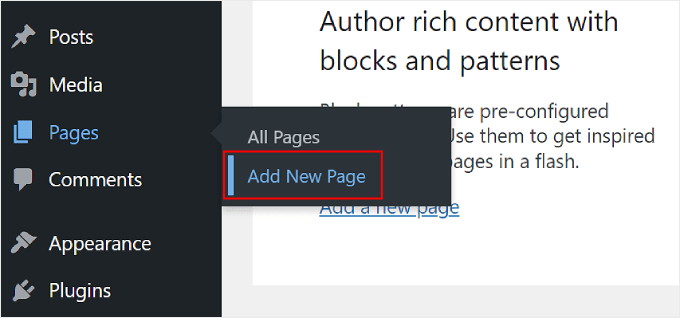
In the content editor, you can start creating the personalized fitness plan for all the possible combinations for your conditional logic form. For this tutorial, we’ll show you how to redirect users who choose:
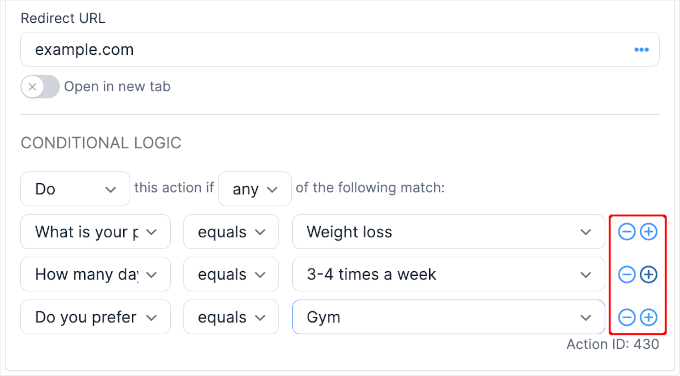
- ‘Weight loss’ for the ‘What is your primary fitness goal?’ question.
- ‘3-4 times a week’ for the ‘How many days a week will you exercise?’ question.
- ‘Gym’ for the ‘Do you prefer home or gym exercise?’ question.
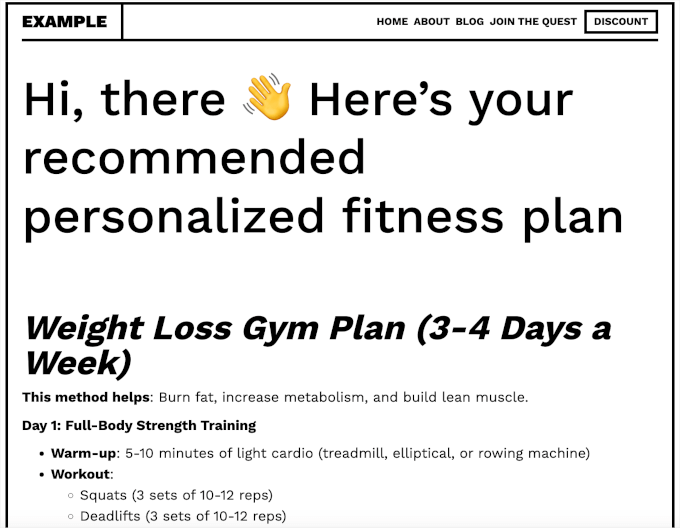
Here’s what our draft looks like:
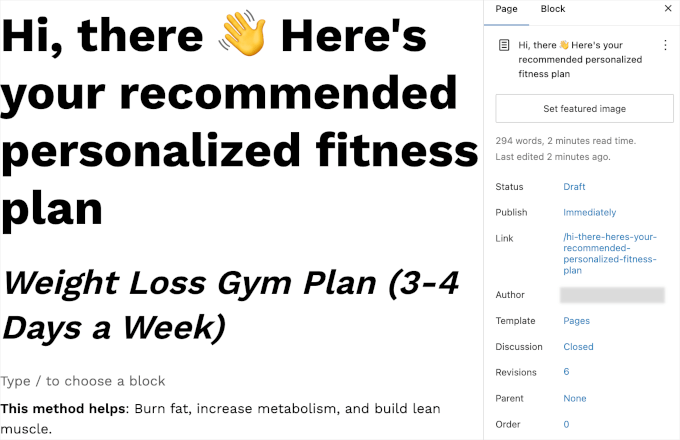
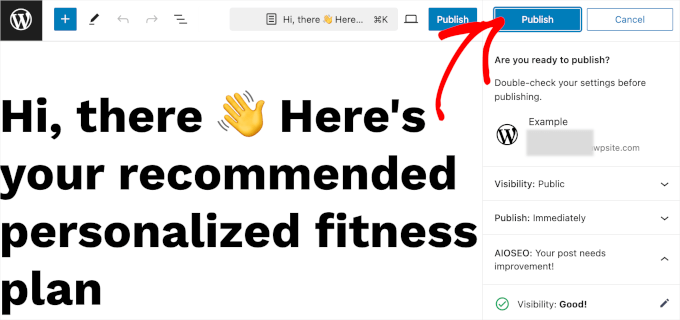
Once you’re done, you can hit the ‘Publish’ button and once again on the confirmation panel.
Then, you can click the ‘View Page’ link when publishing is done. Do note that you’ll want to keep this in a new tab because you’ll need the page’s URL later.
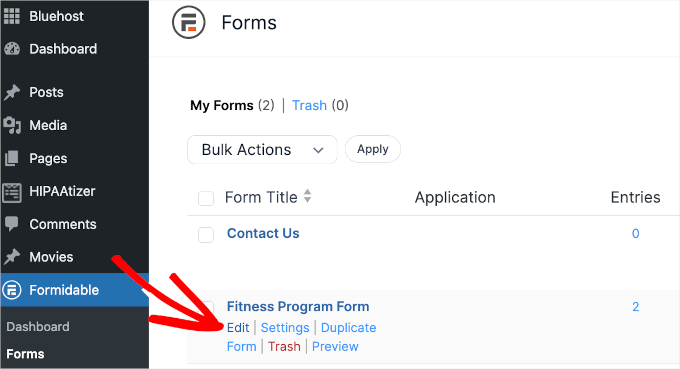
Now, let’s go back to your Formidable Forms fitness plan form.
You can navigate to Formidable Forms » Forms. Then, you’ll want to hover over the fitness plan form you just created and click ‘Edit.’
Once in the form builder, you can switch to the ‘Settings’ tab.
Then, let’s navigate to Actions & Notifications » Confirmation.
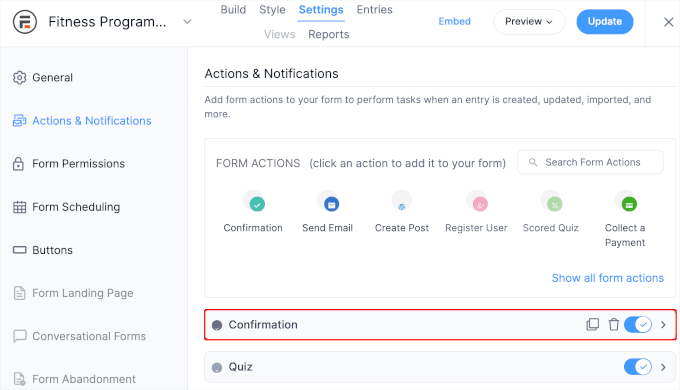
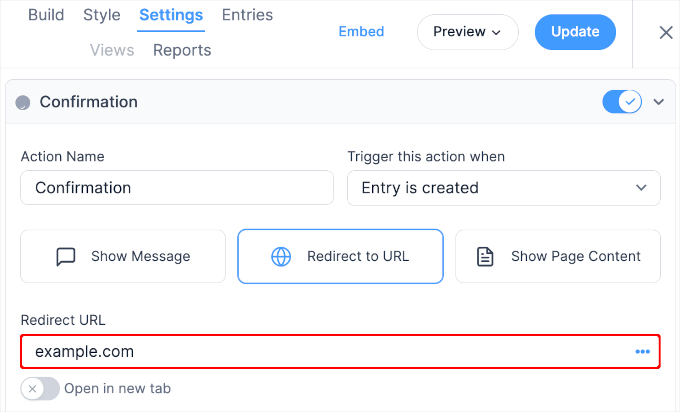
In the ‘Confirmation’ section, you’ll want to change the confirmation type to ‘Redirect to URL.’
This will open a ‘Redirect URL’ text field, so go ahead and enter the page’s link to the fitness plan you just created.
There’s also an action setting to open the page in a new tab. You can toggle the switch to enable the setting, but we’ll keep it inactive.
The next step is to add conditional logic for this redirect.
To do this, you’ll need to click the ‘Conditional Logic’ link and set up the rules. To add more conditions, you can click the ‘+’ button to the right of the dropdown fields,
You can now click ‘Update’ to save your changes.
Now, you might want to make a test submission to see if the conditional logic works. On our test website, we tried to fill out the form using the rules we set for this redirect.
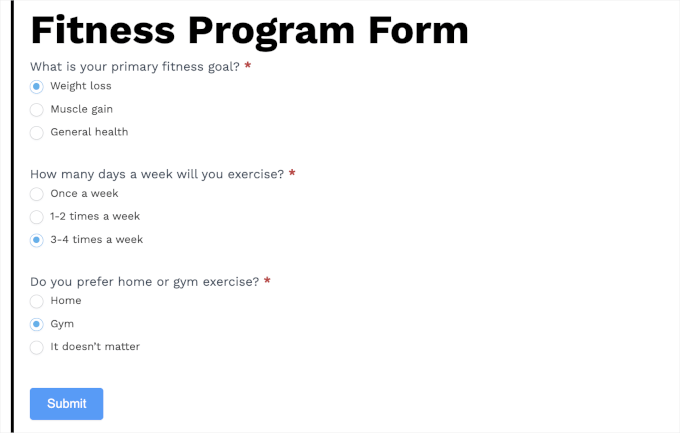
And there we have it!
We’re successfully redirected to the respective page:
We hope this article has showed you some conditional logic use cases for WordPress forms. Next, you might want to look at our tips to create more interactive forms and how to customize your forms in WordPress.
If you liked this article, then please subscribe to our YouTube Channel for WordPress video tutorials. You can also find us on Twitter and Facebook.
The post 6 Ways to Use Conditional Logic in WordPress Forms (Top Use Cases) first appeared on WPBeginner.
Dr Crash says:
