Do you want to connect your WordPress site with ActiveCampaign?
ActiveCampaign is a popular email marketing service that allows you to send marketing emails from your WordPress website. It helps you capture leads and boost conversions.
In this article, we will show you how to easily connect your WordPress site with ActiveCampaign using multiple methods.

Why Connect Your WordPress Site With ActiveCampaign?
ActiveCampaign is a well-known email marketing and automation tool that lets you create automated workflows, forms, landing pages, CRMs, and email lists easily.
By connecting this tool with your WordPress site, you can collect email addresses from customers, create and trigger automated email sequences, send newsletters, and also track visitor data right from your dashboard.
Plus, you can manage your email marketing campaign from a single platform. This can ultimately lead to more conversions and sales for your business.
Having said that, let’s see how to easily connect your WordPress site with ActiveCampaign. Here is a quick overview of the topics we will cover in this guide:
- Getting Started With ActiveCampaign
- Connect ActiveCampaign to WordPress Using WPForms
- Connect ActiveCampaign to WordPress Using OptinMonster
- Connect ActiveCampaign to WordPress Using Formidable Forms
- Connect ActiveCampaign to WordPress Using MemberPress
- Connect ActiveCampaign to WordPress Using Free Plugin
- Bonus: Use an ActiveCampaign Alternative
Getting Started With ActiveCampaign
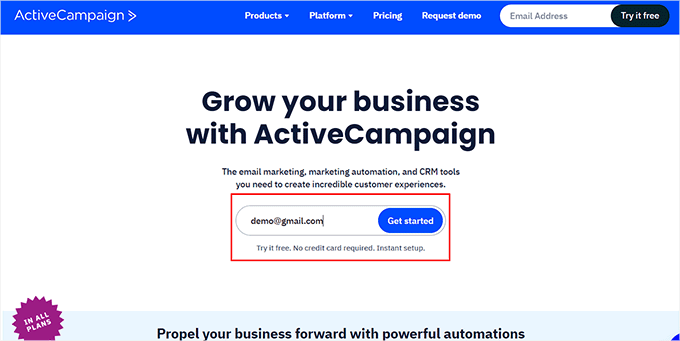
To get started, first, you will need to visit the ActiveCampaign website.
Once you are there, simply type in your email address and click the ‘Get Started’ button. This will take you to a new screen, where you must provide some details about your business to set up an account.
Once that’s done, you will be taken to your ActiveCampaign dashboard, where you need to switch to the ‘Settings’ tab from the left column.
This will open a new panel on the left, where you must choose the ‘Developer’ option to open some new settings. From here, simply copy the URL and Key values under the ‘API Access’ section and paste them into a plain text editor.
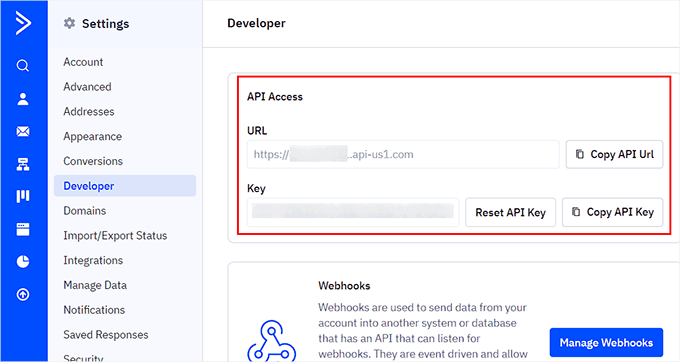
You will need these details later to connect ActiveCampaign with WordPress.
In this beginner’s guide, we will show you different methods so you can choose one that best suits your needs. The first three methods can also be used to connect ActiveCampaign with WooCommerce as well.
Method 1: Connect ActiveCampaign to WordPress Using WPForms
WPForms is the best WordPress form builder on the market. It allows you to easily create any type of form, including newsletter subscription forms, using a simple drag-and-drop tool.
If you connect the forms created with this plugin with ActiveCampaign, then all the customer information will automatically be stored in your chosen list in the ActiveCampaign dashboard.
First, you need to install and activate WPForms. For more details, see our step-by-step guide on how to install a WordPress plugin.
Note: WPForms has a free plan. However, you will need the Elite plan to access the ActiveCampaign addon.
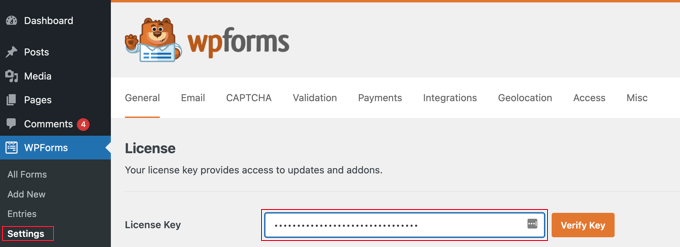
Upon activation, visit the WPForms » Settings page from the WordPress dashboard to enter your license key. You can find this information in your account on the WPForms website.
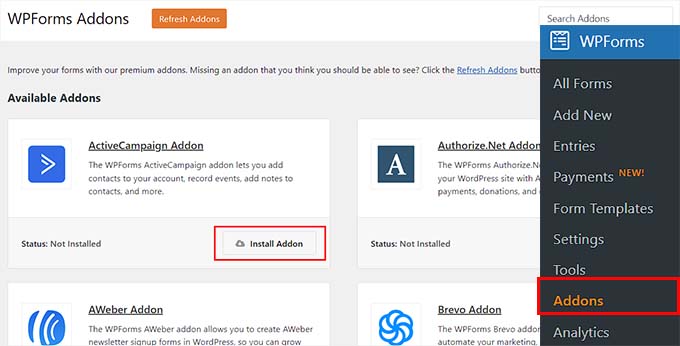
After that, head over to the WPForms » Addons page from the WordPress admin sidebar and locate the ActiveCampaign addon.
Once you do that, simply click the ‘Install Addon’ button to download and activate it on your website. You can now easily create forms and connect them to your ActiveCampaign account.
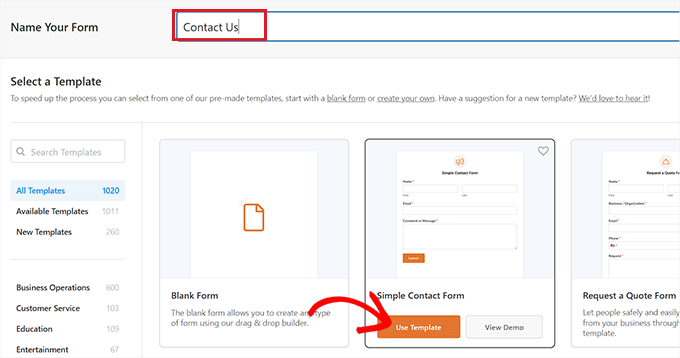
To do this, visit the WPForms » Add New page from the WordPress dashboard and click the ‘Use Template’ button under any of the premade templates.
For this tutorial, we will be creating a simple contact form.
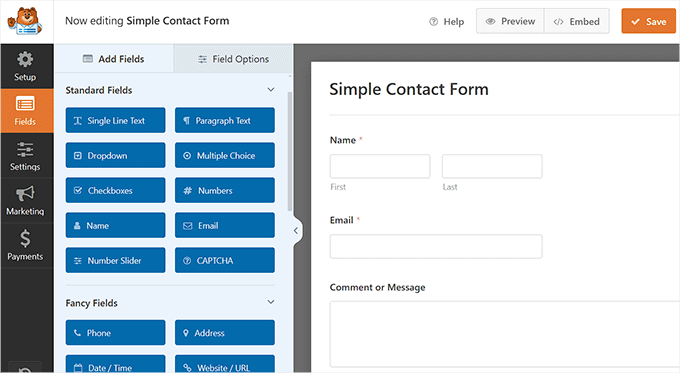
This will launch the WPForms drag-and-drop builder, where you will notice form fields in the left column with a form preview on the right.
From here, you can move or edit any existing fields by simply clicking on them. For detailed instructions, see our tutorial on how to create a contact form in WordPress.
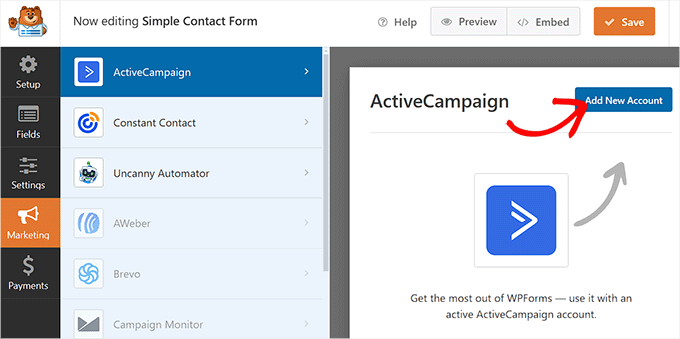
Once you have created a form, switch to the Marketing » ActiveCampaign tab from the left side of the screen.
Here, you must click the ‘Add New Account’ button.
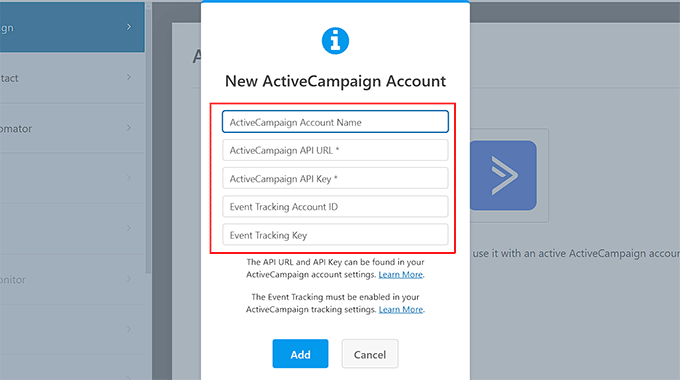
This will open a new prompt, where you must provide your ActiveCampaign account name, API key, and URL to connect it with WordPress.
Go ahead and paste the details that you copied earlier and click the ‘Add’ button.
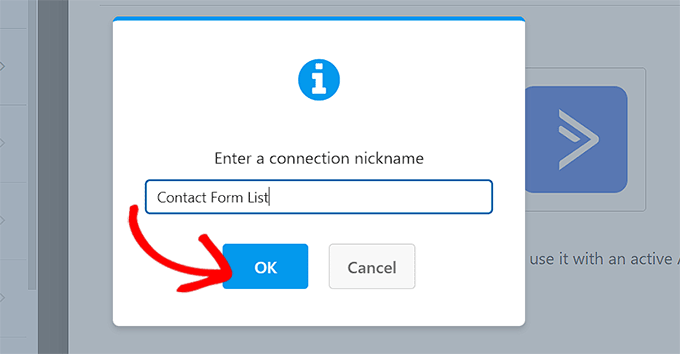
You will now be asked to add a name for the connection. This can be anything you like because it is only used to identify the connection internally.
Simply type a name and click the ‘OK’ button.
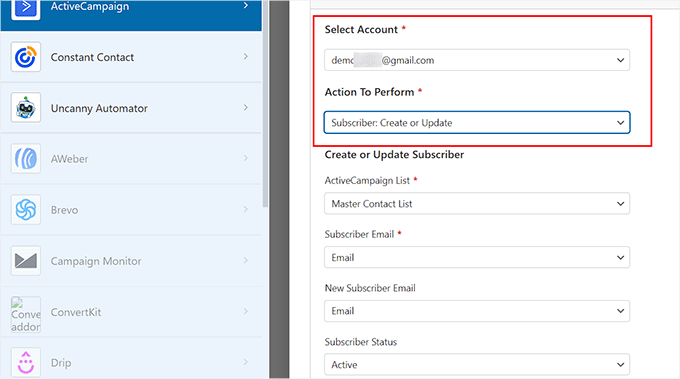
Once you do that, some new settings will open up in the form builder. Here, you can start by selecting your ActiveCampaign account from the ‘Select Account’ dropdown menu.
After that, you must choose the action that you want ActiveCampaign to take when a user submits this form. For example, if you want every user who fills in this form to become a subscriber, then you can select that option.
Next, pick the ActiveCampaign list where the data will be stored and the default subscriber status for every user.
Next, click the ‘Save’ button at the top to store your settings.
You now need to go ahead and open the page or post where you want to add this form from the WordPress admin sidebar. Here, click the ‘Add Block’ (+) button to open the block menu and add the WPForms block.
Once you do that, select the contact form that you created from the dropdown menu within the block itself.
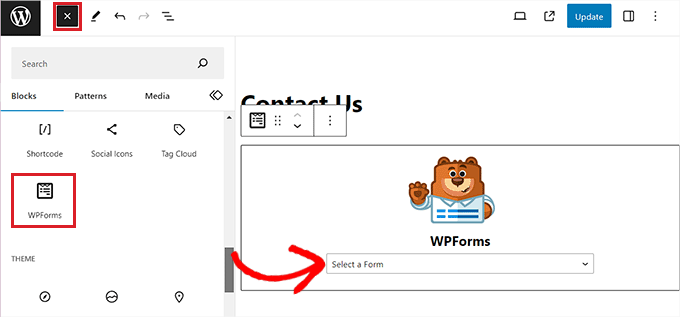
After that, click the ‘Update’ or ‘Publish’ button at the top to store your settings.
Finally, simply visit your WordPress website to view the contact form connected to your ActiveCampaign account.

Method 2: Connect ActiveCampaign to WordPress Using OptinMonster
Static newsletter sign-up forms are also great for building your email list. However, some visitors will turn a blind eye to the forms sitting in your blog’s sidebar or the footer area, which results in lower conversion rates.
This is where OptinMonster comes in. It is the best lead generation and conversion optimization tool on the market that allows you to convert website visitors into subscribers and paying customers.
It includes beautiful popups, sticky header and footer bars, fullscreen popups, slide-in forms, countdown timers, and more. Plus, it comes with a built-in ActiveCampaign integration.
First, you’ll need to sign up for an OptinMonster account.
Next, you must install and activate the free OptinMonster plugin. For more details, see our beginner’s guide on how to install a WordPress plugin.
This plugin acts as a connector between your WordPress website and your OptinMonster account.
Upon activation, a setup wizard will open up on your WordPress admin panel. Here, simply click the ‘Connect Your Existing Account’ button.
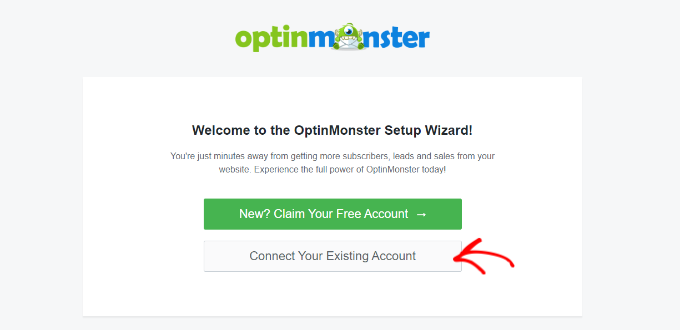
This will open a new window on your screen.
Now, go ahead and click the ‘Connect to WordPress’ button to move forward.

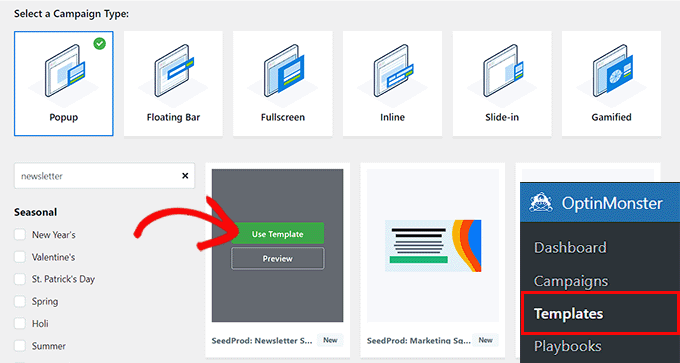
Once you have connected the software with WordPress, visit the OptinMonster » Templates page from the admin dashboard.
Here, you can click the ‘Use Template’ button under any template of your choice for popups, floating bars, slide-ins, and more.
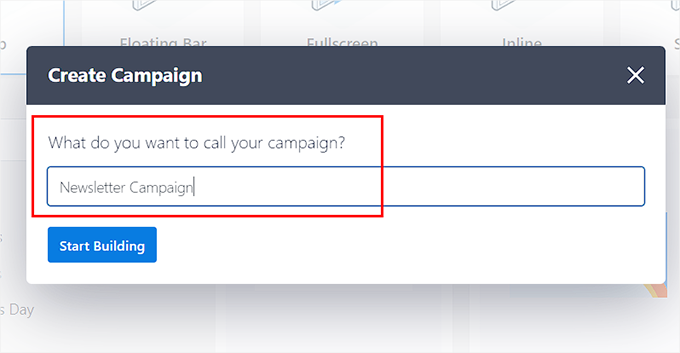
Upon doing that, a prompt will open up on your screen asking you to type a name for the campaign that you are creating.
Simply add a name and click the ‘Start Building’ button.
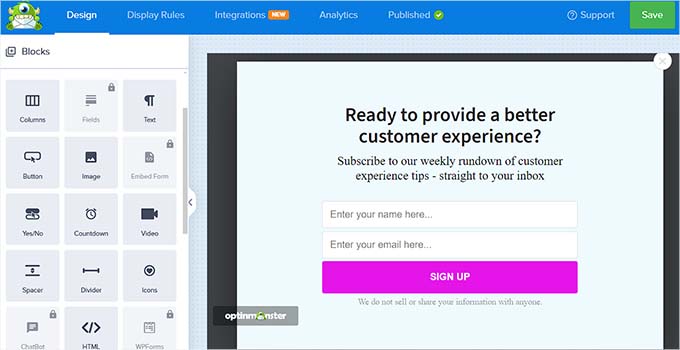
Now, OptinMonster’s drag-and-drop builder will be launched on the screen, where you will notice a popup preview on the right with block elements in the left column.
Here, you can click on any item to edit it or add new blocks from the sidebar. For more information, you may want to see our tutorial on how to create an email newsletter the right way.
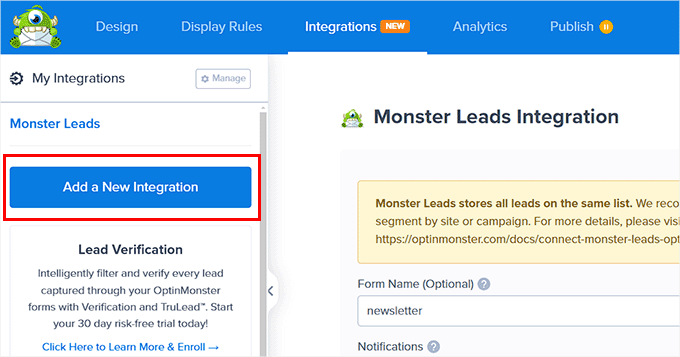
Once you have designed the popup according to your liking, simply switch to the ‘Integrations’ tab from the top.
Here, click the ‘Add a New Integration’ button in the left column.
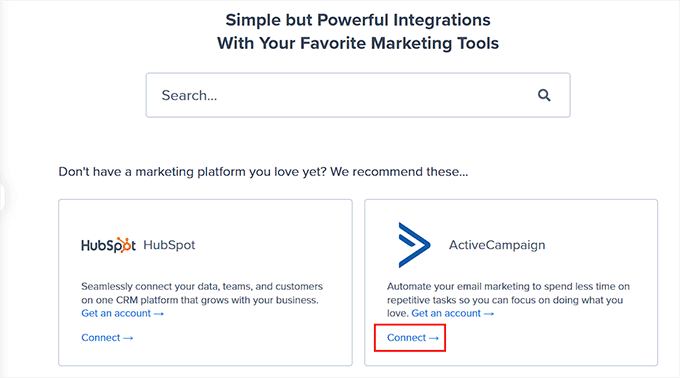
This will open a list of all the tools that are available for integration with OptinMonster.
From here, you must click the ‘Connect’ link under the ActiveCampaign section.
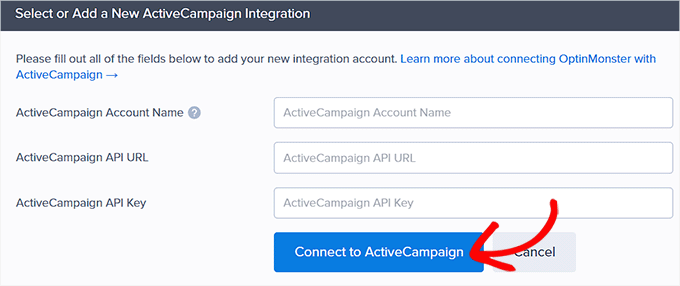
This will open some new settings on the screen, where you must add your ActiveCampaign account name, API key, and URL.
Once you do that, click the ‘Connect to ActiveCampaign’ button.
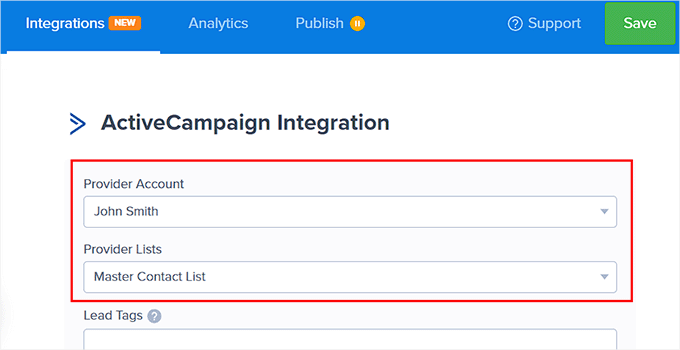
Once the tool has been connected, simply choose your ActiveCampaign list from the ‘Provider Lists’ dropdown menu.
This will be the list where all the customer data collected with the OptinMonster popup will be stored in your dashboard.
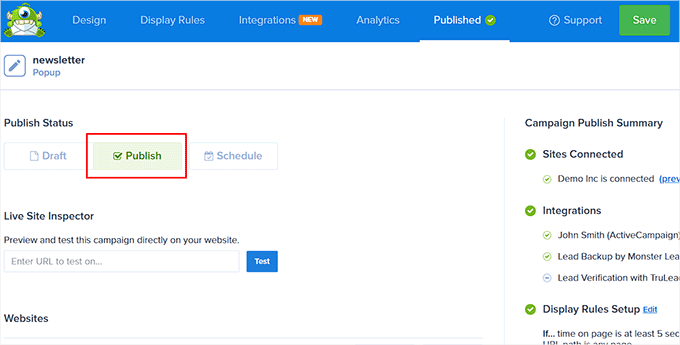
After that, switch to the ‘Publish’ tab from the top and change the popup status to ‘Publish’.
Finally, click the ‘Save’ button to store your settings.
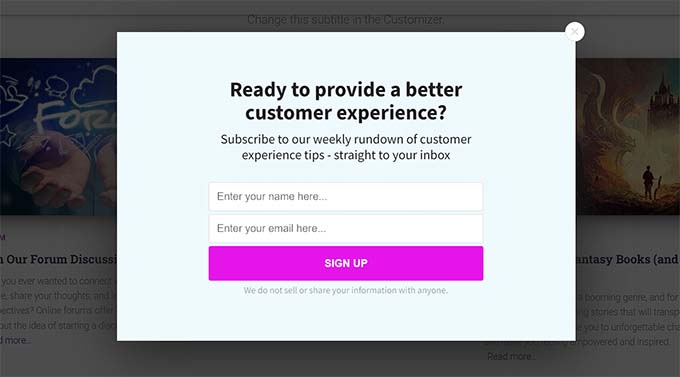
Now, visit your WordPress blog or website to see the OptinMonster newsletter popup in action.
Here is how it looked on our demo website.
Method 3: Connect ActiveCampaign to WordPress Using Formidable Forms
Formidable Forms is the most advanced WordPress form builder that allows you to create complex forms without writing a single line of code.
For instance, you can use Formidable Forms to create directory forms, listing forms, calculators, and more. It also comes with the ActiveCampaign addon, which allows you to easily connect your forms to your ActiveCampaign account.
First, you need to install and activate the Formidable Forms plugin. For more information, see our tutorial on how to install a WordPress plugin.
Note: You will need the Formidable Forms Elite plan to unlock the ActiveCampaign addon. Also, you must install the free plugin first because it acts as a base plugin.
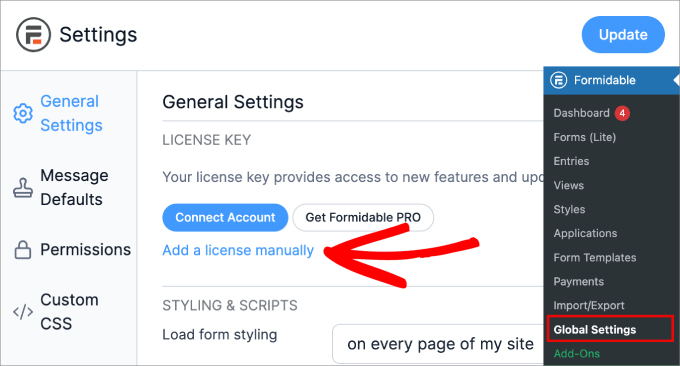
Upon activation, visit the Formidable » Global Settings page from the WordPress dashboard and click the ‘Add a license manually’ link.
This will open a new field, where you must enter your plugin’s license key. You can get this information from your account on the Formidable Forms website.
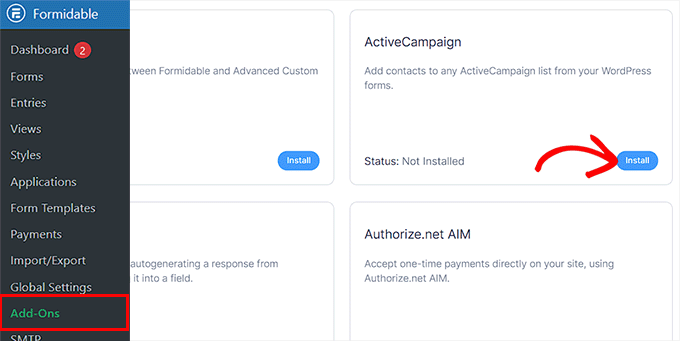
Next, head over to the Formidable » Addons page from the WordPress admin sidebar
Here, find the ‘ActiveCampaign’ addon and click the ‘Install’ button under it.
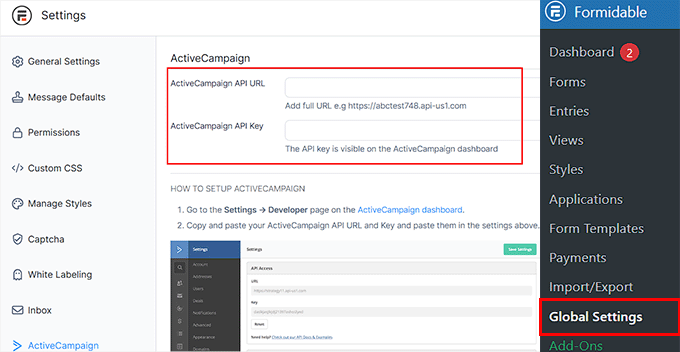
Once that’s done, visit the Formidable » Global Settings page again and switch to the ‘ActiveCampaign’ tab.
You must add the API URL and API key for your ActiveCampaign account. After that, click the ‘Update’ button.
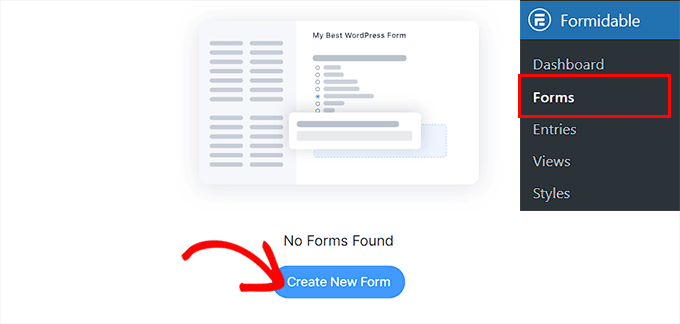
You are now ready to create a form that will capture emails for your ActiveCampaign list. To do this, head over to the Formidable » Forms page from the WordPress dashboard.
Here, click the ‘Create New Form’ button.
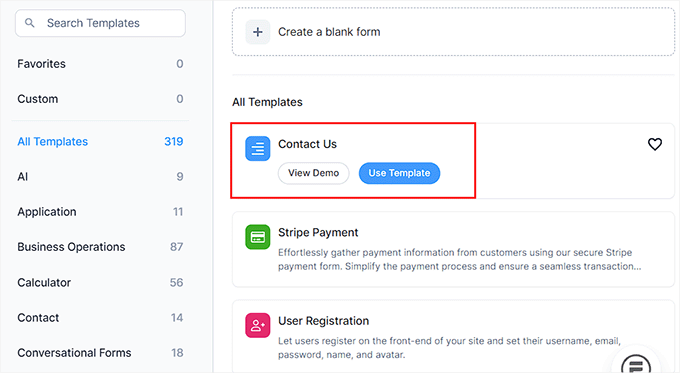
This will open a new screen, where you can click the ‘Use Template’ button under any of the premade templates offered by Formidable Forms.
For this tutorial, we will be creating a simple contact form.
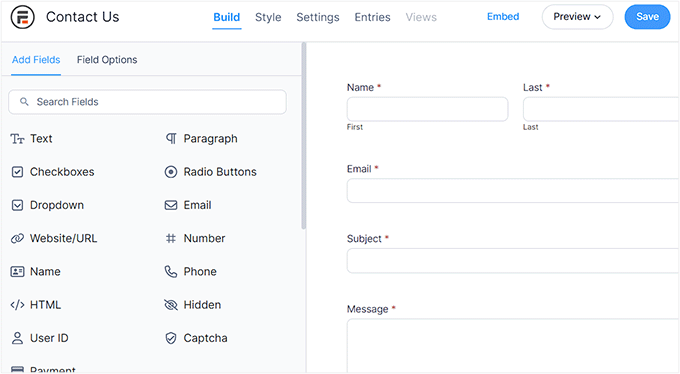
The form builder will now be launched on the screen, where you will see a form preview on the right with form fields in the left column.
Here, you can edit your form, add or remove form fields, and rearrange them according to your liking.
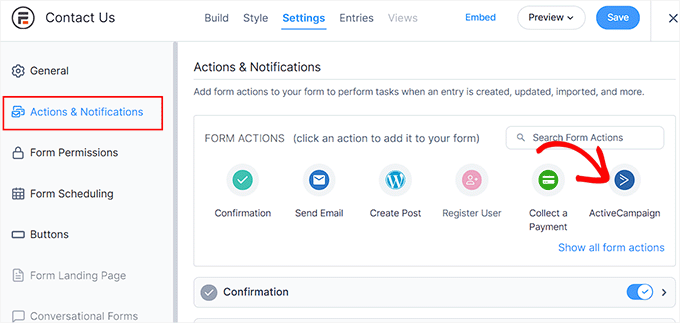
Once you are happy, switch to the ‘Settings’ tab from the top and then select the ‘Actions and Notifications’ option from the left.
This will open a list of form actions on the screen, where you must choose ActiveCampaign.
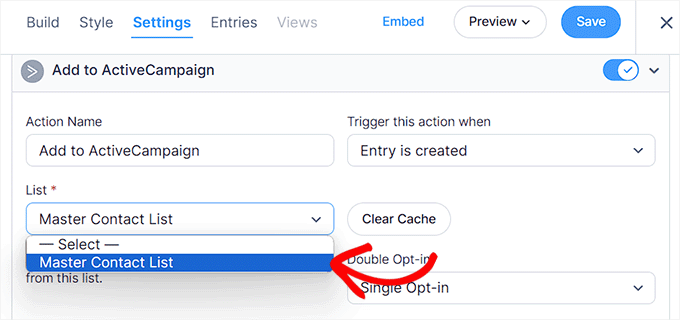
Upon doing that, some new settings will open up for you.
From here, select your ActiveCampaign list from the ‘List’ dropdown menu. This will be where the user data collected by the forms will be stored in ActiveCampaign.
Finally, click the ‘Save’ button at the top to store your settings.
Next, visit the WordPress page or post where you want to add the form and click the ‘Add Block’ (+) button.
This will open the block menu, where you must add the Formidable Forms block. Then, select the form you just created from the dropdown menu within the block itself.
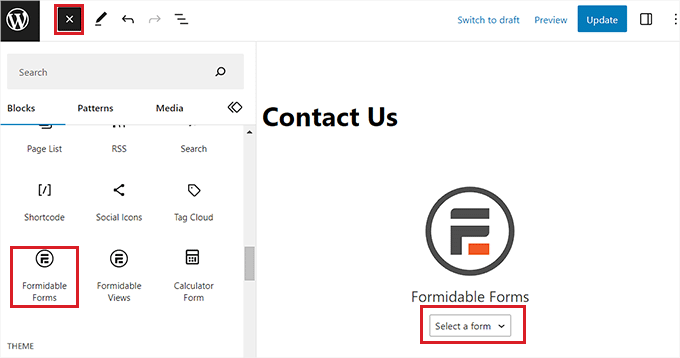
Finally, click the ‘Update’ or ‘Publish’ button to store your settings.
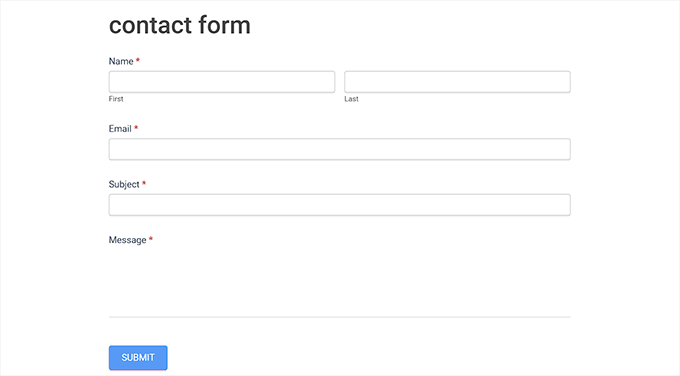
You can now go to your WordPress site to view the form connected with ActiveCampaign.
Method 4: Connect ActiveCampaign to WordPress Using MemberPress
MemberPress is the best WordPress membership plugin. It allows you to easily sell subscriptions, create online courses, and build online communities.
MemberPress also comes with an ActiveCampaign Addon that lets you send emails to customers and segment your members into groups and more.
First, you need to install and activate the MemberPress plugin. For more details, see our guide on how to install a WordPress plugin.
Note: MemberPress has a free plan, but you will need the pro version to unlock the ActiveCampaign addon.
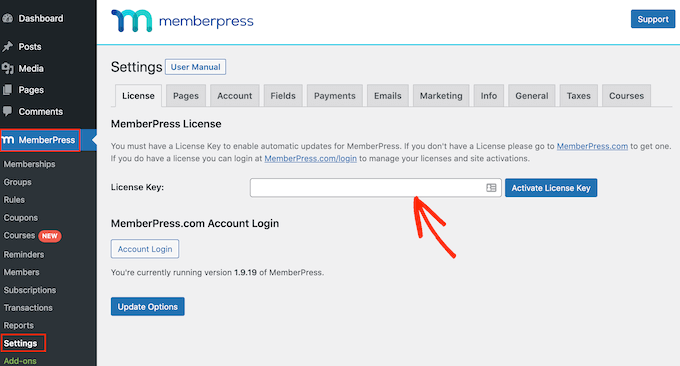
Upon activation, visit the MemberPress » Settings page from the WordPress dashboard and add your license key. After that, click the ‘Activate License Key’ button.
You can get this information from your account on the MemberPress website.
Next, you will have to create a membership program with the plugin. For more details on this, you can see our beginner’s guide on how to create a membership website in WordPress.
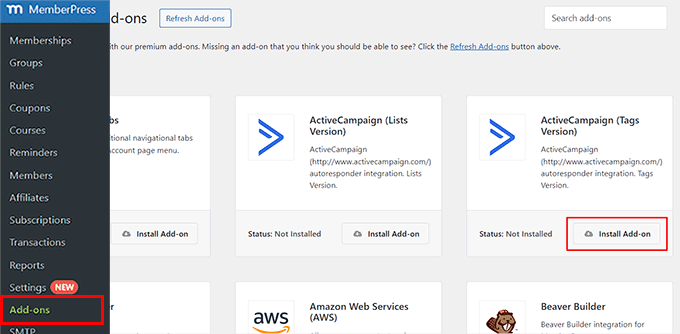
Once you have done that, head over to the MemberPress » Addons page from the WordPress admin sidebar. Here, you will notice the ActiveCampaign Lists and ActiveCampaign Tags addons.
They both work similarly, but the Tags version allows you to segment membership groups and create more effective email funnels. Go ahead and click the ‘Install Addon’ button under it.
Upon addon activation, visit the MemberPress » Settings page from the WordPress dashboard and switch to the ‘Marketing’ tab.
Once you are there, check the ‘Enable ActiveCampaign’ option. This will open some new settings on the page, where you must enter your ActiveCampaign account ID and API key.
Keep in mind that you must write all the numbers that are a part of your API URL as the account ID. MemberPress will then attempt to connect to your ActiveCampaign account, and you will be able to select your email list in the options below.
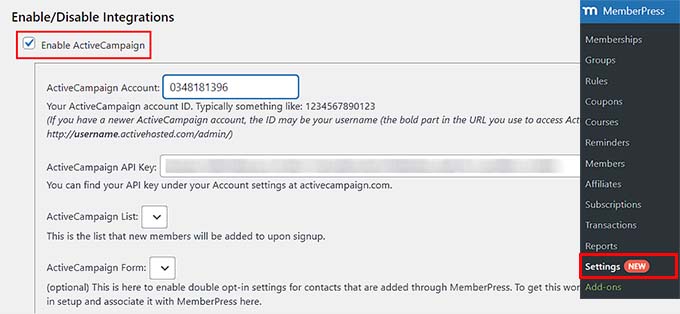
Finally, click on the ‘Update Options’ button to store your settings.
Your MemberPress users will now be subscribed to your ActiveCampaign email list.
Method 5: Connect ActiveCampaign to WordPress Using Free Plugin
For this method, we will be using ActiveCampaign’s own free plugin. This method is easier but doesn’t give you the flexibility of other methods on this list.
First, you need to install and activate the ActiveCampaign plugin. For more details, see our step-by-step guide on how to install a WordPress plugin.
Upon activation, head over to the Settings » ActiveCampaign page from the WordPress admin sidebar and simply enter your API key and URL into the fields.
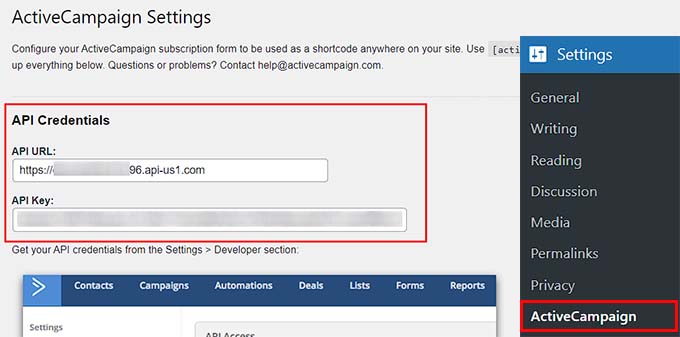
After that, click on the ‘Connect’ button to continue.
The plugin will now connect your WordPress site to your ActiveCampaign account. Once that is done, you must click the ‘ActiveCampaign > Forms’ link.
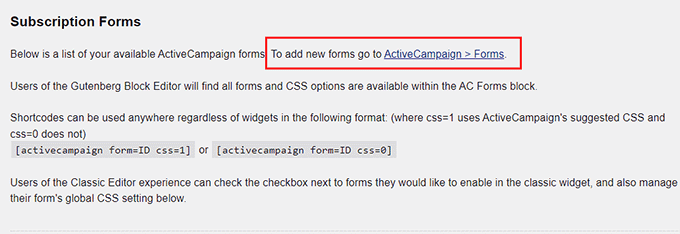
This will open your ActiveCampaign dashboard in a new tab, where you must click the ‘Create New Form’ button.
A prompt will now open up on the screen asking you to add a name and choose a style and action for your form. Once you have done this, you can click the ‘Create’ button.
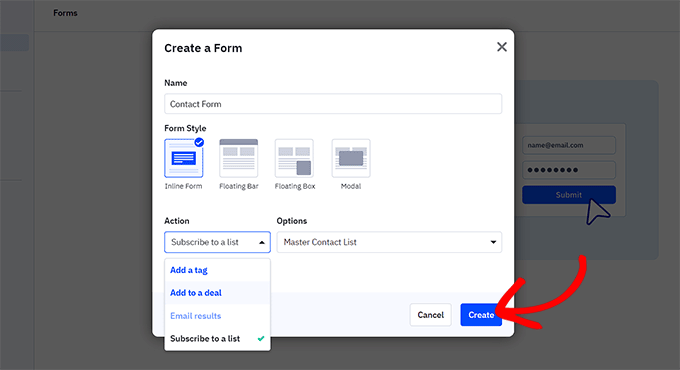
ActiveCampaign’s form builder will now be launched, where you will see a form preview on the left with form fields on the right.
Go ahead and design the form according to your liking. Once you are done, click the ‘Integrate’ button at the top.
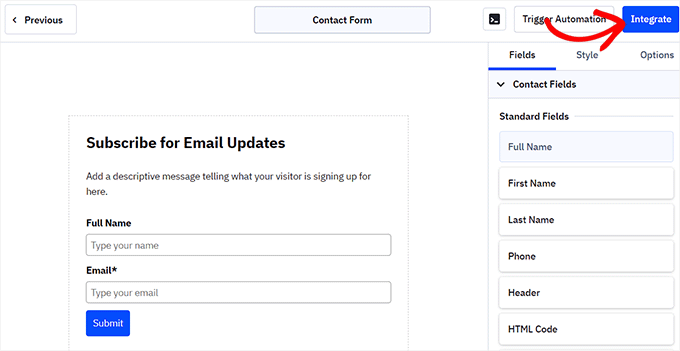
This will direct you to a new screen, where you must click the ‘Save and Exit’ button.
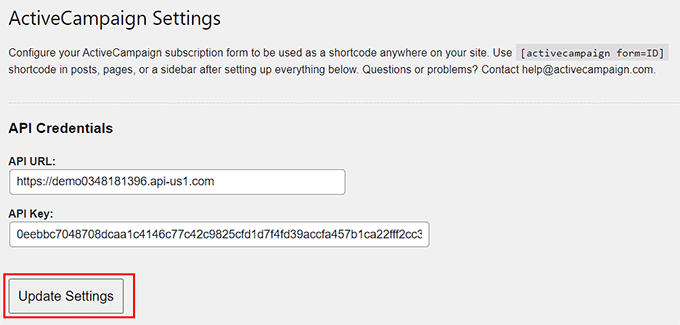
After that, head back to your WordPress dashboard and click the ‘Update Settings’ button on the ‘ActiveCampaign Settings’ page.
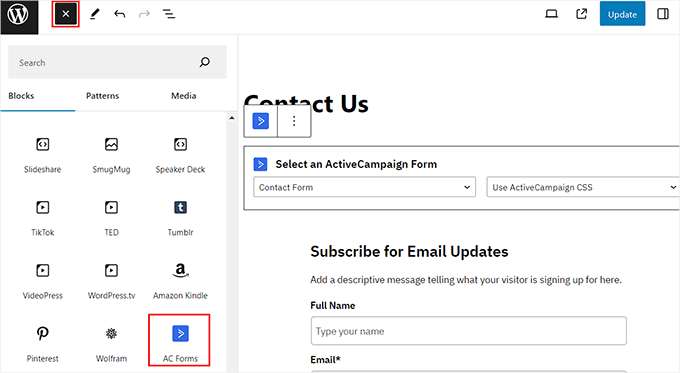
Next, open up a page or post where you want to add the form and click the ‘Add Block’ (+) button.
Once the block menu opens up, you must add the AC Forms block to the page. After that, simply choose the form that you created from the dropdown menu within the block itself.
Finally, click the ‘Update’ or ‘Publish’ button at the top to store your settings.
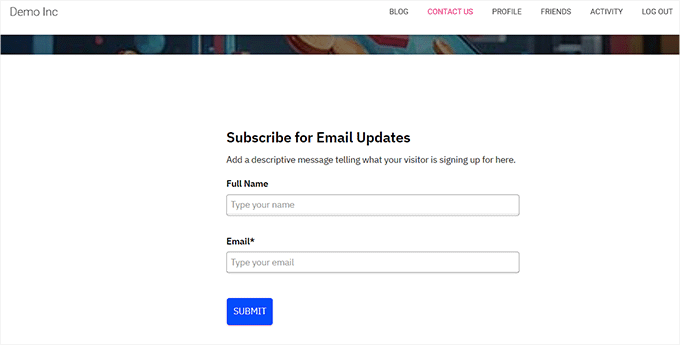
You can now your WordPress site to view the ActiveCampaign form in action.
Bonus: Use an ActiveCampaign Alternative
ActiveCampaign is a great email marketing and automation tool. However, it may not suit your needs because it can be difficult to use for beginners and can be expensive for small businesses.
In that case, there are a lot of ActiveCampaign alternatives that you can opt for instead.
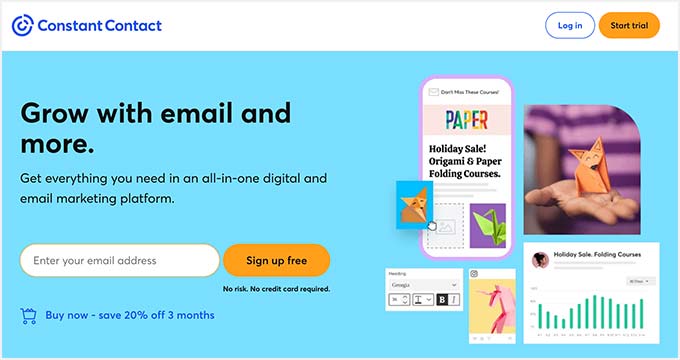
For example, if you are looking for an alternative to build an email list, then Constant Contact could be for you. It is a powerful email and SMS marketing service that comes with a drag-and-drop functionality, premade templates, event marketing, forms, and list-building tools.
For more details on this, you can see our tutorial on how to use a contact form to grow your email list in WordPress.
On the other hand, if you use ActiveCampaign to manage your online store customers, then you could start using FunnelKit Automations instead.
It is the best marketing automation service for WooCommerce stores that helps you launch email and SMS marketing campaigns and create automated workflows and drip sequences.

Alternatively, if you are looking for a more budget-friendly solution, then we recommend MailerLite. It is super affordable compared to ActiveCampaign and comes with all the features you need to create simple workflows.
Similarly, if you just want to focus on email marketing automation, then Drip is the best option. For more information, you can also see our list of the best ActiveCampaign alternatives for your WordPress site.
We hope this article helped you connect your WordPress site with ActiveCampaign. You may also want to see our guide on how to quickly grow your email list with practical tips, and our expert comparison of the best business phone services for small businesses.
If you liked this article, then please subscribe to our YouTube Channel for WordPress video tutorials. You can also find us on Twitter and Facebook.
The post How to Connect Your WordPress Site With ActiveCampaign (5 Methods) first appeared on WPBeginner.
Dr Crash says:

