Do you want to migrate your WordPress site but are not sure if everything is ready?
Website migration can be complicated as there are many things to look after. Having a checklist can help ensure that you’ve followed all the steps. This also prevents multiple errors.
In this article, we will share the ultimate website migration checklist and show the steps you need to do.
Here is a quick overview of what we will cover in this guide. You can click the links below to jump ahead to any section:
- What is Website Migration?
- How Does Migration Impact WordPress SEO?
- Plan Your Migration and Inform Your Users
- Put Your WordPress Site in Maintenance Mode
- Create a Backup of Your WordPress Website
- Perform a Website SEO Audit
- Disable Caching, Firewall, and Redirect Plugins
- Prevent Search Engines from Indexing Your New Site
- Ensure Your Domain is Pointing to the New Host
- Make Sure WordPress is Installed on Your Site
- Set Up and Test Redirects
- Make Sure the New Site is Indexable and Crawlable
- Test the Overall Functionality of Your Site
- Check for 404 Errors
- Perform a Speed Test to See the Performance
- Run an SEO Audit Again to Check for Errors
- Track Keyword Positions, Traffic, and Conversions
- Ensure Your Old Hosting is Closed
What is Website Migration?
You can migrate many different things on a WordPress site, including upgrading to new technology, website redesign, restructuring content, or moving to a new server or location.
There are many reasons for WordPress migration. You might want to move to a new content management system (CMS) for better performance and security. Or you’d like to switch hosting servers to scale your site and business.
For example, you’d like to migrate your site from Blogger, Shopify, Squarespace, Joomla, Gumroad, and other platforms to WordPress.
See our ultimate WordPress migration guide to learn more about moving your site from different blogging platforms.
Migration can also take place when your site is going through a redesign for a better user experience. Or you’re updating the site structure and navigation. Moving your site from HTTP to HTTPS also requires careful WordPress migration.
Another reason for migrating your WordPress site is changing your domain name. Let’s say you’re rebranding and going to use another website name. Then, you’ll need to migrate your site.
That said, let’s see how migration can affect your site’s rankings in search engine page results.
How Does Migration Impact WordPress SEO?
WordPress migration is a major change that happens on your website, and it can impact your site’s SEO (search engine optimization).
If done correctly, migration can have a positive impact. For example, switching to a faster hosting service can improve WordPress performance and help boost keyword rankings.
However, the slightest mistake can lead to multiple SEO-related errors like broken links, lost rankings, and missing content.
This is where the website migration checklist comes in handy. You can go through it step by step to ensure everything is working properly.
Let’s look at each step in the website migration checklist.
Tip: Website migration has many moving parts and it can be tricky for beginners. If you don’t want to worry about migrating a website yourself, then you can hire Seahawk. They offer a wide range of WordPress services, including website migration. Seahawk helps transfer any website to WordPress bug-free and ensure smooth functionality.
Website Migration Checklist: Preparing Your Site for Migration
Before you can start website migration, there are several factors to take into account.
Here are a few checklist items you should look into prior to moving your WordPress site.
1. Plan Your Migration and Inform Your Users
When you decide to migrate your WordPress website, it is important to plan things in advance and decide on a time to move your site.
To start, you can set objectives. For example, simply ask why you’re moving your website and if everything is ready.
Next, you’ll need to decide on a particular time to move website assets. Ideally, it should be done when the traffic is low. There will be a small outage when you migrate the site, so there is bound to be a drop in traffic.
That’s why it is best practice to avoid website migration during peak traffic times. You can use a plugin like MonsterInsights to monitor website traffic to find the best time to perform the migration.
Once you’ve settled on migration time, it is also best to inform your users. This way, your audience will know beforehand about your site being unavailable. It will help build trust and credibility.
To inform users about the migration, you can send an email, show a popup notice on the website, or send push notifications.
2. Put Your WordPress Site in Maintenance Mode
Before you start the migration, it is important to put the website in maintenance mode. This will inform visitors that your site is down temporarily and will be restored shortly.
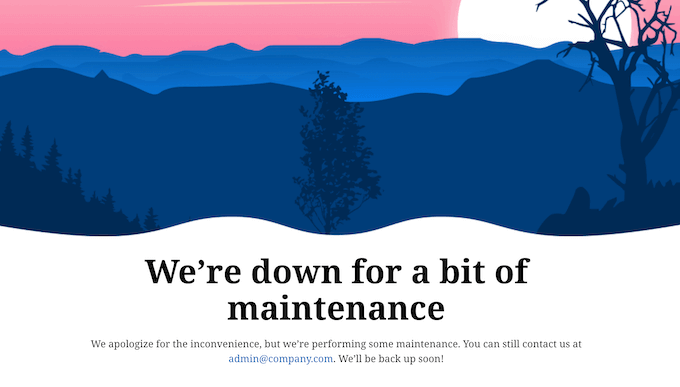
There are several ways to put your site in maintenance mode.
You can use SeedProd to create a custom maintenance mode page and enable it on your site when you’re ready for migration.
SeedProd is the best WordPress theme and landing page builder. It offers pre-built templates and comes with a drag-and-drop builder. Plus, there are several customization options to edit the maintenance mode.
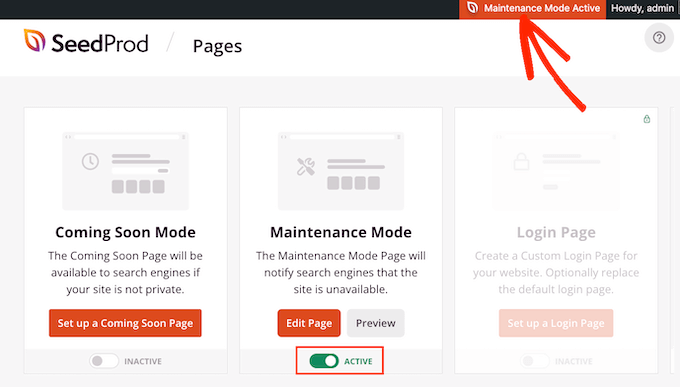
To learn more, please see our guide on how to put your WordPress site in maintenance mode.
3. Create a Backup of Your WordPress Website
Another important website migration checklist item is making a fresh backup of your site. This way, if anything goes wrong during the migration process, you’ll have an updated copy of your website.
WordPress backups will protect your critical data and help restore the site in case there is a failure during migration.
There are several ways to create a backup of your site. The easiest way is by using a plugin like Duplicator. It is the best WordPress backup plugin and is very easy to use. Simply create a new package, select the storage location, and choose files to backup.
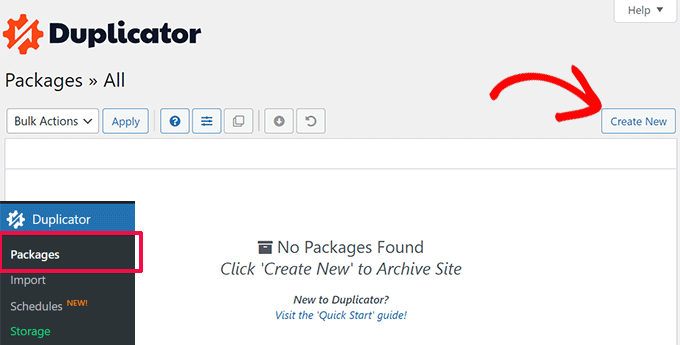
You can also create backups manually by using the cPanel in your WordPress hosting, backup databases, or using an FTP client to access site files.
Please follow our guide on how to backup your WordPress site to learn all the ways.
4. Perform a Website SEO Audit
Next, you should check the website’s SEO health before migration. This will help reveal any issues that may arise during the migration process.
For example, an audit can reveal issues like your pages are missing SEO titles or if there are images without alt attributes. These errors can hurt your SEO when the website is migrated.
You can perform an SEO audit inside your WordPress dashboard by using the All in One SEO (AIOSEO) plugin. It is the best WordPress SEO plugin that helps conduct a complete SEO audit and shows critical issues that need to be resolved.
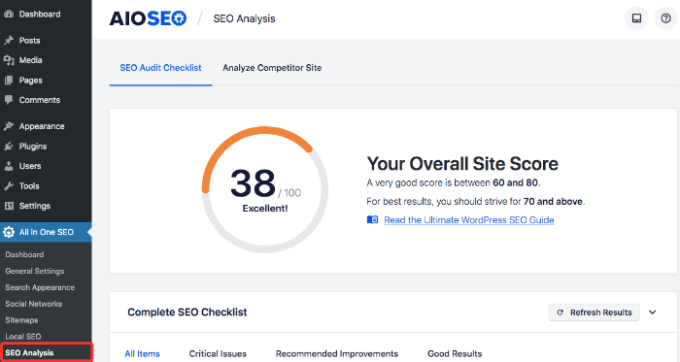
As an alternative, you can also use the WPBeginner SEO Analyzer tool. It is 100% free to use and helps find critical errors on your site.
You may also want to see our guide on the WordPress SEO audit checklist to boost rankings.
5. Disable Caching, Firewall, and Redirect Plugins
Another important step in the migration checklist is to disable any caching, firewall, and redirection plugins. These plugins and tools can cause issues during the migration process.
For instance, you may see 403 Forbidden errors or 500 Internal Server errors if these tools are not disabled. Similarly, a firewall plugin can cause errors by blocking requests made during the migration process for site files.
In WordPress, you can head to Plugins » Installed Plugins and then simply click the ‘Deactivate’ option under these plugins.
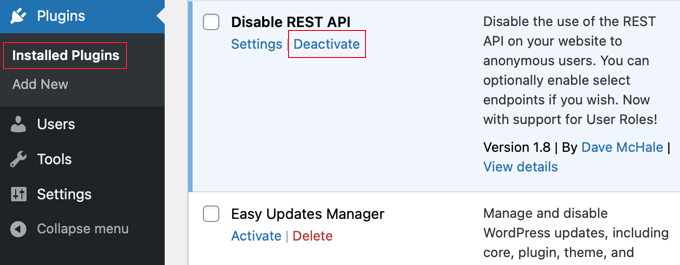
To learn more, please see our guide on how to easily deactivate WordPress plugins.
6. Prevent Search Engines from Indexing Your New Site
If you are moving your site to a new domain or a new content management system (like WordPress), then you should ensure that search engines don’t index the new site before the migration.
This way, Google and other search engines won’t show both versions on the search results.
In WordPress, you can go to Settings » Reading and then uncheck the ‘Search Engine Visibility’ checkbox.

Besides that, you can also stop search engines from indexing specific pages and posts by using an SEO plugin like AIOSEO.
It offers Robots.txt settings for each content, where you can enable the ‘No Index’ option.
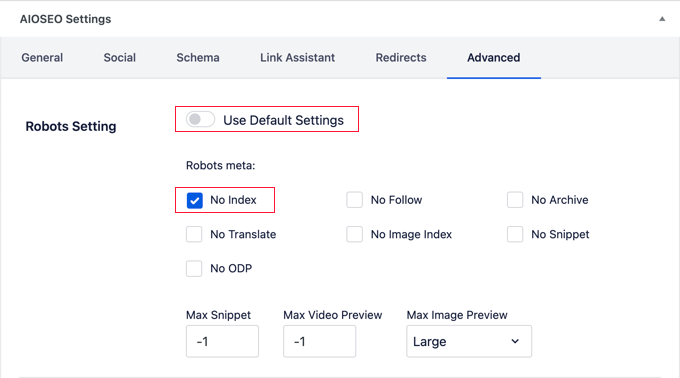
You can find all the details in our guide on how to stop search engines from crawling a WordPress site.
Website Migration Checklist: Starting the Migration Process
Now that you’ve prepared your website for migration, the next step is to start the migration process.
Here are checklist steps to follow during the migration stage.
7. Ensure Your Domain is Pointing to the New Web Host
If you are moving your website to a new web hosting service, then you’ll need to point the domain to the new host.
To do that, you will need to edit the DNS or Domain Name System records. These records help connect your domain name to the new servers that will be hosting your site.
Now, the steps for updating the DNS settings will depend on the hosting provider or domain registrar you are using.
For more details, please see our guide on how to easily change domain nameservers.
8. Make Sure WordPress is Installed on Your Site
Many WordPress hosting services will have WordPress pre-installed when you migrate a website.
However, if your hosting plan doesn’t come with WordPress, then you can easily add it.
Do note that the steps to install WordPress will depend on the hosting services you are using. You can also use auto-installers or manually install it through cPanel or an FTP client.
Please see our guide on how to install WordPress the right way for more details.
9. Set Up and Test Redirects when Migrating to New Domain
Next, you’ll need to set up redirection if you’ve switched to a new domain.
This way, when a user enters the old website URL, they’ll be redirected to the new one automatically.
A simple way of setting up 301 redirects in WordPress is by using All in One SEO (AIOSEO). It offers a powerful redirection manager that you can use to set up redirects and also perform full site redirects.
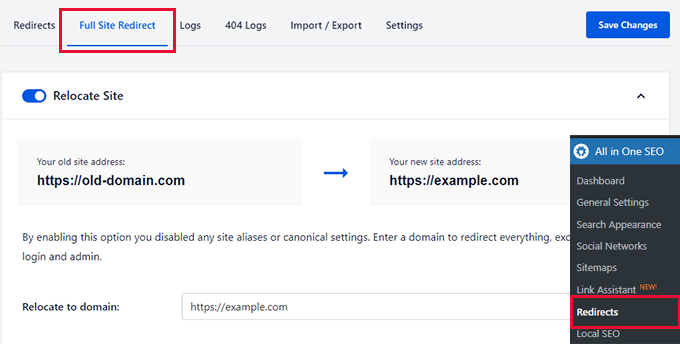
You may also want to see our guide on creating 301 redirects in WordPress.
10. Make Sure the New Site is Indexable and Crawlable
As the migration process nears an end, you should remove any blockades that can stop users and search engine crawlers from accessing your new website.
For instance, if you enabled noindex or any other option to prevent search engines from finding your new domain, then you should remove it. This way, search engines can crawl and index your site in the search results.
One way of checking if your site is being crawled is by using Google Search Console.
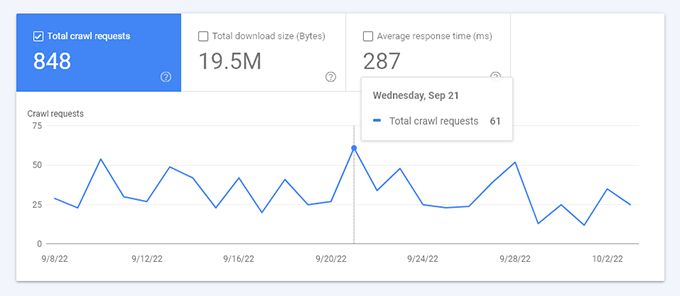
It offers a Crawl Stats report that shows crawl requests from your site. If you see a drop, then check your site’s settings that might be stopping your pages from being crawled.
Website Migration Checklist: Monitor and Test Migration
Once the website migration process is complete, you will need to monitor the changes and see their impact.
Here are some website migration checklist items to keep a lookout for after moving your website.
11. Test the Overall Functionality of Your Site
After the migration process is complete, you should ensure that everything is working properly on your site.
For instance, if you redesigned your site, then you should see if all the buttons, links, navigation menus, and other elements are functioning properly.
Besides that, you can also fill out different WordPress forms to see if all the fields are working. Similarly, try leaving a comment under blog posts to check its functionality.
If you have an online store, then try adding products to your cart, go through the checkout process, view each product page, and click the links to check everything.
12. Check for 404 Errors
One of the most common errors you will notice is the 404 error after migrating a website.
404 error occurs when a user is unable to reach a web page because it doesn’t exist. This happens when you migrate a site to a new CMS or hosting service, and the old domain no longer works.
A simple way to track 404 errors is by using the AIOSEO plugin. Its redirection manager lets you track 404 errors and quickly fix them by setting up redirection.
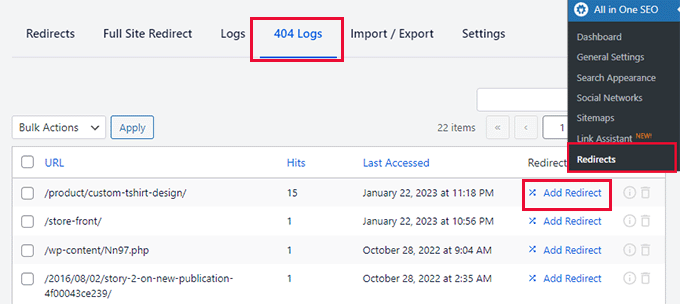
To learn more, please follow our guide on how to track 404 pages and redirect them in WordPress.
13. Perform a Speed Test to See the Performance
Next website migration checklist item to see the performance of your WordPress site. This is particularly useful if you moved to a new hosting service for faster loading sites.
For example, you should see an improvement in the speed if you’ve upgraded to the fastest hosting provider.
There are different website speed test tools you can use to get started. For instance, Google offers a free PageSpeed Insights tool to test your site’s speed.
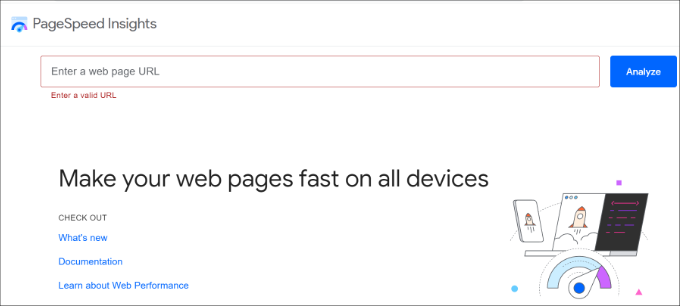
You may also want to see our ultimate guide to WordPress performance to learn more tips on speeding up your site.
14. Run an SEO Audit Again to Check for Errors
Once you’ve completed the migration process, it is a best practice to run an SEO audit of your website again.
This way, you will catch any issues that might have been raised during the migration.
For example, if there are any broken links that need fixing, your content is missing SEO titles, or there are other technical issues to look into.
15. Track Keyword Positions, Traffic, and Conversions
After moving a site to a new CMS or web hosting platform, you should check the keyword rankings, traffic, and conversions of the new site.
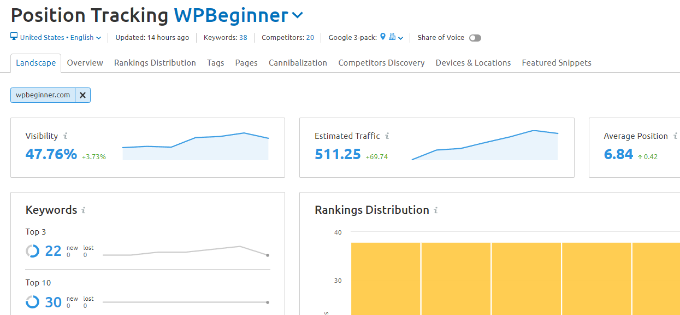
Tracking keyword positions will help you see whether there is a boost in rankings or a drop.
There are many SEO rank tracker tools in the market. For example, you can use Semrush to monitor keyword rankings. The SEO tool shows changes in position along with other important metrics.
16. Ensure Your Old Hosting is Closed
Now that the migration is complete, one final checklist item to cross off is to close the old domain hosting account. This way, Google and other search engines will know that this is the new site to index.
However, make sure to set up 301 redirects and ensure they are working before closing the old hosting account. If any redirect is not functioning properly, then you can quickly fix it.
Once you’re happy with everything, go ahead and close the old hosting account.
Your site will now be migrated, and all the content will be visible and available for users.
We hope this article helped you learn about the website migration checklist and the steps you need to do. You may also want to see our ultimate WordPress migration guide for beginners and when do you really need managed WordPress hosting.
If you liked this article, then please subscribe to our YouTube Channel for WordPress video tutorials. You can also find us on Twitter and Facebook.
The post Ultimate Website Migration Checklist: 16 Steps You Need to Do first appeared on WPBeginner.
Dr Crash says:
