
Do you want to create a custom WordPress block for your website?
While WordPress comes with a lot of basic blocks for creating content, you might need something more specific for your website.
In this article, we will show you two ways to create custom Gutenberg blocks for your WordPress site.
Why Create a Custom WordPress Block?
WordPress comes with an intuitive block editor that allows you to easily build your posts and pages by adding content and layout elements as blocks.
By default, WordPress ships with several commonly-used blocks. WordPress plugins may also add their own blocks that you can use.
However, sometimes you may want to create your own custom block to do something specific on your WordPress website because you can’t find a blocks plugin that works for you.
With custom blocks, you can add unique features and functionality to your website that may not be available in pre-built blocks. This can help automate processes or make content creation for your WordPress blog more efficient.
For example, you could create a custom block to display testimonials and then easily insert and manage that block without any coding knowledge.
Having said that, let’s see how to easily create a completely custom block in WordPress.
For this tutorial, we will be showing you two methods to create a custom block. You can use the quick links below to jump to the method of your choice:
Method 1: Create Custom Blocks for WordPress Using WPCode (Recommended)
If you are a beginner and inexperienced with coding, then this method is for you.
WPCode is the best WordPress code snippets plugin on the market that makes it super easy and safe to add custom code to your website.
It comes with the block snippets feature that allows you to easily create custom blocks for your WordPress site without writing any code.
First, you need to install and activate the WPCode plugin. For detailed instructions, you may want to see our beginner’s guide on how to install a WordPress plugin.
Note: WPCode also offers a free version that you can use to add custom code to your website. However, you will need the Pro version of the plugin to unlock the custom block snippets feature.
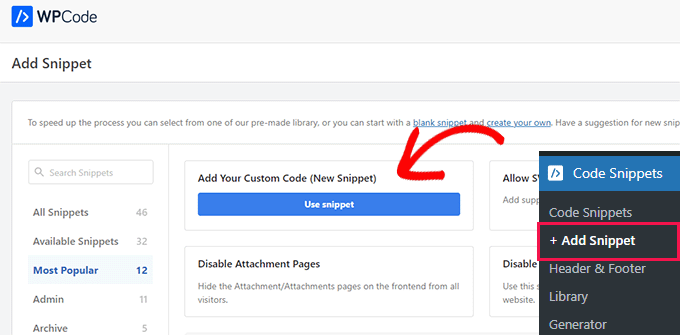
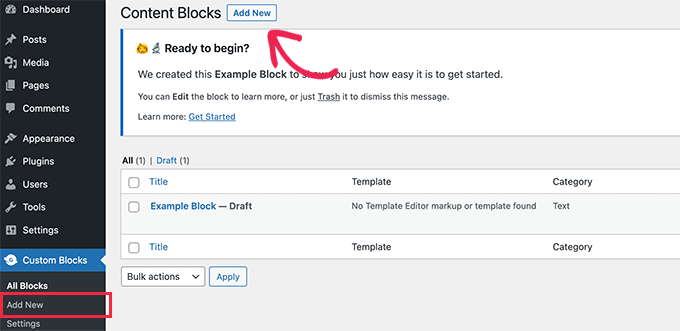
Upon activation, you need to head over to the Code Snippets » + Add Snippet page from the WordPress admin sidebar.
Once you are there, click the ‘Use Snippet’ button under the ‘Add Your Custom Code (New Snippet)’ option.
This will take you to the ‘Create Custom Snippet’ page, where you can start by typing a name for the custom block that you are about to create.
Once you have done that, just select the ‘Blocks Snippet’ option from the ‘Code Type’ dropdown menu in the right corner of the screen.
This will display the ‘Edit with Block Editor’ button in the ‘Code Preview’ box.
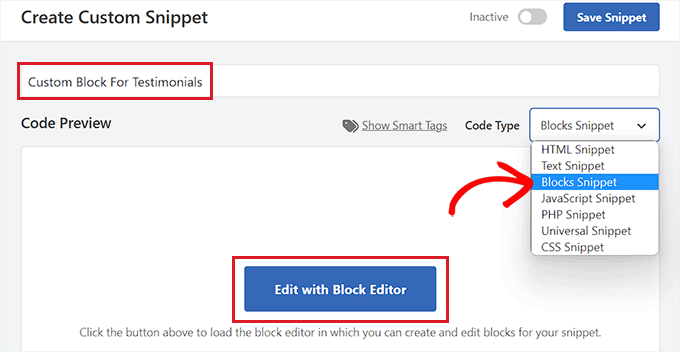
Simply click on this button to launch the block editor.
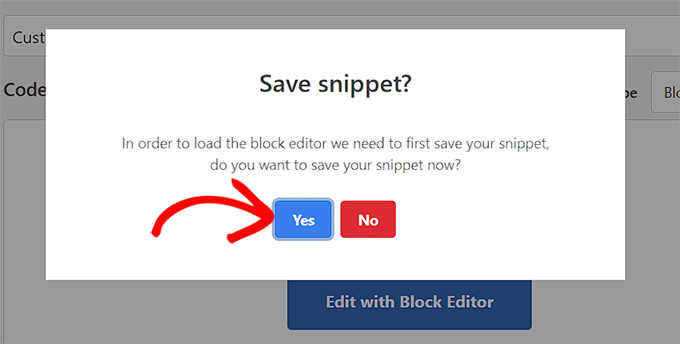
Now, a prompt will appear on your screen asking you to save the code snippet to load it in the block editor. Just click on the ‘Yes’ button to move ahead.
Now that you are in the block editor, you can easily create a custom block using the pre-made blocks available in the block menu.
For this tutorial, we will be creating a custom block for adding testimonials on your site.
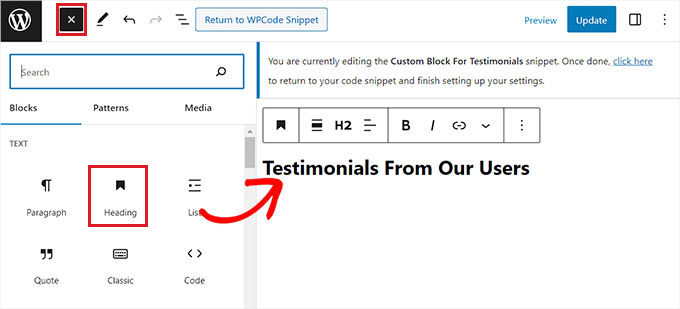
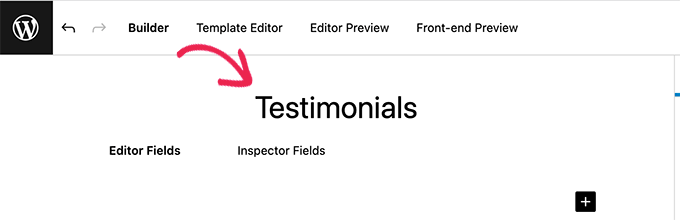
First, you need to click the ‘+’ button in the top left corner of the screen to open up the block menu.
From here, drag and drop the Heading block into the block editor interface and name it ‘Testimonials’.
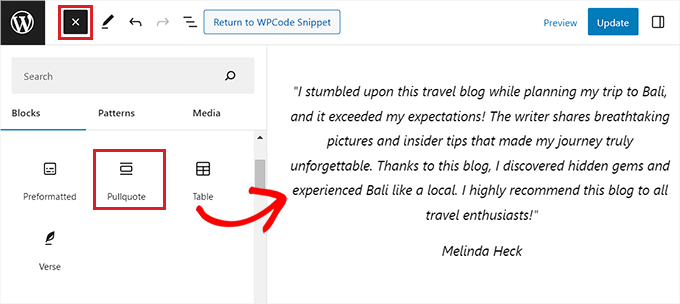
Next, you can use the paragraph, pull-quote, or quote blocks to add testimonials from different clients on your website.
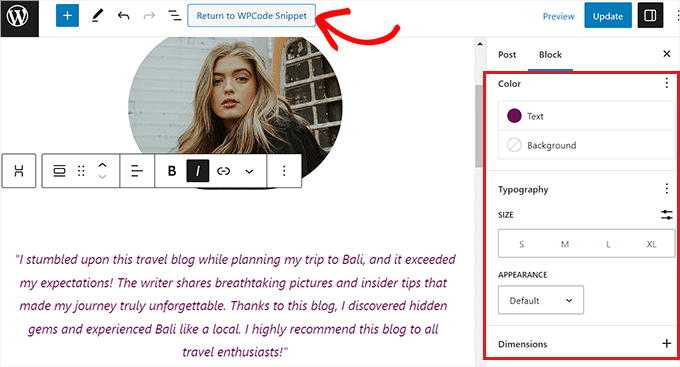
You can even use the image, site logo, social icons, or site tagline blocks to further customize your Testimonials block.
You can also customize the size, text color, or background color of your testimonials from the block panel on the right side of the screen.
Once you are done, don’t forget to click the ‘Update’ button at the top to store your custom block settings.
Next, just click on the ‘Return to WPCode Snippet’ button at the top to be redirected to the ‘Edit Snippet’ page.
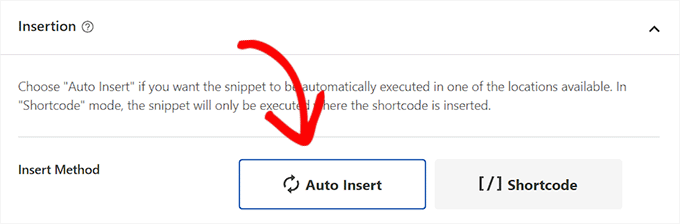
Once you are there, scroll down to the ‘Insertion’ section and choose the ‘Auto Insert’ mode.
Upon activation of the code snippet, your custom block will be automatically added to where you choose to insert it on your website.
Next, you have to configure the location of the custom block you created.
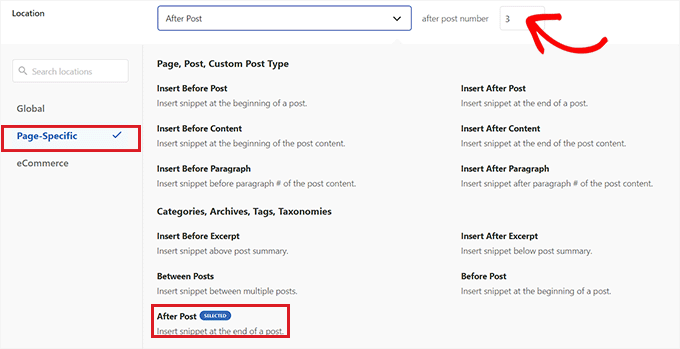
To do this, simply click the ‘Location’ dropdown menu in the ‘Insertion’ section and switch to the ‘Page-Specific’ tab. From here, you can now choose the ‘Insert After Post’ option if you want to show your Testimonials block after the post ends.
Once you do that, you can also configure the number of posts after which the testimonial block should appear. For example, if you type in the number 3, then the Testimonials block will appear in every third post.
You can also display the block in between different paragraphs, after post excerpts, and more.
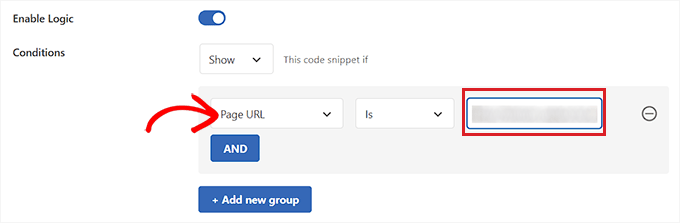
However, if you don’t find the block location that you are looking for, then you can also create your own conditional logic rule to add the custom block to your preferred place.
To do this, scroll down to the ‘Smart Conditional Logic’ section and toggle on the ‘Enable Logic’ switch.
Next, you must click the ‘Add New Group’ button to start creating a conditional logic rule.

For example, if you only want to show the custom block you created on a specific page or post, then you will have to select the ‘Page URL’ option from the dropdown menu on the right.
After that, you can leave the dropdown menu in the middle as it is and then add the URL of the WordPress page/post of your choice into the field on the left.
You can also configure your conditional logic rule to only display the custom block on a specific page, logged-in users, on WooCommerce store pages, Easy Digital Downloads pages, specific dates, and more.
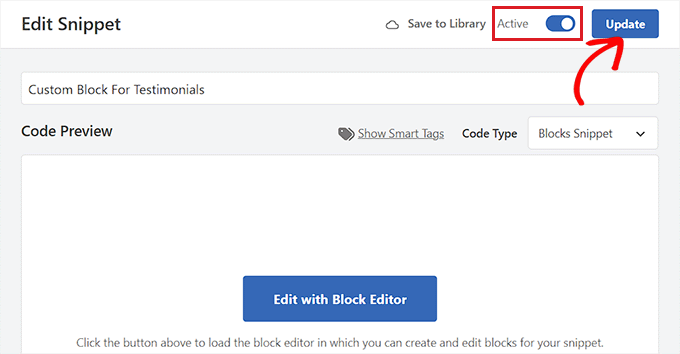
Once you are done, scroll back to the top of the page and toggle the ‘Inactive’ switch to ‘Active’. Then, click the ‘Update’ button to store your settings.
Your custom block will now be automatically added to all the locations that you selected for the block snippet.
Keep in mind that the custom block you created won’t be displayed as an option in the block menu of the Gutenberg editor.
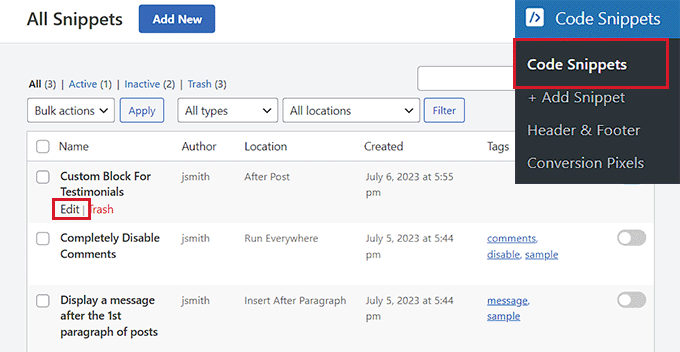
You will have to configure the block settings by visiting the Code Snippets page from the WordPress dashboard and clicking the ‘Edit’ link under the block snippet.
This will open the ‘Edit Snippet’ page, where you can customize the block or change its location and conditional logic rules easily.
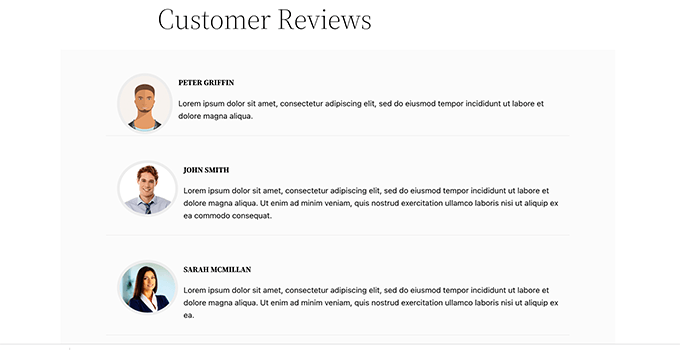
Now visit your website to view the custom block that you created in action.
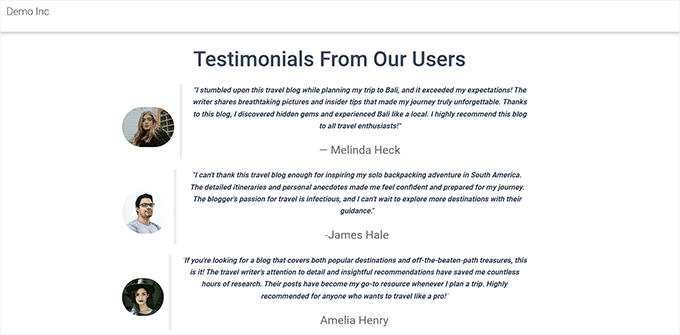
Here is our custom Testimonials block on our demo website.
Method 2: Create Custom Blocks for WordPress Using Genesis Custom Code Plugin (Free)
If you are an intermediate user and looking for a free solution, then this method is for you. Keep in mind that you will need to be familiar with HTML and CSS to follow the instructions in this method.
First, you need to install and activate the Genesis Custom Blocks plugin. For more details, see our step-by-step guide on how to install a WordPress plugin.
Made by the people behind WP Engine hosting, this plugin provides developers with easy tools to quickly create custom blocks for their projects.
For the sake of this tutorial, we will build a Testimonials block.
Step 1: Create a Custom Block for WordPress
First, you need to head over to Custom Blocks » Add New page from the left sidebar of your admin panel.
This will bring you to the Block Editor page, where you will be creating a custom block for your WordPress site.
From here, you can start by giving a name to your block.
Now on the right side of the page, you will find the block properties that you can configure.
Here you can choose an icon for your block, add a category, and add keywords.
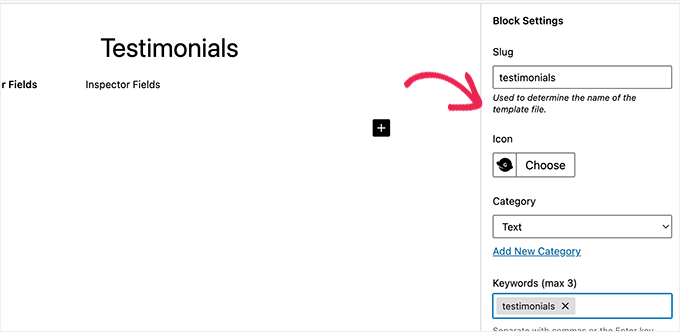
The slug will be auto-filled based on your block’s name, so you don’t have to change it. However, you may write up to 3 keywords in the ‘Keywords’ text field so that your block can be easily found.
Now, it’s time for you to add some fields to your block. You can add different types of fields like text, numbers, email addresses, URLs, colors, images, checkboxes, radio buttons, and more.
We will add 3 fields to our custom Testimonials block: an image field for the photo of the reviewer, a textbox for the reviewer name, and a text area field for the testimonial text.
Just click on the ‘+’ button to insert the first field.
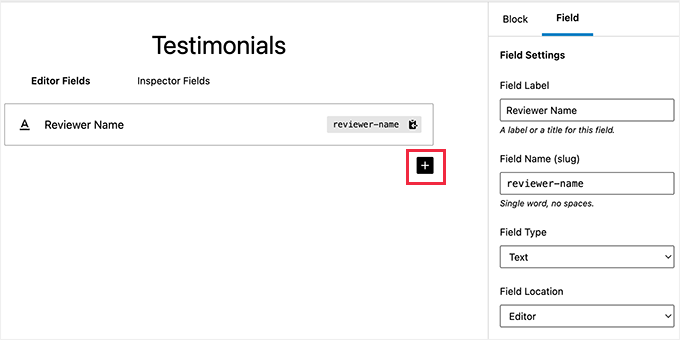
This will open up some options for the field in the right column. Let’s take a look at each of them.
- Field Label: You can use any name of your choice for the field label. Let’s name our first field ‘Reviewer Image’.
- Field Name: The field name will be generated automatically based on the field label. We will use this field name in the next step, so make sure it’s unique for every field.
- Field Type: Here, you can select the type of field. We want our first field to be an image, so we will pick ‘Image’ from the dropdown menu.
- Field Location: You can decide whether you want to add the field to the editor or the inspector.
- Help Text: You can add some text to describe the field. This is not required if you are creating this block for your personal use but may be helpful for multi-author blogs.
You may also see some additional options based on the field type you choose. For example, if you select a text field, then you will get extra options like placeholder text and character limit.
Following the above process, let’s add 2 other fields for our Testimonials block by clicking the ‘+’ button.
In case you want to reorder the fields, then you can do that by dragging them using the handle on the left side of each field label. To edit or delete a particular field, you need to click the field label and edit the options in the right column.
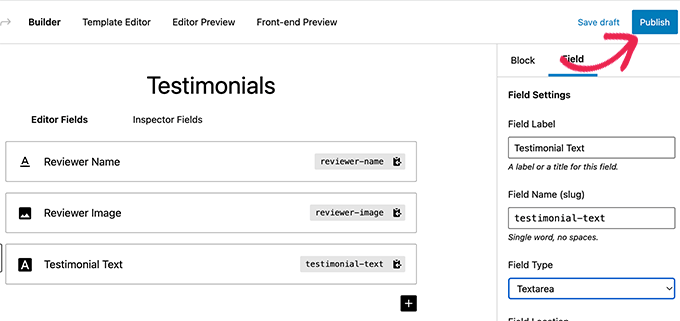
Once you are done, just click on the ‘Publish’ button on the right side of the page to save your custom Gutenberg block.
Step 2: Create a Custom Block Template
Although you created the custom WordPress block in the last step, it won’t work until you create a block template.
The block template determines exactly how the information entered into the block is displayed on your website. You get to decide how it looks by using HTML and CSS, or even PHP code if you need to run functions or do other advanced things with the data.
There are two ways to create a block template. If your block output is in HTML/CSS, then you can use the built-in template editor.
On the other hand, if your block output requires some PHP to run in the background, then you will need to manually create a block template file and upload it to your theme folder.
Method 1: Using Built-in Template Editor
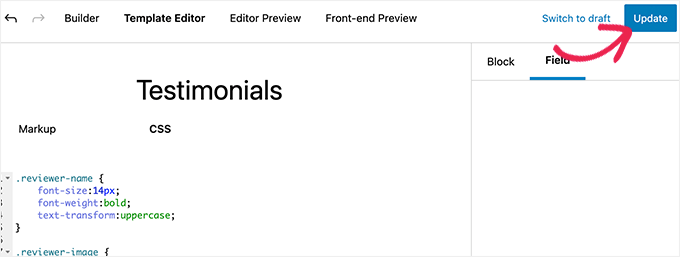
On the custom block edit screen, simply switch to the ‘Template Editor’ tab and enter your HTML under the markup tab.

You can write your HTML and use double curly brackets to insert block field values.
For instance, we used the following HTML for the sample block we created above:
<div class="testimonial-item">
<img src="{{reviewer-image}}" class="reviewer-image">
<h4 class="reviewer-name">{{reviewer-name}}</h4>
<div class="testimonial-text">{{testimonial-text}}</div>
</div>
After that, just switch to the ‘CSS’ tab to style your block output markup.
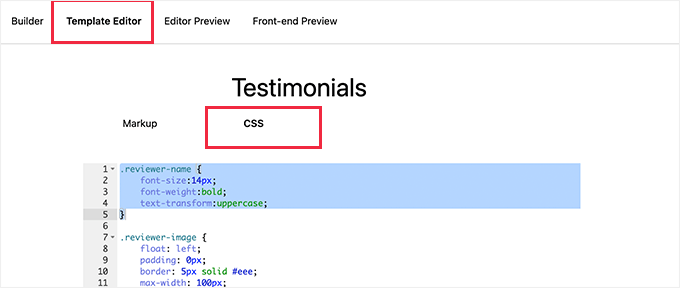
Here is the sample CSS we used for our custom block:
.reviewer-name { font-size:14px; font-weight:bold; text-transform:uppercase;
} .reviewer-image { float: left; padding: 0px; border: 5px solid #eee; max-width: 100px; max-height: 100px; border-radius: 50%; margin: 10px;
} .testimonial-text { font-size:14px;
} .testimonial-item { margin:10px; border-bottom:1px solid #eee; padding:10px;
}
Method 2: Manually Uploading Custom Block Templates
This method is recommended if you need to use PHP to interact with your custom block fields. You will basically need to upload the editor template directly to your theme.
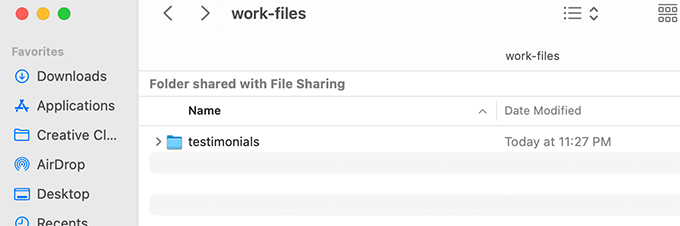
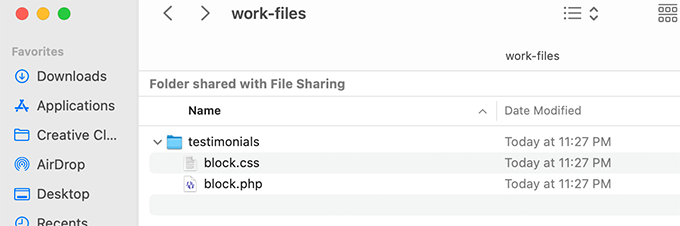
First, you need to create a folder on your computer and name it using your custom block name slug.
For instance, our demo block is called Testimonials, so we will create a testimonials folder.
Next, you need to create a file called block.php using a plain text editor. This is where you will put the HTML / PHP part of your block template.
Here is the sample template we used for our example:
<div class="testimonial-item <?php block_field('className'); ?>">
<img class="reviewer-image" src="<?php block_field( 'reviewer-image' ); ?>" alt="<?php block_field( 'reviewer-name' ); ?>" />
<h4 class="reviewer-name"><?php block_field( 'reviewer-name' ); ?></h4>
<div class="testimonial-text"><?php block_field( 'testimonial-text' ); ?></div>
</div>
Now you may have noticed how we used the block_field() function to fetch data from a block field.
We have wrapped our block fields in the HTML we want to use to display the block. We have also added CSS classes so that we can style the block properly.
Don’t forget to save the file inside the folder you created earlier.
Next, you need to create another file using the plain text editor on your computer and save it as block.css inside the folder you created.
We will use this file to add CSS needed to style our block display. Here is the sample CSS we used for this example:
.reviewer-name { font-size:14px; font-weight:bold; text-transform:uppercase;
} .reviewer-image { float: left; padding: 0px; border: 5px solid #eee; max-width: 100px; max-height: 100px; border-radius: 50%; margin: 10px;
} .testimonial-text { font-size:14px;
} .testimonial-item { margin:10px; border-bottom:1px solid #eee; padding:10px;
}
Don’t forget to save your changes.
Your block template folder will now have two template files inside it.
After that, you need to upload your block folder to your website using an FTP client or the File Manager app inside your WordPress hosting account’s control panel.
Once connected, navigate to the /wp-content/themes/your-current-theme/ folder.
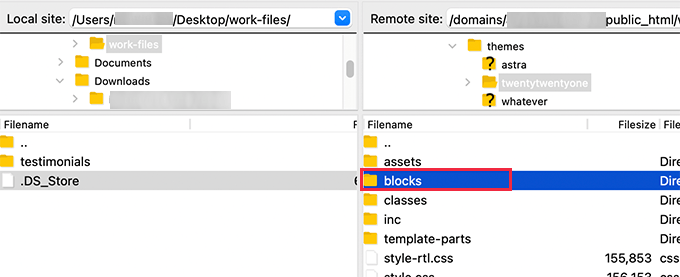
If your theme folder doesn’t have a folder named ‘blocks’, then go ahead and create a new directory and call it blocks.
Next, you have to upload the folder you created on your computer to the blocks folder.
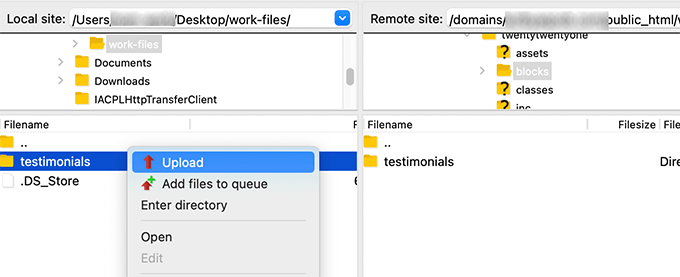
That’s all! You have successfully created manual template files for your custom block.
Step 3: Preview Your Custom Block
Before you can preview your HTML/CSS, you will need to provide some test data that can be used to display a sample output.
Inside the WordPress admin area, edit your block and switch to the ‘Editor Preview’ tab. Here, you need to enter some dummy data.
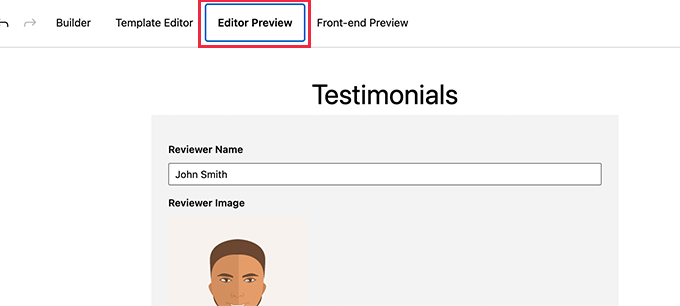
This data won’t be a part of your custom block and will only be used for previewing the changes you made using HTML and CSS.
Once you have added the data, don’t forget to click on the ‘Update’ button to save your changes.
If you don’t click the ‘Update’ button, then you won’t be able to see the preview of your custom block.
You can now switch to the ‘Front-end Preview’ tab to see how your block will look on the front end of your WordPress website.
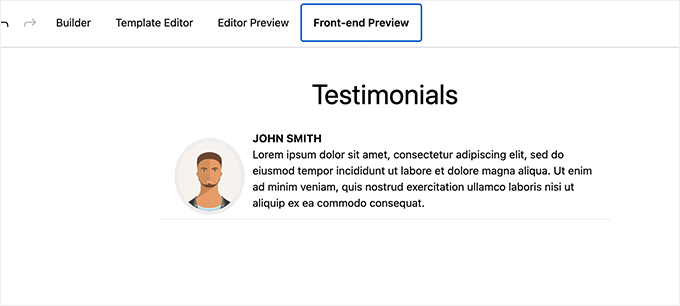
If everything looks good to you, then you can update your block again to save any unsaved changes.
Step 4: Using Your Custom Block in WordPress
You can now use your custom block in WordPress like you would any other block.
Simply edit any post or page where you want to use this block. Then, click the ‘+’ button in the top left corner to open up the block menu.

From here, find your block by typing in its name or keywords and then add it to the page/post.
After you insert the custom block into the content area, you will see the block fields you created earlier.
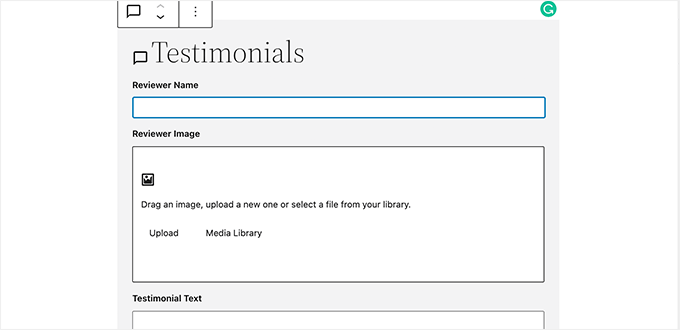
You can fill out the block fields as needed.
As you move away from the custom WordPress block to another one, the editor will automatically show a live preview of your block.
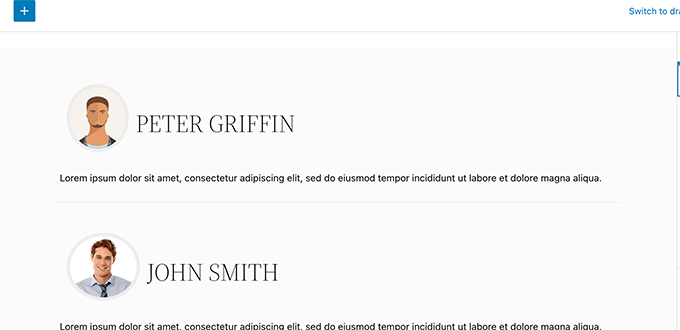
You can now save your post and page and preview it to see your custom block in action on your website.
Here’s how the Testimonials block looks on our test site.
We hope this article helped you learn how to easily create custom Gutenberg blocks for your WordPress website. You may also want to see our guide on how to create a custom WordPress theme from scratch or see our expert picks for the best block themes for full site editing.
If you liked this article, then please subscribe to our YouTube Channel for WordPress video tutorials. You can also find us on Twitter and Facebook.
The post How to Create a Custom WordPress Block (Easy Way) first appeared on WPBeginner.
Dr Crash says:


