Do you want to create a loyalty program in WooCommerce?
A loyalty program can keep customers coming back to your online store, and keep them away from your competitors. It can also be a great way to reward your best customers and make them feel valued.
In this guide, we’ll show you how to create a loyalty program for your WooCommerce store.
Why Create a Loyalty Program in WooCommerce?
Creating a loyalty program can be a great way to get more sales on your online store.
A loyalty program encourages customers to keep coming back to your WordPress website, which is the key to running a successful business over the long term. It can even boost average spend per customer by giving shoppers a reason to add more items to their basket.
Most stores give customers points for buying products and services. However, you can also reward customers for other actions like creating an account, placing their first order, signing up to your email newsletter, or spending over a certain account.
You might even give customer extra points for returning to an abandoned shopping cart and completing their purchase. In this way, a loyalty program can help you recover WooCommerce abandoned cart sales.
With that said, let’s take a look at how to add a loyalty program in WooCommerce.
Setting Up Your WooCommerce Loyalty Program
The easiest way to create a loyalty program is by using Advanced Coupons. It is the best WordPress coupons plugin and lets you create all kinds of coupons, programs, buy one get one free offers, and other rewards.
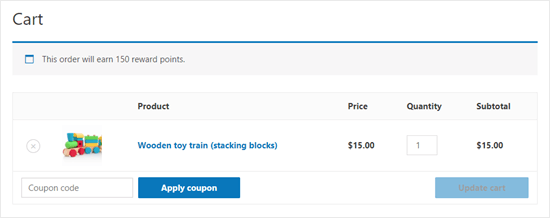
After creating a loyalty program, Advanced Coupons will show the customer how many points they’ll get for each action, including buying a specific product.
First, you’ll need to install and activate both the free Advanced Coupons plugin and the premium Advanced Coupons Loyalty Program addon. For more information, please see our step-by-step guide on how to install a WordPress plugin.
Note: You can purchase the Advanced Coupons and Loyalty Program plugins together by getting the ‘All-In-One Bundle’.
After that, simply go to Coupons » Loyalty Program in your WordPress admin dashboard and click on the ‘License’ tab.
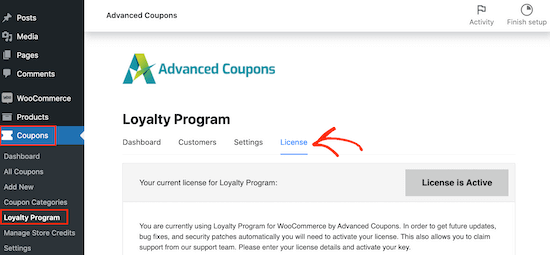
You can now enter your license key and the email address you used to purchase Advanced Coupons. You can find this information by logging into your account on the Advanced Coupons website.
After that, go ahead and click on the ‘Settings’ tab. This brings you to a screen where you can build the loyalty program.
To start, let’s reward members with points when they take certain actions on your website, like leaving a product review, posting a comment, or buying a product.
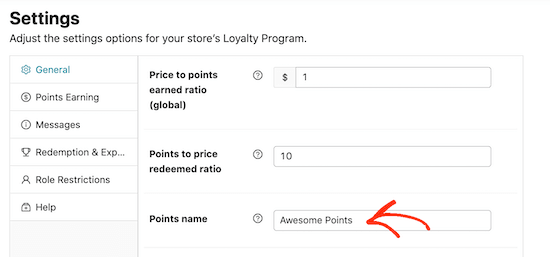
In the ‘Price to points earned ratio,’ we can see that the Loyalty Program plugin gives customers 1 point for every $1 spent.

If you want your WooCommerce loyalty program to look more impressive, then you give customers more points. For example, members might earn 2 points or 10 points for every $1 they spend.
‘Points to price redeemed ratio’ is how many points it takes to earn a dollar as part of your loyalty program.
By default, customers earn $1 for every 10 points. That means the customer needs to redeem 10 points to get a $1 discount coupon. You can change these values to anything you want.
You can also change the name of your loyalty scheme by typing into the ‘Points name’ field. We’ve gone with ‘Awesome Points’ for our loyalty program, but you might want to use something more branded, like Starbucks does with their ‘Stars’.
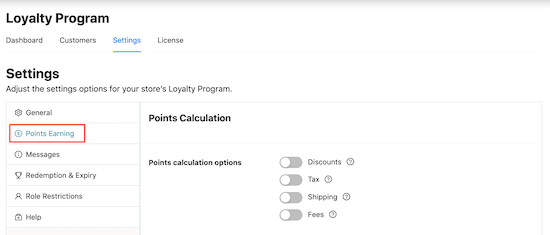
Next, you’ll need to decide how your points are calculated. For instance, you may want to give a customer less points if they use a coupon code, compared to a customer who didn’t use a coupon. In this way, you can give the best rewards to your best customers.
To do this, click on the ‘Points Earning’ tab. Here, you can check the boxes to take any discounts, tax, shipping costs, and any fee amounts into account when awarding points.
Many online marketplaces and digital stores only reward customers for spending money. However, there may be other actions that benefit you, so it’s a good idea to reward customers for taking these actions.
For example, you might want to reward visitors for registering with your membership site, posting a product review, or even commenting on a blog post.
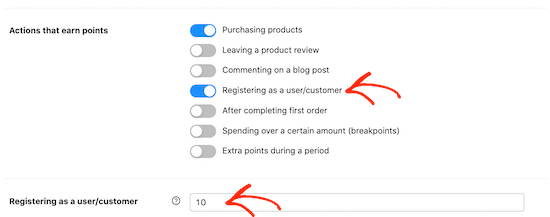
Simply scroll to the ‘Point Amounts’ section and then click the switch for any action that will earn the customer points.
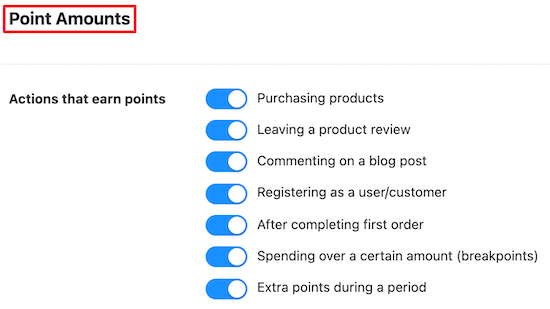
After activating these toggles, check whether there are any new settings to configure.
For example, you’ll need to type in how many points customers will get for registering as a new user.
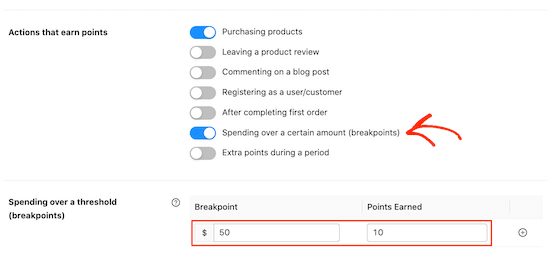
You can also encourage shoppers to spend more by awarding extra points for orders over a certain amount.
To do this, enable the ‘Spending over a certain amount’ switch and then type a value into the ‘Spending over a threshold’ field.
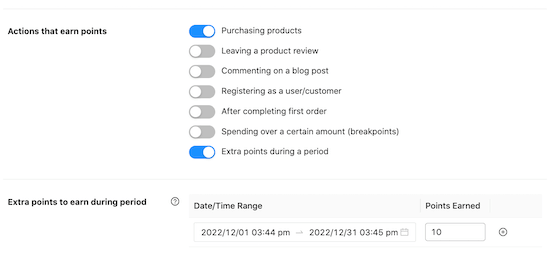
During busy shopping periods you may want to give customers an extra reason to buy from your store. For example you might award extra points during Black Friday, so customers aren’t tempted to shop with a competitor.
You can give customers extra points during a specific period by enabling the ‘Extra Points To Earn During Period’ slider. Then, enter a date and time range into the ‘Extra points to earn during period’ section and type in how many points customers will earn.
There are some more settings you may want to look at, but this is enough to create a loyalty program in WooCommerce. When you’re happy with how the program is set up, scroll to the bottom of the page and click the ‘Save changes’ button.
Your new WooCommerce loyalty program is now live.
Automatically Creating Accounts for Your Customers
Your customers will need to create an account in order to collect loyalty points.
Already, this encourages people to sign up to your online store. However, you can also create an account automatically when a visitor makes their first purchase. This can improve the shopping experience, and may get you some extra members.
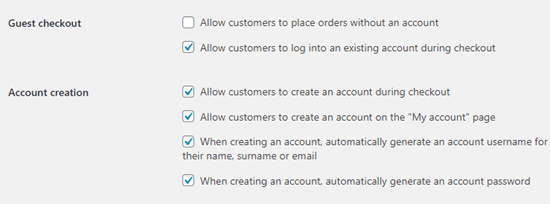
To automatically create an account for a new customer, go to WooCommerce » Settings. Then, click on the ‘Accounts and Privacy’ tab.

To start, you may want to uncheck ‘Allow customers to place orders without an account’, so that customers can’t checkout as a guest. This will encourage more people to register with your site, but it may cause more shoppers to give up on a purchase and abandon their shopping carts.
With that being said, it’a a good idea to set up WooCommerce conversion tracking and track visitors to your WordPress website. You can then see whether this change hurts your conversion rates.
Next, check the ‘Allow customers to log into an existing account during checkout’ box.
Once you’ve done that, you’ll want to make it as easy as possible for customers to create an account. With that in mind, we recommend checking all the boxes in the ‘Account creation’ section, as you can see in the following image.
Now, WooCommerce will automatically send an email to first-time customers with information on how to access their new account.
The WooCommerce Loyalty Program in Action
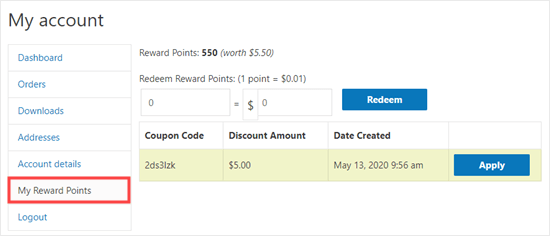
Your loyalty program is up and running! Once a customer has earned loyalty points, they can turn them into coupons by going to My Account » My Reward Points.
The customer can then simply type in how many points they want to use, and your WordPress blog or website will show how much the coupon is worth.
The customer can go ahead and click ‘Redeem’ to create that coupon.
In the following image, the customer has created a $5 coupon by converting 500 of their points. They still have 550 points left to redeem.
We hope this tutorial helped you learn how to create a loyalty program in WooCommerce. You may also want to check out our guide on how to create a WooCommerce popup and the best virtual business phone number apps.
If you liked this article, then please subscribe to our YouTube Channel for WordPress video tutorials. You can also find us on Twitter and Facebook.
The post How to Create a Loyalty Program in WooCommerce first appeared on WPBeginner.
Dr Crash says:
