Do you want to change, move, or delete WordPress categories?
Categories help organize your content and make it easy for visitors to find interesting posts. However, as your website grows and you learn more about your audience, you may need to change your categories.
In this article, we will show you how you can easily change, move, and delete the categories on your WordPress website.

Why Change, Move or Delete WordPress Categories?
Categories help sort your blog posts and make it easier for users to find what they are looking for. This will keep them on your website for longer and encourage them to convert.
However, it can be difficult to plan all your categories in advance. This is especially true if you’re just getting started with WordPress, or aren’t sure which direction to take your new blog, online store, or small business website.
You may also want to try out different categories and content, and then analyze what works the best by installing Google Analytics in WordPress. You can then use this insight to fine-tune your categories.
With that being said, at some point, you may need to change your WordPress categories. This might involve renaming a category to include the keywords that got the most clicks during A/B split testing, or fixing a spelling mistake.
You might even organize your categories and subcategories into new parent-child relationships to help visitors discover new content.
If you don’t make these changes carefully, then it could hurt the visitor experience, damage your SEO, and make it more difficult for visitors to navigate your website.
With that being said, let’s see how you can properly change, move, and delete WordPress categories. Simply use the quick links below to jump straight to the change you want to make.
How to Rename or Edit a WordPress Category
To start, you can change a category’s name, assign it to a different parent category, or display a category description to help other authors understand how to use that category.
To make any of these changes, head over to Posts » Categories.
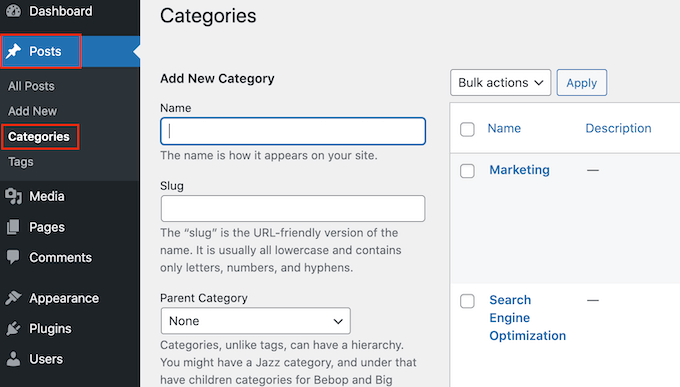
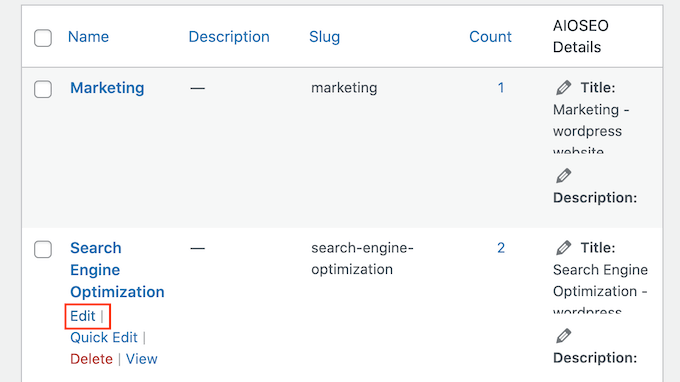
Here, find the category that you want to change and hover the mouse over it.
When the ‘Edit’ link appears, give it a click.
This will take you to a screen where you can rename the category, add a parent or subcategory, or write a category description. For example, if you’ve used a keyword research tool to find some new keywords or phrases, then you may want to change the category’s name to include these words.
To rename a category, simply type the new title into the ‘Name’ field.
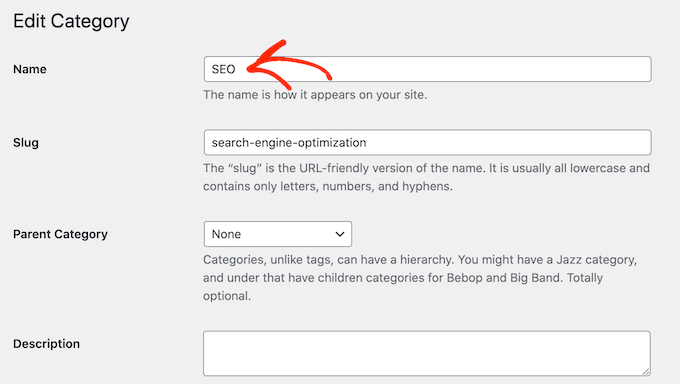
When you’re happy with the changes you’ve made, don’t forget to click on ‘Update’ to store your settings.
After that, WordPress will automatically update all the posts within this category.
How to Properly Move a WordPress Category (Without Causing Broken Links)
Every category has an archive page in WordPress, as you can see in the following image. These pages help visitors find related content, which can increase your pageviews and reduce the bounce rate in WordPress.
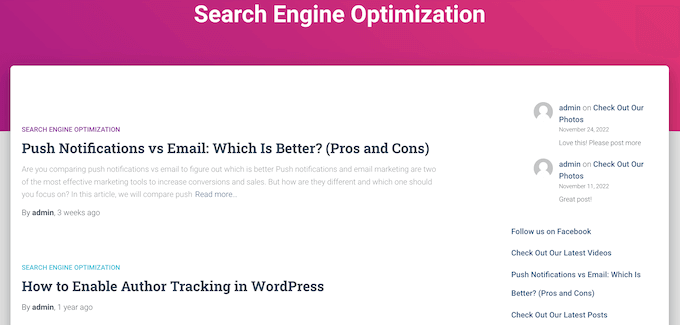
Sometimes you may want to change where this archive page is located. For example, if you’ve renamed a category, then you might also change its archive URL to avoid confusing visitors.
However, changing the slug means that anyone who tries to visit the original URL will get a 404 error.
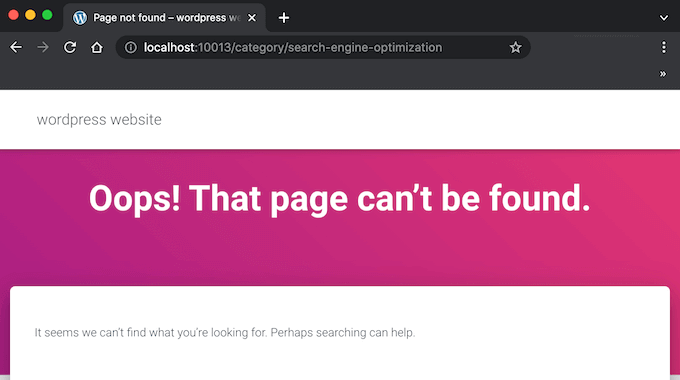
This is a bad user experience and can impact your WordPress SEO. Thankfully, you can easily fix this problem by creating a redirect.
With that in mind, go ahead and change the slug by going to Posts » Categories. Then, find the category that you want to edit and hover the mouse over it.
When the ‘Edit’ button appears, give it a click.
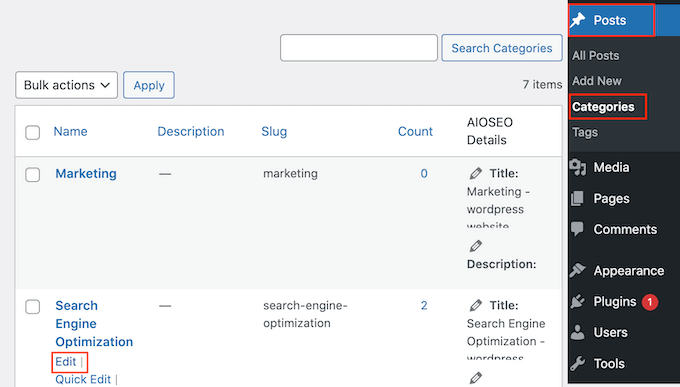
In the ‘URL’ field, you’ll see the current slug for this category’s archive page.
Simply type in the new URL that you want to use. Just be aware that you can only use lowercase letters, numbers, and hyphens in the URL.
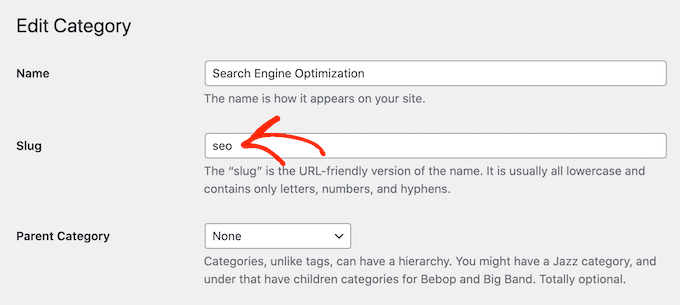
When you’re happy with how the slug looks, scroll to the bottom of the screen and click on ‘Update’ to store your changes.
Now, you’ll see the archive page if you visit the new URL, but you’ll get an error if you type in the original link.
The easiest way to redirect from the old URL to the new link is by using AIOSEO.
AIOSEO is the best SEO plugin for WordPress and can help you get more visitors from search engines like Google. It even has a setup wizard that will help you choose the best SEO settings for your website and improve your rankings, even if you’re completely new to search engine optimization.
For this guide, we’ll be using the AIOSEO Pro version because it has the Redirection Manager that you’ll need to set up a redirect. However, there is also a free version of AIOSEO that you can use to optimize your website no matter what your budget.
First, you’ll need to install and activate the plugin. If you need help, then please see our guide on how to install a WordPress plugin.
Upon activation, AIOSEO will automatically launch the setup wizard. You can simply click on ‘Let’s Get Started’ and then follow the onscreen instructions to improve your site’s search engine rankings.

To learn more, please see our step-by-step guide on how to set up All in One SEO for WordPress correctly.
Since we want to use the plugin’s premium features, you’ll need to enter a license key when asked. You can find this information under your account on the AIOSEO website.

After entering the license key, click on the ‘Finish Setup’ button to save your settings and close the setup wizard.
With that out of the way, head over to All in One SEO » Redirects in the WordPress dashboard. You can then go ahead and click on Activate Redirects.
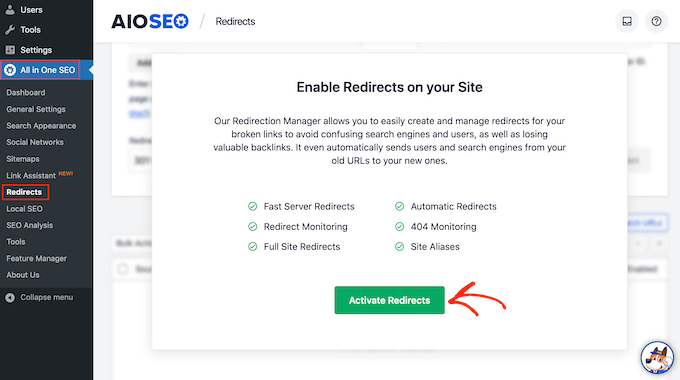
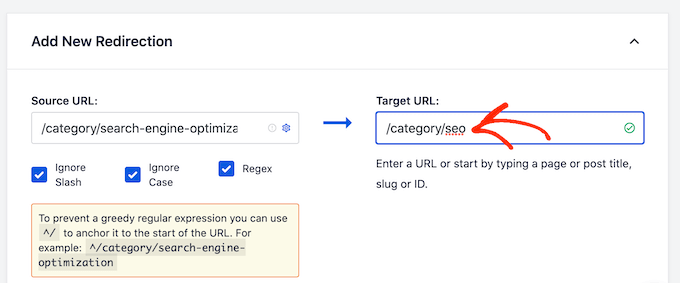
Now you’ve activated the Redirection Manager, you can start by typing in the source URL. This is the category archive’s original web address, and will usually start with /category/ followed by the original category name.
Here, we’re redirecting anyone who tries to visit /category/search-engine-optimization.
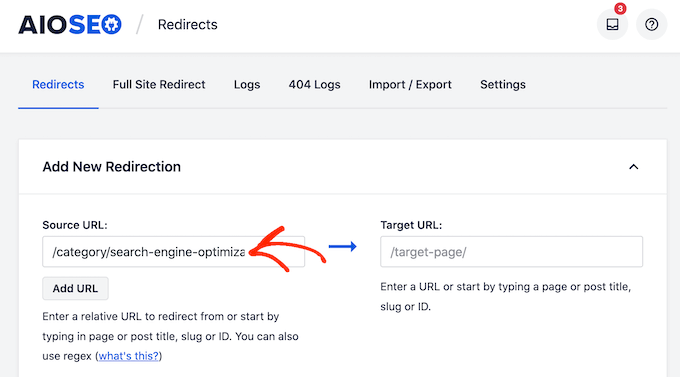
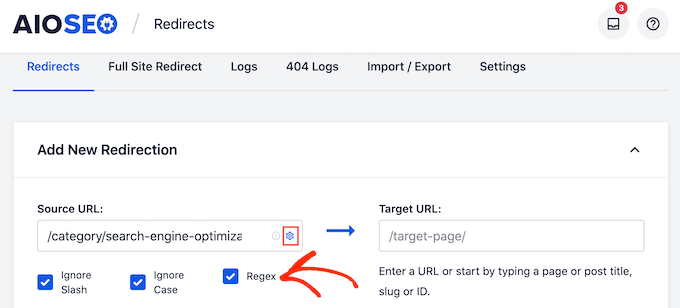
After typing in the source URL, make sure you click on the small cog icon to see some extra settings that you can configure.
You’ll need to check the box next to ‘Regex.’
Now, it’s time to move to the target URL, which is our new category archive page.
In the following image, visitors will be redirected to /category/seo.
Your next task is choosing the type of redirect that AIOSEO should use. There are various types of redirects that are identified with numbers such as 301, 302, and 307.
If you’re permanently moving the archive to a new location, then you’ll want to use a 301 redirect as this tells search engines that the page will always be at this new location. This way, all the old archive’s traffic and backlinks are transferred to the new page.
Simply open the ‘Redirect Type’ dropdown and choose ‘301 Moved Permanently.’
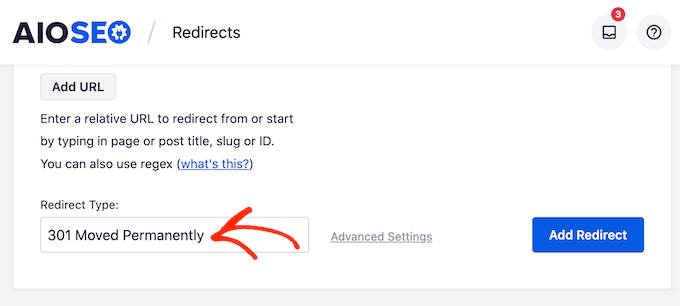
If you’re only temporarily moving the category archive page to a new URL, then you should choose ‘307 Temporary Redirect’ instead.
When you’ve done that, go ahead and click on the ‘Add Redirect’ button.
Now, if you try to visit the original category archive page, AIOSEO will automatically redirect you to the new target URL.
How to Properly Delete a WordPress Category
Sometimes you may no longer need a particular category. For example, you may have accidentally created two very similar categories or changed the direction of your WordPress blog so you no longer cover the same content.
Before deleting a category, it’s important to think about how this will affect your WordPress website. Firstly, WordPress will remove the deleted category from all your posts. Any posts that no longer have a category, will be marked as ‘uncategorized.’
Lots of uncategorized content will make it more difficult for visitors to explore your website. With that being said, you may want to look through all the posts within the category you plan to delete, to make sure they have at least one alternate category.
You can also set up a redirect for that category’s archive page by following the same process described above. This can help you fix any broken links before they hurt your search engine rankings or the visitor experience.
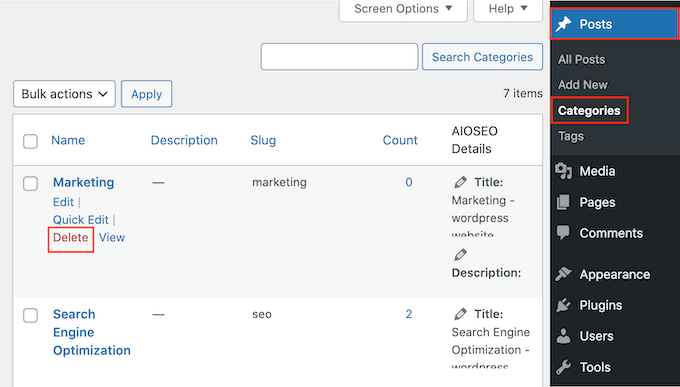
When you’re ready to delete the category, simply go to Posts » Categories. You can then hover the mouse over the category and click on the ‘Delete’ link when it appears.
How to Change the Default Uncategorized Category
If you don’t assign a category to a post, then WordPress will assign one automatically. By default, this is ‘uncategorized’ but you may want to change this to an alternative category.
Another option is to continue using the ‘uncategorized’ category, but give it a more descriptive and useful name.
This change is particularly important if you run a WordPress multi-author blog or accept guest contributions, as these people may forget to add a category to their posts.
Changing the default category can also improve your WordPress SEO by making sure that every post has a descriptive category.
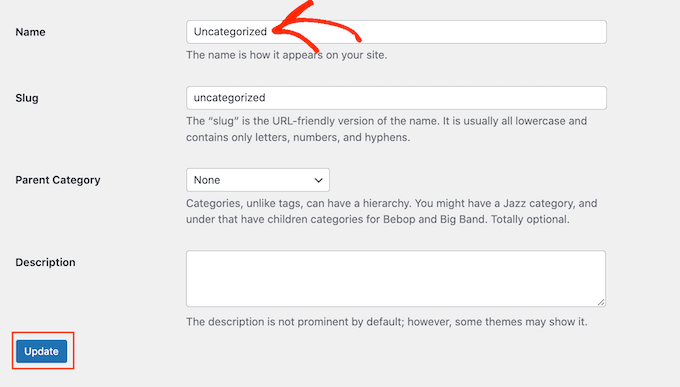
Let’s start by renaming the uncategorized category by going to Posts » Categories.
Here, find ‘Uncategorized’ and hover your mouse over it. When the ‘Edit’ link appears, give it a click.
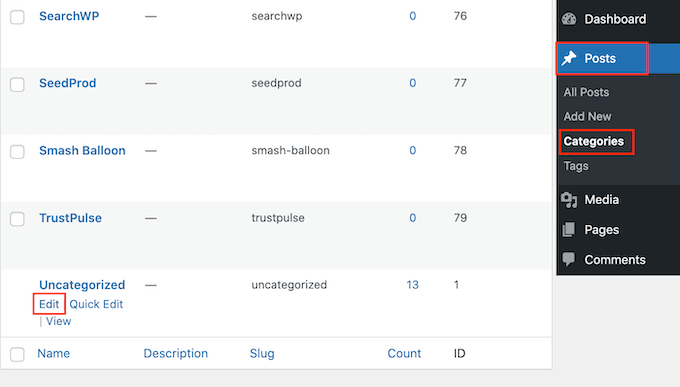
You can now type a new title into the ‘Name’ field.
After that, scroll to the bottom of the screen and click on ‘Save.’
Another option is to change the default category. This can be useful if you’ve already created a general category, and now want to use it as your default.
To make this change, head over to Settings » Writing in the WordPress dashboard. You can then open the ‘Default Post Category’ dropdown and choose any category from the list.
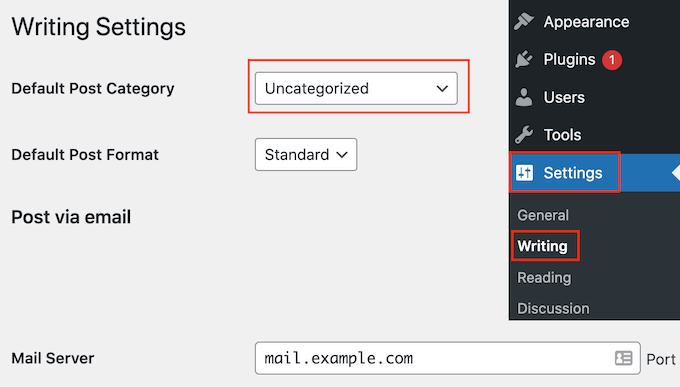
After that, don’t forget to click on ‘Save Changes’ to store your settings.
How to Add a Subcategory in WordPress
WordPress allows you to add category hierarchy, so you can add sub categories as needed.
You can do this easily by using the Parent category dropdown on the Add New Category screen.
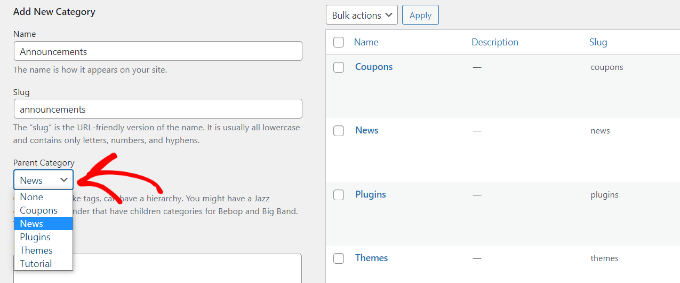
For more details, see our step by step guide on how to add subcategories in WordPress.
How to Easily Convert Categories into Tags
Categories and tags are both important ways to organize and group your posts. However, to help visitors find their way around your site, you should use them in slightly different ways.
Categories are great for broadly grouping your posts, while tags are meant to describe the specific details of each post.
Visitors can use categories to quickly find the type of content they’re interested in, or their favorite subject. They can then use tags to pinpoint the exact post within that category.
At WPBeginner we have a Beginner’s Guide category, which is aimed at new WordPress users. Each post in the Beginner’s Guide has different tags, such as custom taxonomy, SEO, and sorting your content.
It’s easy to get categories and tags mixed up, especially if you’re just getting started with WordPress. Your website may also change over time, to the point where one of your tags would now work better as a category.
You can easily turn categories into tags, using the Categories to Tags Converter plugin. For example, you can turn a ‘Beginner’s Guide’ category into a ‘Beginner’s Guide’ tag with the click of a button. Even better, all posts that were categorized as ‘Beginner’s Guide’ will be assigned the new ‘Beginner’s Guide’ tag automatically.
This can save you a ton of time and let you test different ways of organizing your content.
First, you’ll need to install and activate the Categories to Tags Converter plugin. If you need help, then please see our guide on how to install a WordPress plugin.
Upon activation, go to Tools » Import. Here, find ‘Categories and Tags Converter’ and click on its ‘Run importer’ link.
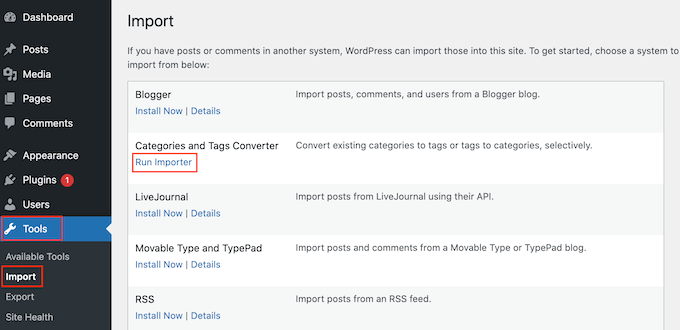
You’ll now see all the different categories and tags you’ve created for your website, organizied into tabs.
To convert a category into a tag, simply check the box next to it. You can then click on the ‘Convert Categories’ button.
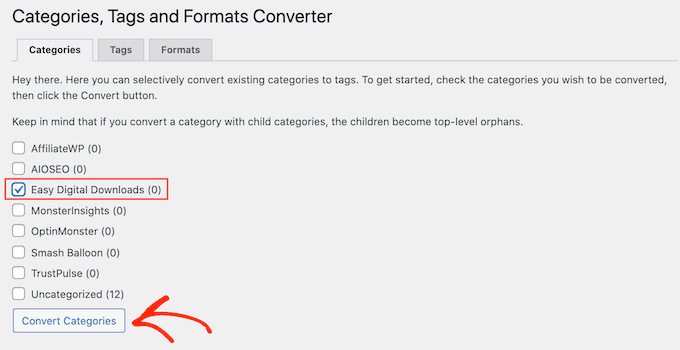
After a few moments, you’ll see a ‘Converted successfully’ message. To turn more categories into tags, simply repeat the process described above.
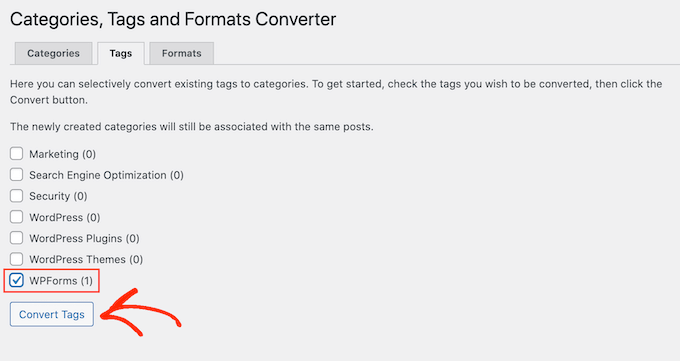
To turn a tag into a category, select the ‘Tags’ tab. You can now check the box next to the tag that you want to change, and click on the ‘Convert Tags’ button.
We hope this article helped you learn how to properly change, move, and delete WordPress categories. You can also go through our guide on the best email marketing services and proven ways to make money online blogging with WordPress.
If you liked this article, then please subscribe to our YouTube Channel for WordPress video tutorials. You can also find us on Twitter and Facebook.
The post How to Properly Change, Move and Delete WordPress Categories first appeared on WPBeginner.
Dr Crash says:

