Are you looking to use Microsoft Clarity analytics on your WordPress website?
Microsoft Clarity is a free analytics tool that helps you analyze how users engage with your website with click tracking, scroll tracking, and heatmaps.
In this article, we’ll show you how to easily install Microsoft Clarity in WordPress, step by step.

This is what we’ll cover in this tutorial:
What Is Microsoft Clarity and Why Use It?
Microsoft Clarity is a free analytics tool for websites. It helps you see the most popular pages on your website and how users click, scroll, and interact with those pages.
The most important feature of Microsoft Clarity is its data visualization. This includes click tracking, heatmap reports, session recordings, and more.
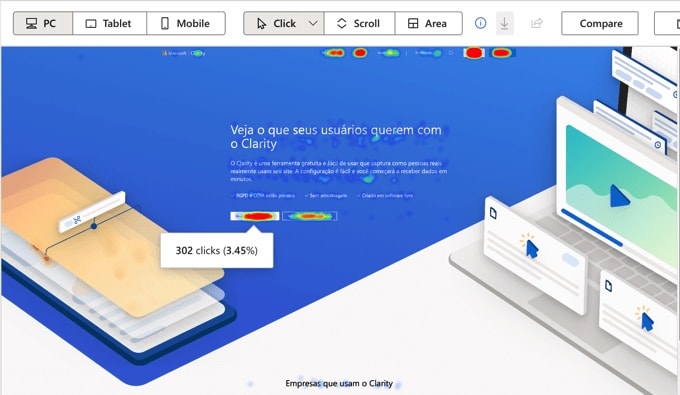
Heatmaps show a visual report of how users move their mouse, as well as where they click, select, and scroll.
Similarly, session recordings help you see how users view your content, where they spend more time, and what takes them away from your WordPress website.
This information helps you create a better user experience for your users, improve performance, and boost sales conversion.
Note: Microsoft warns that Clarity should not be used on sites that contain sensitive data including user health care, financial services, or government-related information.
Microsoft Clarity vs Google Analytics: What’s the Difference?
Google Analytics is the best analytics solution on the market because it offers a lot of in-depth tracking features. Microsoft Clarity, on the other hand, focuses on the visualization of user interactions with heatmaps and session recordings.
Google Analytics helps you track almost anything on your website. It also has enhanced eCommerce tracking, conversion tracking, and detailed reports.
Microsoft Clarity is a newer platform, and it’s currently not an alternative to Google Analytics’ far superior features. However, you can use Microsoft Clarity alongside Google Analytics to unlock features like heatmaps and visitor session recordings because Google doesn’t offer those features yet.
Before Microsoft’s analytics feature, many website owners would use paid heatmap solutions like Hotjar or CrazyEgg alongside Google Analytics, but now you have a free alternative to those tools.
We recommend installing Google Analytics on all your websites. After that, you can follow our guide below to install Microsoft Clarity in WordPress.
They both work along quite well without affecting your website’s functionality.
It’s easy to add Microsoft Clarity to any website. You need to sign up for Microsoft Clarity and then add a tracking code to your website. We’ll take you through the process step by step.
Signing Up for Microsoft Clarity
First, head to the Microsoft Clarity website and click on the ‘Get Started’ button. You need a Microsoft, Facebook, or Google account to sign up.
After signing up, you will see the Clarity dashboard with a popup to add a new project.
Go ahead and enter a name for your project. You can use the name of your website to make it easily recognizable. Next, enter your website URL.
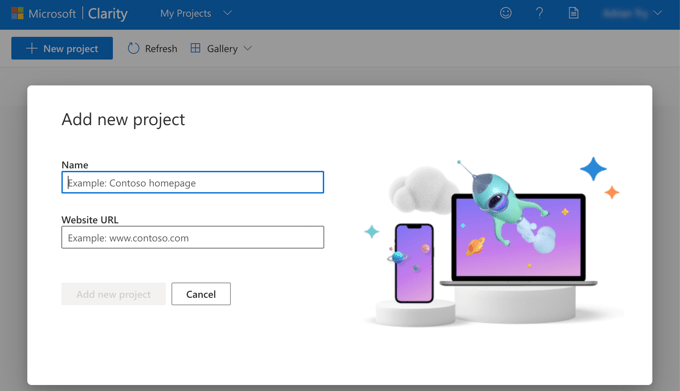
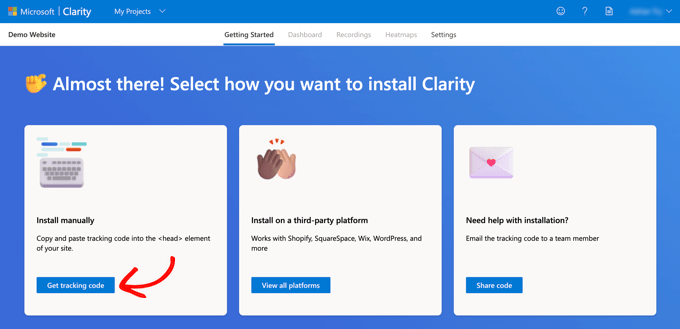
Once you’ve created your new project, you will be asked how you want to install Clarity. You should click the ‘Get tracking code’ option.
You will now see the tracking code that you need to add to your WordPress website. Simply click the ‘Copy to clipboard’ button.
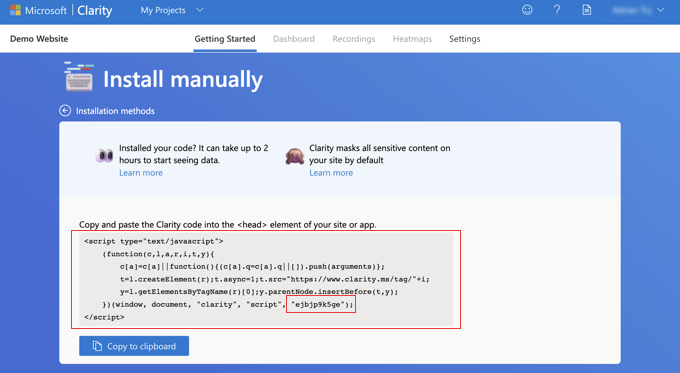
Depending on the method you use to add this code to your WordPress site, you may need the complete tracking code, or just your project ID. You’ll find the project ID at the end of the tracking code, just before </script>. In the screenshot above, it is ‘ejbjp9k5ge’.
We recommend leaving this tab open or copying the code to a safe place. You will need it in the next step of this tutorial.
Adding Microsoft Clarity Code to WordPress
Now you need to add the Microsoft Clarity tracking code to your WordPress website in a way that makes it present on all pages. Luckily, there are a number of easy ways to make this happen without manually editing any WordPress files.
You can choose your preferred method from the following three.
Method 1: Adding Microsoft Clarity Code Using the Microsoft Clarity Plugin
The first thing you need to do is install the Microsoft Clarity plugin. For more details, see our step-by-step guide on how to install a WordPress plugin.
Upon activation, you need to visit the Settings » Clarity page in WordPress admin. Here you need to paste the project ID. That’s the last item in your Clarity tracking code and will look something like ‘ejbjp9k5ge’.
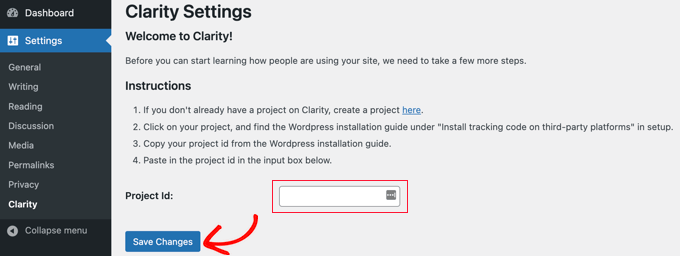
Make sure you click the ‘Save Changes’ button at the bottom to store your settings. Your WordPress site is now connected to Microsoft Clarity.
Method 2: Adding Microsoft Clarity Code Using WPCode
The safest and easiest way to add code to your website is WPCode, the best WordPress code snippets plugin. This plugin lets you add any script in your website’s header or footer right from your WordPress dashboard (no FTP or cPanel needed).
Once you have installed and activated the WPCode Free Plugin, you need to visit the Code Snippets » Header & Footer page. Once there, you should paste the entire Microsoft Clarity tracking code into the ‘Header’ field.
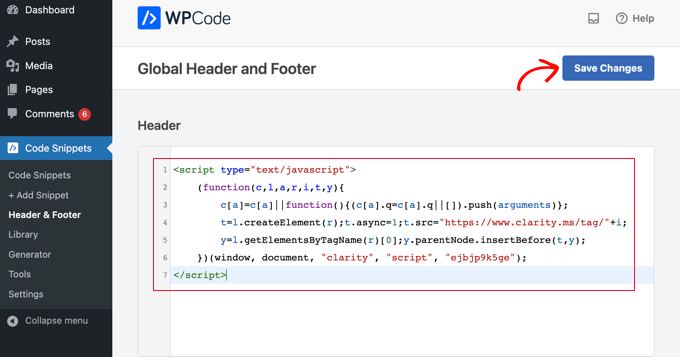
Don’t forget to click the ‘Save Changes’ button to store your settings.
The plugin will now automatically add the Microsoft Clarity analytics code to all pages of your WordPress site, so you can track website visitor activity on your website.
Method 3: Adding Microsoft Clarity Code Using All in One SEO
All in One SEO is the best WordPress SEO plugin that allows you to easily optimize your WordPress website for search engines and social media platforms. We show you how to get the most out of it in our guide on how to set up All in One SEO for WordPress correctly.
If you have All in One SEO installed on your website, then you can use it to add the Microsoft Clarity tracking code.
Simply head over to All in One SEO » General Settings » Webmaster Tools and click on the ‘Microsoft Clarity’ icon. A field will appear where you can paste your Clarity project ID. That’s the last item in your Clarity tracking code and will look something like ‘ejbjp9k5ge’.
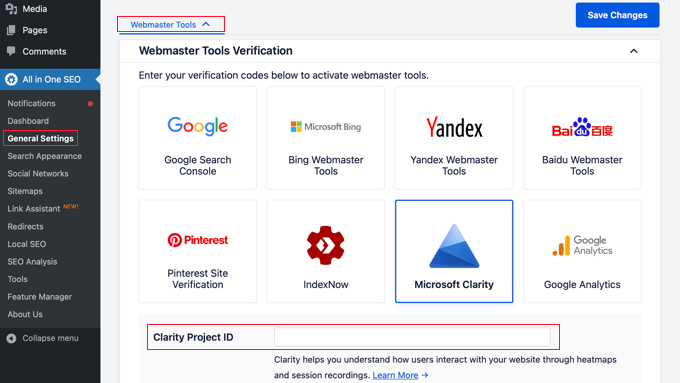
Make sure you click the ‘Save Changes’ button afterward, and your WordPress site will be connected to Microsoft Clarity.
Pro Tip: If you’re using a WordPress caching plugin, then you need to clear your WordPress cache after you add the project ID or tracking code. This is important otherwise Microsoft will not be able to verify your site for a few hours.
Using Microsoft Clarity
Once you have installed the tracking code and cleared your WordPress cache, Microsoft will then start recording visitor session data.
However, it will likely take up to 2 hours before you can see any results in your Clarity account.
Using the Microsoft Clarity Dashboard
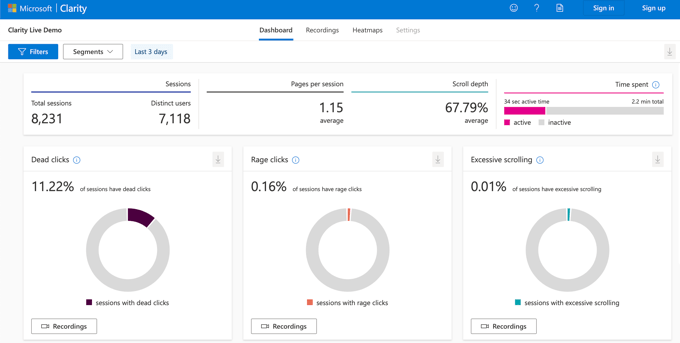
Simply log in to your Clarity account after a few hours, and you should be able to see the activity summary in your dashboard.
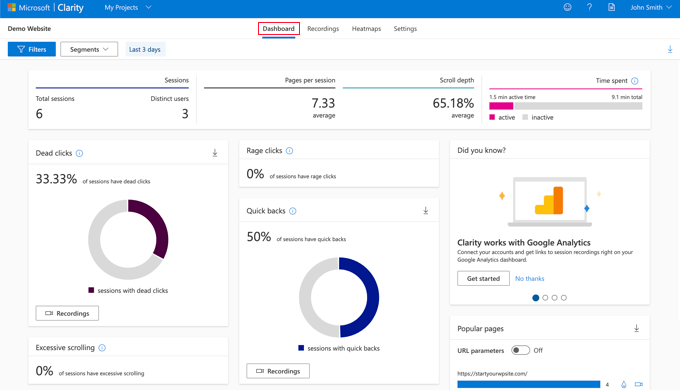
You can see useful insights like the percentage of sessions that have ‘dead clicks’. These are clicks that don’t go anywhere. For instance, users might be clicking on an image thinking that it’s a button or a link.
Another useful statistic is rage clicks when users rapidly click or tap in the same area. Paying close attention to these metrics can help you make your site more user-friendly.
The dashboard also shows you the number of ‘quick backs’. These occur when a user moves off a page and then very quickly comes back to it.
It also tracks excessive scrolling, when users scroll through a page more than expected. And like Google Analytics, Microsoft makes it easy to see the most popular pages on your site.
Using Microsoft Clarity Recordings
The ‘Recordings’ tab shows you recordings of different user sessions. You get the details of the user’s device, operating system, and country.
Clarity also tells you the number of pages they visited, the duration and time of their session, and the number of clicks they made.
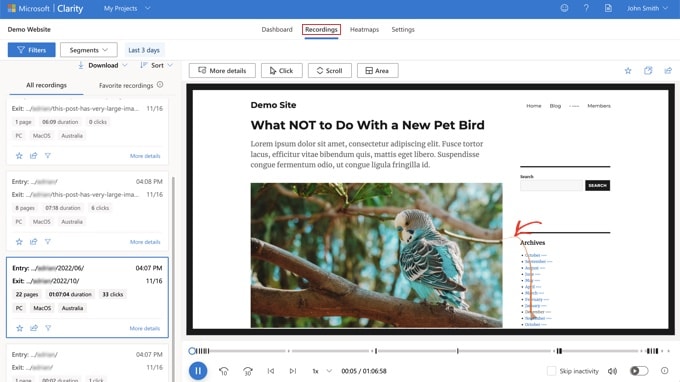
The recordings let you watch an animation of mouse movements and clicks. In the screenshot above, you can see a user moved their mouse to the November archives link and clicked it.
Using Microsoft Clarity Heatmaps
The ‘Heatmaps’ tab shows you a heatmap of your website. These help you see which sections are popular on your site based on the number of people clicking.
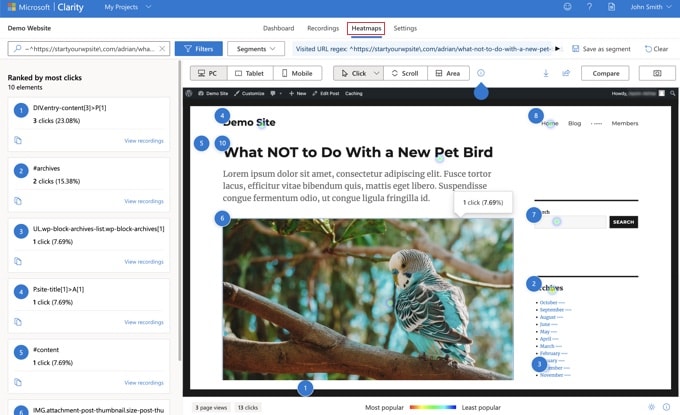
The heatmap will also show you how far users scrolled down the page, and which areas on the page received the most clicks.
Final Thoughts on Microsoft Clarity Analytics Tool
Microsoft Clarity is a new analytics tool with some neat features. While it’s no alternative to the powerful Google Analytics platform, it definitely offers some interesting features like free heatmap and session recording.
Often new website owners want to see heatmaps and session recordings, but they don’t have the budget to purchase premium solutions like HotJar or CrazyEgg. Well, now you can use Microsoft Clarity.
Using the heatmaps and session recordings, you should be able to optimize your website or online store experience to improve user experience and boost sales.
We hope this article helped you learn how to install Microsoft Clarity Analytics in WordPress. You may also want to see our comparison of the best WordPress page builders to create custom layouts without any code, and our pick of the best email marketing services to grow your business.
If you liked this article, then please subscribe to our YouTube Channel for WordPress video tutorials. You can also find us on Twitter and Facebook.
The post How to Install Microsoft Clarity Analytics in WordPress first appeared on WPBeginner.
Dr Crash says:
